Documentation


Table of Contents
11 Oktaを使用したSAMLセットアップ
このセクションでは、ZabbixのSAML2.0認証を有効にするようにOktaを設定する方法について説明します
Oktaの設定
1. https://okta.comにアクセスして、アカウントに登録またはサインインします。
2. OktaWebインターフェースでアプリケーション→アプリケーションに移動し、[アプリケーションの追加]ボタン( )を押します。
3. 「新しいアプリの作成」ボタン( ) を押し、ポップアップウィンドウでPlatform: Web, Sign on method:SAML2.0と選択して「作成」ボタンを押します。

4. 必要であれば[一般設定]タブ(最初に表示されるタブ)のフィールドに入力し、[次へ]を押します。
5. Configure SAMLタブで以下に示す値を入力し[次へ]を押します。
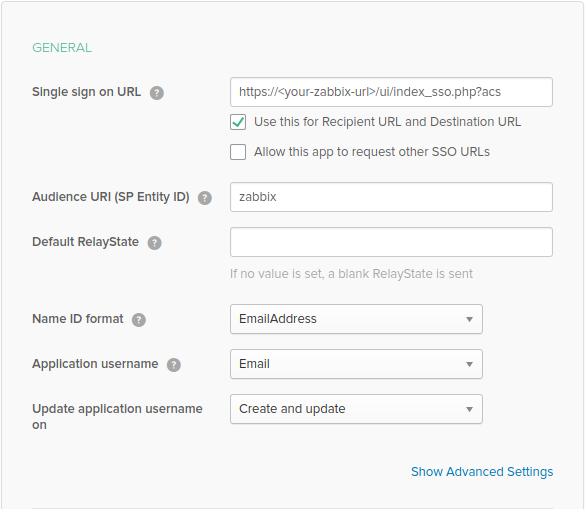
- GENERAL セクション:
- Single sign on URL:https://<your-zabbix-url>/ui/index_sso.php?acs
Use this for Recipient URL and Destination URLのチェックボックスにマーク - Audience URI (SP Entity ID): zabbix
この値は、SAMLアサーション内で一意のサービスプロバイダー識別子として使用されることに注意してください(一致しない場合、操作は拒否されます)。このフィールドには、URLまたは任意のデータ文字列を指定できます。 - Default RelayState:
このフィールドは空白のままにします。カスタムリダイレクトが必要な場合は、Zabbixの[管理]→[ユーザー]設定で追加できます。 - 必要であれば、他のフィールドも入力します。
- Single sign on URL:https://<your-zabbix-url>/ui/index_sso.php?acs
暗号化接続の使用を計画している場合は、プライベートおよびパブリック暗号化証明書を生成してから、パブリック証明書をOktaにアップロードします。 Assertion Encryptionが暗号化に設定されている場合、証明書のアップロードフォームが表示されます(このパラメーターを見つけるにはShow Advanced Settingsをクリックします)
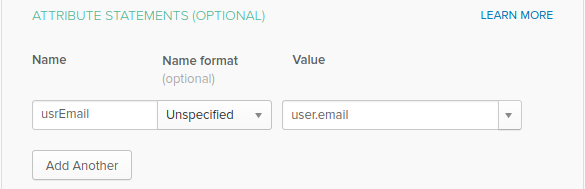
- ATTRIBUTE STATEMENTS(OPTIONAL)セクションで、次の属性ステートメントを追加します。
- Name: usrEmail
- Name format: Unspecified
- Value: user.email
6. 次のタブで"I'm a software vendor. I'd like to integrate my app with Okta"を選択し「完了」を押します。
7. 次にAssignmentsタブに移動して"Assign"ボタンを押し、ドロップダウンからAssign to Peopleを選択します。

8. 表示されるポップアップで、作成したアプリをSAML 2.0を使用してZabbixで認証するユーザーに割り当て、"Save and go back"を押します。
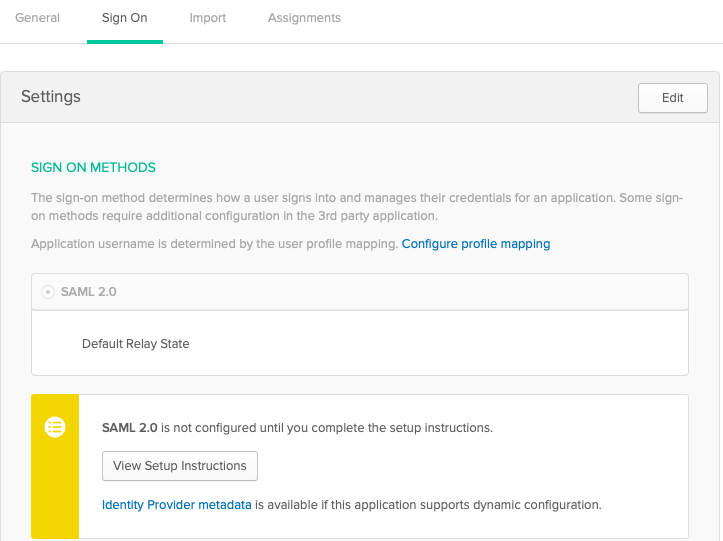
9. Sign Onタブに移動し、"View Setup Instructions"ボタンを押します。セットアップ手順は新しいタブに表示されます。Zabbixを設定している間、このタブを開いたままにしてください。
Zabbixの設定
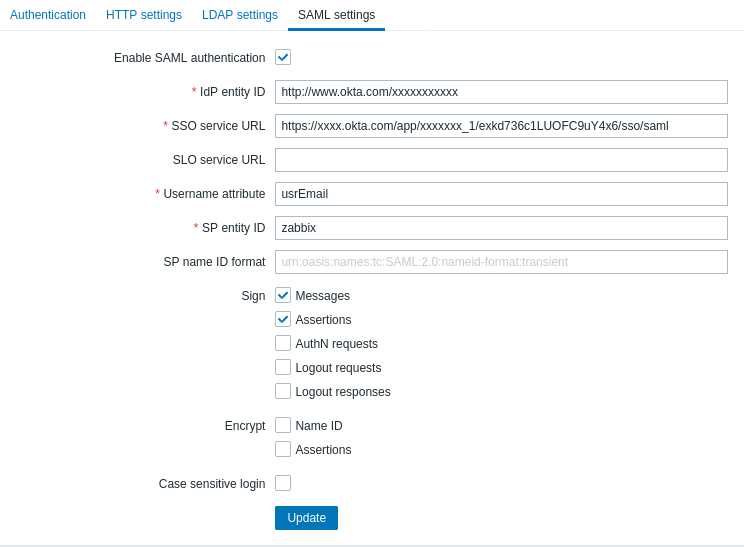
1. Zabbixで[管理]→[認証]セクションのSAML設定に移動し、Oktaのセットアップ手順から対応するフィールドに情報をコピーします。
- Identity Provider Single Sign-On URL → SSO service URL
- Identity Provider Issuer → IdP entity ID
- Username attribute → Attribute name (usrEmail)
- SP entity ID → Audience URI
2. Oktaのセットアップ手順ページに記載されている証明書をidp.crtとしてui/conf/certsフォルダーにダウンロードし、次のコマンドを実行してアクセス許可を644に設定します。
古いバージョンからZabbix5.0にアップグレードした場合は、以下をzabbix.conf.phpファイル(//ui//conf//ディレクトリにあります)に手動で追加する必要があることに注意してください。
// Used for SAML authentication.
       $SSO['SP_KEY'] = 'conf/certs/sp.key'; // Path to your private key.
       $SSO['SP_CERT'] = 'conf/certs/sp.crt'; // Path to your public key.
       $SSO['IDP_CERT'] = 'conf/certs/idp.crt'; // Path to IdP public key.
$SSO['SETTINGS'] = []; // Additional settings詳細については、一般的なSAML認証の手順を参照してください。
3. Assertion EncryptionがOktaでEncryptedに設定されている場合、ZabbixでもEncryptパラメータのチェックボックス「Assertions」をマークする必要があります。
4. "更新"ボタンを押して設定を保存します。
SAMLでサインインするには、Zabbixのユーザー名がOktaの電子メールと一致している必要があります。これらの設定は、ZabbixWebインターフェースの管理→ユーザーセクションで変更できます。
SCIM provisioning
1. To turn on SCIM provisioning, go to "General" -> "App Settings" of the application in Okta.
Mark the Enable SCIM provisioning checkbox. As a result, a new Provisioning tab appears.
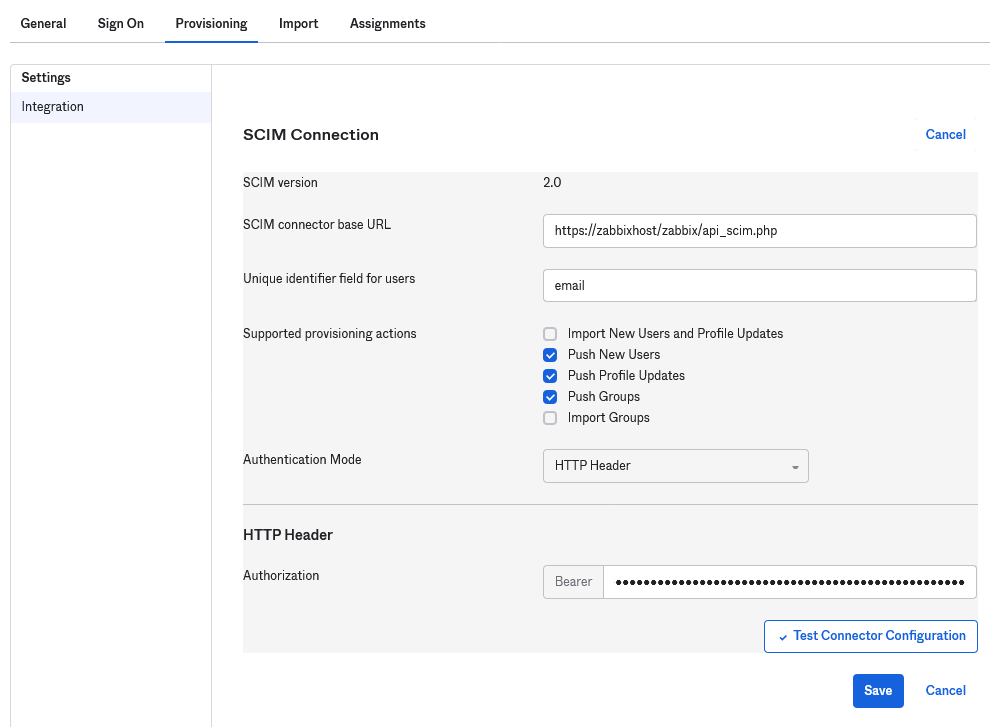
2. Go to the "Provisioning" tab to set up a SCIM connection:
- In SCIM connector base URL specify the path to the Zabbix frontend and append
api_scim.phpto it, i.e.:
https://<your-zabbix-url>/zabbix/api_scim.php - Unique identifier field for users:
email - Authentication mode:
HTTP header - In Authorization enter a valid API token with Super admin rights
If you are using Apache, you may need to change the default Apache configuration in /etc/apache2/apache2.conf by adding the following line:
Otherwise Apache does not send the Authorization header in request.
3. Click on Test Connector Configuration to test the connection. If all is correct a success message will be displayed.
4. In "Provisioning" -> "To App", make sure to mark the following checkboxes:
- Create Users
- Update User Attributes
- Deactivate Users
This will make sure that these request types will be sent to Zabbix.
5. Make sure that all attributes defined in SAML are defined in SCIM. You can access the profile editor for your app in "Provisioning" -> "To App", by clicking on Go to Profile Editor.
Click on Add Attribute. Fill the values for Display name, Variable name, External name with the SAML attribute name, for example, user_name.
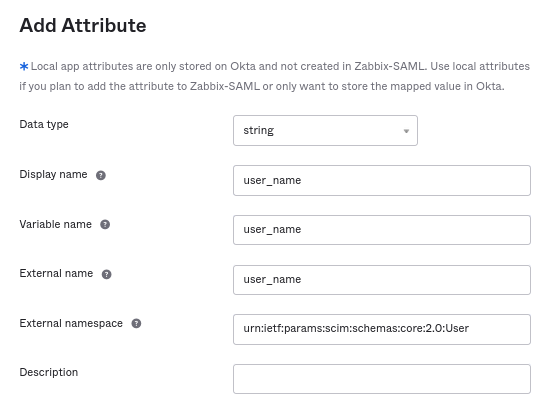
Extenal namespace should be the same as user schema: urn:ietf:params:scim:schemas:core:2.0:User
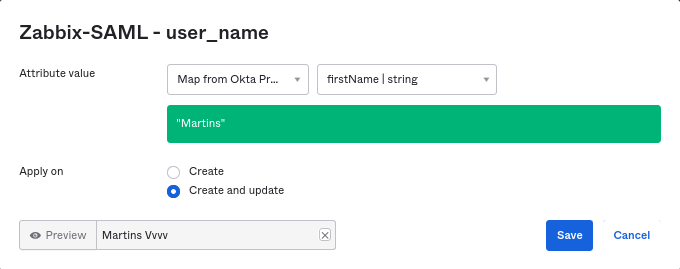
6. Go to "Provisioning" -> "To App" -> "Attribute Mappings" of your application. Click on Show Unmapped Attributes at the bottom. Newly added attributes appear.
7. Map each added attribute.
8. Add users in the "Assignments" tab. The users previously need to be added in Directory -> People. All these assignments will be sent as requests to Zabbix.
9. Add groups in the "Push Groups" tab. The user group mapping pattern in Zabbix SAML settings must match a group specified here. If there is no match, the user cannot be created in Zabbix.
Information about group members is sent every time when some change is made.