
Creating webhooks
Zabbix webhook integration development guidelines
Webhook integrations are using custom JavaScript code to perform HTTP calls. This allows creating an integration with external systems such as messengers or ticket systems. To ensure that the webhook meets all the quality requirements, the following guidelines should be used.
Data validation
The whole data validation process can be split into two parts: input data validation and external system response data validation.
Input data validation
While supported macro values are strictly defined, it is possible to assign a custom macro value during webhook testing. The webhook should implement user input validations to guide the user during all stages of using the webhook (including testing).
This includes the following validations:
- Invalid values used in webhook configuration or webhook
testing.
At any point, users can misconfigure the webhook by accident, so it is required that the webhook code is ready to handle such cases. - Missing webhook parameters.
Same as with the invalid values provided by users some parameters can be accidentally deleted. The webhook code should keep track of the required parameters and check if all of the required parameters are present. - Macros not being substituted.
Some of the macros are context-dependent and will not be resolved in certain cases (see macros supported by location). Additionally, there is no macro substitution available for webhook testing.
All error messages from input data validations should contain information about the cause of the problem (for example, the fact that a value "bebebe" is not acceptable as an event value) and a potential solution (for example, a list of values that are acceptable for a specific field).

Please see the Error handling section for information on the proper error message format.
Response data validation
Same as with user input validations, the response data validation should ensure that responses from the external system are in the expected format.
This includes the following validations:
- The response is retrieved and there is no HTTP error.
- The response contains data in the expected format (raw / JSON / XML / etc).
- The response contains all of the required fields or data.
- There are no errors in the response data.
While some external services are promising to respond using only a single message format (for example, JSON), it is possible for users to misconfigure the webhook by providing invalid endpoints (in cases, when it is configurable). Users can also have an HTTP proxy between the Zabbix server and external services, which can give unexpected responses in some cases.
Parameters
Webhooks use parameters to retrieve configuration and macro values. There could be no "full list of required macros", but the following macros are required for most of the webhooks:
- {ALERT.SUBJECT} - is used as an alert subject.
- {ALERT.MESSAGE} - is used as an alert message.
- {ALERT.SENDTO} - is used to define user-specific parameters such as user ID in a messaging system.
Please note, that the value of the {ALERT.SENDTO} field is shown in the list of problems, so putting credentials in the "Send to" field will cause exposure of the credentials to other Zabbix users.
Additionally, the following macros can be used to implement additional logic or provide supplementary information:
- {EVENT.SOURCE} - the source of the event. Please note that some macros are available only for certain event sources. For example, {EVENT.TAGS} is supported for trigger-based events only. A webhook should check the source of the event to prevent invalid behavior in case of an internal or autoregistration event.
- {EVENT.VALUE} - the value of the event. As an example, this can be used in a ticket system webhook to distinguish between a problem event and a recovery event and then perform required actions based on this information.
- {EVENT.TAGS} or {EVENT.TAGSJSON} - a webhook can use these macros to pass event tags to the external system in the required format (plain text or structured data).
All parameters that must be set or changed before using the webhook should have special value placeholders:
- the placeholders should start with the "<" and end with the ">" symbols
- the contents of the placeholder should explicitly state what should be used as a value.
- only capital letters should be used.
Example: a parameter defining an endpoint can have the value
<PUT ENDPOINT HERE>.
All webhooks should accept an additional optional
parameter HTTPProxy. This is required to provide an ability to set an
HTTP proxy for requests sent from the Zabbix server. This parameter may
have an empty value, which should be treated the same way as the absence
of the parameter.
The following code can be used to set the proxy in the webhook code:
// "params" is an object holding parsed data from the "value" variable
if (typeof params.HTTPProxy === 'string' && params.HTTPProxy.trim() !== '') {
    request.setProxy(params.HTTPProxy);
}
Code formatting
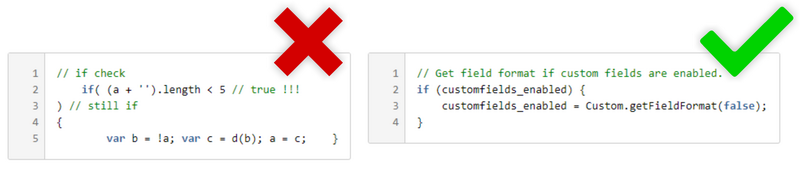
JavaScript code of the integration should comply with the JavaScript coding guidelines. The only exception from guidelines is that 4 (four) spaces should be used for indents instead of the tabs. The webhook code should be implemented as three logical parts:
1. The class implementing integration with a specific service.
var Jira = {
    request: function (method, query, data) {
        // ...
    },

    createIssue: function(summary, description, fields) {
        // ...
    },

    updateIssue: function(summary, fields) {
        // ...
    },

    // ...
};
For simple integrations, class implementation can be omitted.
2. Input data validation block.
// ...
if ([0, 1, 2, 3].indexOf(parseInt(params.event_source)) === -1) {
    throw 'Incorrect value "' + params.event_source + '" for "event_source" field. Must be 0-3.';
}
// Check {EVENT.VALUE} for trigger-based and internal events.
if (params.event_value !== '0' && params.event_value !== '1'
        && (params.event_source === '0' || params.event_source === '3')) {
    throw 'Incorrect value "' + params.event_value + '" for "event_value" field. Must be 0 or 1.';
}
// ...
3. Webhook logic (calling proper methods depending on the event state).
// ...
if (params.event_source !== '0' && params.event_recovery_value !== '0') {
    Jira.createIssue(params.alert_subject, params.alert_message);
}
// ...
Please note, that the input data validation block and webhook logic share the same try/catch block to properly format errors.
try {
    // Validation block.

    // Webhook logic block.
}
catch (error) {
    Zabbix.Log(4, '[ Jira Webhook ] ERROR: ' + error);
    throw 'Sending failed: ' + error;
}
Webhook tags
Tags are used to store event data (for trigger-based events only). A webhook using tags to store ticket IDs, links, or any other info received from the external system, should store this information as event tags. The following rules should be taken into account when creating tag names:
- Common words that can be used on a trigger level should be
avoided.
For example, a trigger can have a URL tag defined to keep the address of the system related to the trigger. If the webhook also uses URL tag name to store a link retrieved from the ticket system, this will lead to confusion (two tags with the same name will be present and the webhook logic can be compromised). - Tag names should be prefixed with a unique string to avoid
duplicates across multiple webhooks.
For example, if Redmine and Jira webhooks have fully identical ticket_id tag names (without prefixes), the tag values can get mixed up when both webhooks are used in the same action.
Return values
While there are no requirements to return specific values, one of the following approaches should be used when defining a webhook's response:
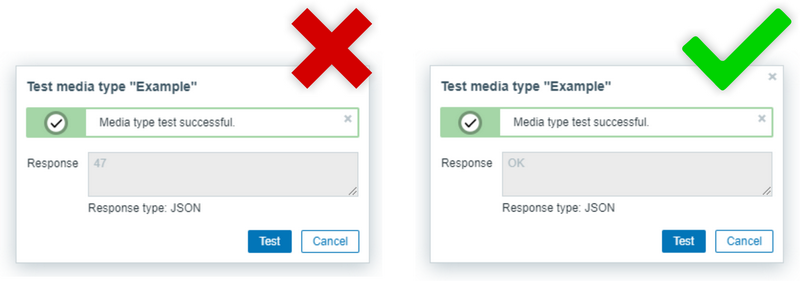
If a webhook doesn't use tags: it is recommended to return a generic
string (for example, OK) to signify that the execution was successful.
If a webhook uses tags (the Process tags checkbox is marked): the
webhook should always return a JSON object containing at least an empty
object for tags:{tags: {}}.
Example
If the webhook is working with the ticket-based system and wants to
store a ticket ID in the event tags, it should still return empty tags
for update/recovery operations. This is the only way to make sure that
the Zabbix server will not produce errors when parsing webhook result
and that there will be no overhead on parsing existing tags when this is
not needed. Please note that JSON should be returned as a string and not
as an object as the Zabbix server is converting objects to
[Object object] string.
Error handling
The webhooks should perform error handling in all cases, including:
- Invalid user input.
- Network problems/misconfiguration.
- Error responses from service.
Error messages must meet the requirements listed below.
Error messages should:
- be written in English;
- contain full information about the problem (including field names, etc);
- contain information about potential solutions (if possible);
- use "cannot" instead of "can't" or "could not".
Logging
Webhooks should use logging capabilities provided by Zabbix to store debug information for users. The following logging requirements should be met:
Debug level information should be provided.
This can be used to find out the cause of the errors in webhook logic. Simple logging of requests sent and responses received is considered the best practice.
Example:
// ...
Zabbix.Log(4, '[ Custom Webhook ] Sending request: ' + url + ((typeof data === 'string')
    ? ('\n' + data)
    : ''));
switch (method) {
    case 'get':
    response = request.Get(url, data);
    break;

    case 'post':
    response = request.Post(url, data);
    break;

    case 'put':
    response = request.Put(url, data);
    break;

    default:
    throw 'Unsupported HTTP request method: ' + method;
}

Zabbix.Log(4, '[ Custom Webhook ] Received response with status code ' +
    request.Status() + '\n' + response);
// ...
Log level higher than "Debug" (4) should not be used.
Exceptions can be made when it is required to keep track of failed or executed webhooks on higher levels. For most webhooks, there is no need to create log entries on higher levels as the Zabbix server will log failed webhooks on the "Warning" (3) level automatically.
Log entries should be prefixed with the webhook name.
For example, a webhook called "Bebebe" should use the prefix "[Bebebe Webhook]" for all of the log entries. This is done to ensure that log entries created by webhook are distinguishable from the other log entries in the Zabbix Server log file.
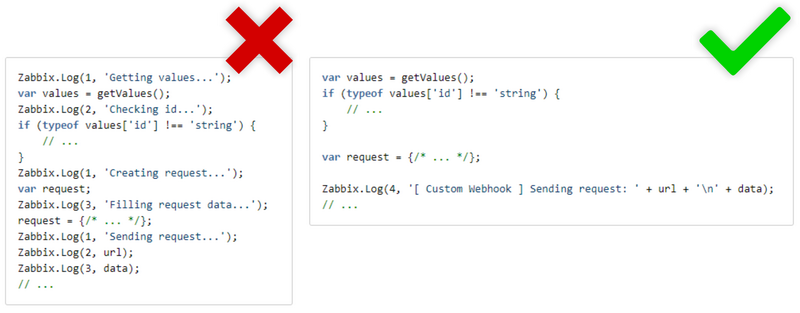
There is no need to create log entries on every step of the webhook.
Only the steps where significant actions have been performed (e.g. external requests), should be logged.
Documentation
The last (but not the least) step of creating a good integration is to create a Readme file containing the following information:
- A short description or link to the description of an external
system.
It is enough to add a few sentences about the type of an external system (messaging, ticket, or any other). - How to configure an external system to work with this
integration.
There is no need to copy setup instructions from external resources. If such a guide already exists, a link to the guide can be used. - How to configure a webhook.
What is the meaning of specific parameters and how to set proper values for them? - Known limitations/problems.
List all known limitations or problems, so users can be prepared for them before installing the webhook.
Existing Webhooks
To avoid creating duplicate integrations, make sure that a webhook doesn't already exist in Zabbix. Existing webhooks are available in Zabbix Git repository