
Наилучшие практики для безопасной установки Zabbix
Обзор
В этом разделе содержатся рекомендации, которые следует соблюдать для того, чтобы настроить Zabbix безопасным образом.
Практики, описанные здесь, не требуются для работы Zabbix. Они рекомендуются для повышения безопасности системы.
Access control
Principle of least privilege
The principle of least privilege should be used at all times for Zabbix. This principle means that user accounts (in Zabbix frontend) or process user (for Zabbix server/proxy or agent) have only those privileges that are essential to perform intended functions. In other words, user accounts at all times should run with as few privileges as possible.
Giving extra permissions to 'zabbix' user will allow it to access configuration files and execute operations that can compromise the overall security of the infrastructure.
When implementing the least privilege principle for user accounts, Zabbix frontend user types should be taken into account. It is important to understand that while a "Admin" user type has less privileges than "Super Admin" user type, it has administrative permissions that allow managing configuration and execute custom scripts.
Some information is available even for non-privileged users. For example, while Administration → Scripts is not available for non-Super Admins, scripts themselves are available for retrieval by using Zabbix API. Limiting script permissions and not adding sensitive information (like access credentials, etc) should be used to avoid exposure of sensitive information available in global scripts.
Настройка SSL для Zabbix веб-интерфейса
На RHEL/Centos, установите пакет mod_ssl:
yum install mod_sslСоздайте папку для SSL ключей:
mkdir -p /etc/httpd/ssl/private
chmod 700 /etc/httpd/ssl/private
Создайте SSL сертификат:
openssl req -x509 -nodes -days 365 -newkey rsa:2048 -keyout /etc/httpd/ssl/private/apache-selfsigned.key -out /etc/httpd/ssl/apache-selfsigned.crtЗаполните подсказки соответствующим образом. Самая важная строка здесь, которая запрашивает Common Name. Вам необходимо указать имя домена, которое вы хотите связать с вашим сервером. Вместо него вы можете указать публичный IP адрес, если у вас отсутствует имя домена. В этой статье мы будем использовать example.com.
Country Name (2 letter code) [XX]:
State or Province Name (full name) []:
Locality Name (eg, city) [Default City]:
Organization Name (eg, company) [Default Company Ltd]:
Organizational Unit Name (eg, section) []:
Common Name (eg, your name or your server's hostname) []:example.com
Email Address []:
Измените конфигурацию Apache SSL:
/etc/httpd/conf.d/ssl.conf

DocumentRoot "/usr/share/zabbix"
ServerName example.com:443
SSLCertificateFile /etc/httpd/ssl/apache-selfsigned.crt
SSLCertificateKeyFile /etc/httpd/ssl/private/apache-selfsigned.key
Перезапустите сервис Apache, чтобы применить изменения:
systemctl restart httpd.serviceZabbix Windows agent with OpenSSL
Zabbix Windows agent compiled with OpenSSL will try to reach the SSL configuration file in c:\openssl-64bit. The "openssl-64bit" directory on disk C: can be created by non-privileged users.
So for security hardening, it is required to create this directory manually and revoke write access from non-admin users.
Please note that the directory names will be different on 32-bit and 64-bit versions of Windows.
Cryptography
Отключение отображения информации о веб-сервере
Рекомендуется отключить все подписи веб-сервера, как часть процесса по улучшению защищенности веб-сервера. По умолчанию веб-сервер раскрывает подпись программного обеспечения:
Эту подпись можно отключить, добавив две строки в файл конфигурации Apache (используется как пример):
ServerSignature Off
ServerTokens Prod
Подпись PHP (Заголовок X-Powered-By HTTP) можно отключить, изменив файл конфигурации php.ini (подпись отключена по умолчанию):
expose_php = OffЧтобы изменения файлов конфигурации вступили в силу, необходимо перезапустить веб-сервер.
Дополнительный уровень безопасности можно достичь, используя mod_security (пакет libapache2-mod-security2) с Apache. mod_security позволяет совсем удалить подпись сервера вместо удаления лишь версии из подписи сервера. Подпись можно изменить на любое значение, исправив "SecServerSignature" на любое желаемое значение, после установки mod_security.
Пожалуйста, обратитесь к документации по вашему веб-серверу для того, чтобы узнать как удалять/изменять подписи к программному обеспечанию.
Web server hardening
Отключение страниц ошибок по умолчанию веб-сервера
Рекомендуется отключить страницы ошибок по умолчанию, чтобы избежать раскрытия информации. По умолчанию веб-сервер использует встроенные страницы ошибок:
Страницы ошибок по умолчанию необходимо заменить/удалить, как часть процесса по улучшению защищенности веб-сервера. Можно использовать директиву "ErrorDocument", чтобы задать пользовательскую страницу/текст веб-серверу Apache (используется как пример).
Пожалуйста, обратитесь к документации по вашему веб-серверу для того, чтобы узнать как заменять/удалять страницы ошибок по умолчанию.
Удаление тестовой страницы с веб-сервера
Рекомендуется удалить тестовую страницу веб-сервера, чтобы избежать раскрытия информации. По умолчанию, корневой каталог веб-сервера содержит тестовую страницу с именем index.html (Apache2 на Ubuntu используется как пример):
Тестовую страницу необходимо удалить или сделать недоступной, как часть процесса по улучшению защищенности веб-сервера.
Disabling web server information exposure
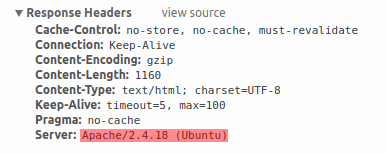
It is recommended to disable all web server signatures as part of the web server hardening process. The web server is exposing software signature by default:
The signature can be disabled by adding two lines to the Apache (used as an example) configuration file:
ServerSignature Off
ServerTokens Prod
PHP signature (X-Powered-By HTTP header) can be disabled by changing the php.ini configuration file (signature is disabled by default):
expose_php = OffWeb server restart is required for configuration file changes to be applied.
Additional security level can be achieved by using the mod_security (package libapache2-mod-security2) with Apache. mod_security allows to remove server signature instead of only removing version from server signature. Signature can be altered to any value by changing "SecServerSignature" to any desired value after installing mod_security.
Please refer to documentation of your web server to find help on how to remove/change software signatures.
Disabling default web server error pages
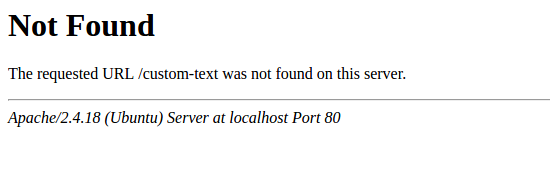
It is recommended to disable default error pages to avoid information exposure. Web server is using built-in error pages by default:
Default error pages should be replaced/removed as part of the web server hardening process. The "ErrorDocument" directive can be used to define a custom error page/text for Apache web server (used as an example).
Please refer to documentation of your web server to find help on how to replace/remove default error pages.
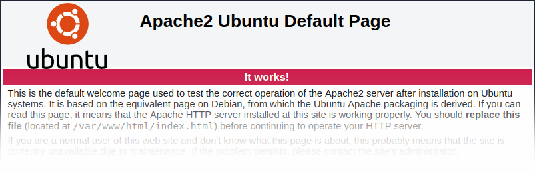
Removing web server test page
It is recommended to remove the web server test page to avoid information exposure. By default, web server webroot contains a test page called index.html (Apache2 on Ubuntu is used as an example):
The test page should be removed or should be made unavailable as part of the web server hardening process.
Set X-Frame-Options HTTP response header
By default, Zabbix is configured with X-Frame-Options HTTP response
header set to SAMEORIGIN, meaning that content can only be loaded in
a frame that has the same origin as the page itself.
Zabbix frontend elements that pull content from external URLs (namely, the URL dashboard widget) display retrieved content in a sandbox with all sandboxing restrictions enabled.
These settings enhance the security of the Zabbix frontend and provide protection against XSS and clickjacking attacks. Super Admins can modify iframe sandboxing and X-Frame-Options HTTP response header parameters as needed. Please carefully weigh the risks and benefits before changing default settings. Turning sandboxing or X-Frame-Options off completely is not recommended.
Hiding the file with list of common passwords
To increase the complexity of password brute force attacks, it is
suggested to limit access to the file ui/data/top_passwords.txt by
modifying web server configuration. This file contains a list of the
most common and context-specific passwords, and is used to prevent users
from setting such passwords if Avoid easy-to-guess passwords parameter
is enabled in the password
policy.
For example, on NGINX file access can be limited by using the location
directive:
location = /data/top_passwords.txt {
deny all;
return 404;
}On Apache - by using .htacess file:
<Files "top_passwords.txt">
  Order Allow,Deny
  Deny from all
</Files>
Displaying URL content in the sandbox
Since version 5.0.2, some Zabbix frontend elements (for example, the URL dashboard widget) are preconfigured to sandbox content retrieved from the URL. It is recommended to keep all sandboxing restrictions enabled to ensure protection against XSS attacks.
Включение Zabbix в корневом каталоге URL
Добавьте виртуальный хост в конфигурацию Apache и задайте постоянную переадресацию для корневого каналога на Zabbix SSL URL. Не забудьте заменить example.com на актуальное имя сервера.
/etc/httpd/conf/httpd.conf

#Добавьте строки

<VirtualHost *:*>
    ServerName example.com
    Redirect permanent / http://example.com
</VirtualHost>
Перезапустите сервис Apache, чтобы применить изменения:
systemctl restart httpd.serviceWindows installer paths
When using Windows installers, it is recommended to use default paths provided by the installer as using custom paths without proper permissions could compromise the security of the installation.