13 SAML-installatie met OneLogin
Overzicht
Dit gedeelte biedt richtlijnen voor het configureren van single sign-on en gebruikersvoorziening in Zabbix vanuit OneLogin met behulp van SAML 2.0-authenticatie.
OneLogin configuratie
Applicatie aanmaken
Log in op je account bij OneLogin. Voor testdoeleinden kun je een gratis ontwikkelaarsaccount aanmaken bij OneLogin.
In de OneLogin webinterface ga naar Applications → Applications.
Klik op "App toevoegen" en zoek de juiste app. De richtlijnen op deze pagina zijn gebaseerd op het voorbeeld van de app SCIM Provisioner with SAML (SCIM v2 Enterprise, volledige SAML).
Als eerste wil je mogelijk de weergavenaam van je app aanpassen. Je wilt ook het pictogram en de app-details toevoegen. Klik daarna op Opslaan.
Setting up SSO/SCIM provisioning
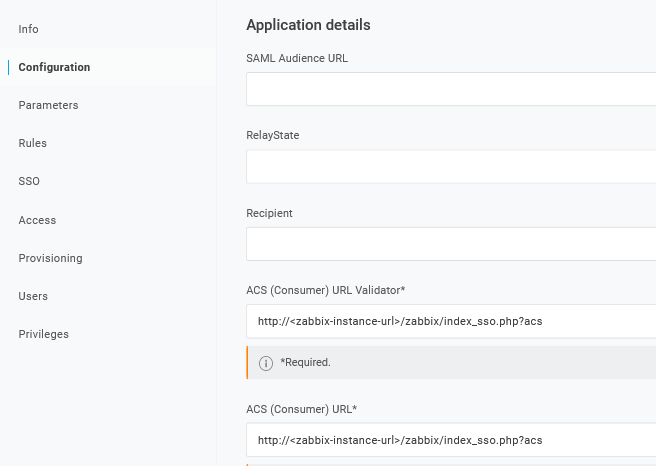
1. In Configuration -> Application details, set the Zabbix single sign-on endpoint http://<zabbix-instance-url>/zabbix/index_sso.php?acs as the value of these fields:
- ACS (Consumer) URL Validator
- ACS (Consumer) URL
Note the use of "http", and not "https", so that the acs parameter is not cut out in the request.
It is also possible to use "https". To make that work with Zabbix, it is necessary to add to conf/zabbix.conf.php the following line:
$SSO['SETTINGS'] = ['use_proxy_headers' => true];Leave other options with their default values.
2. In Configuration -> API connection, set the following values:
- SCIM Base URL:
https://<zabbix-instance-url>/zabbix/api_scim.php - SCIM JSON Template: should contain all custom attributes that you would like to pass to Zabbix via SCIM such as
user_name,user_lastname,user_email, anduser_mobile:
{
         "schemas": [
           "urn:ietf:params:scim:schemas:core:2.0:User"
         ],
         "userName": "{$parameters.scimusername}",
         "name": {
           "familyName": "{$user.lastname}",
           "givenName": "{$user.firstname}"
         },
          "user_name": "{$user.firstname}",
          "user_lastname": "{$user.lastname}",
          "user_mobile": "{$user.phone}",
          "user_email": "{$user.email}"
       }
The attribute names are arbitrary. Different attribute names may be used, however, it is required that they match the respective field value in Zabbix SAML settings.
Note that for user provisioning to work, OneLogin needs to receive in response a 'name' attribute with 'givenName' and 'familyName', even if it was not required by the service provider. Thus it is necessary to specify this in the schema in the application configuration part.
- SCIM Bearer Token: enter a Zabbix API token with Super admin permissions.
Click on Enable to activate the connection.
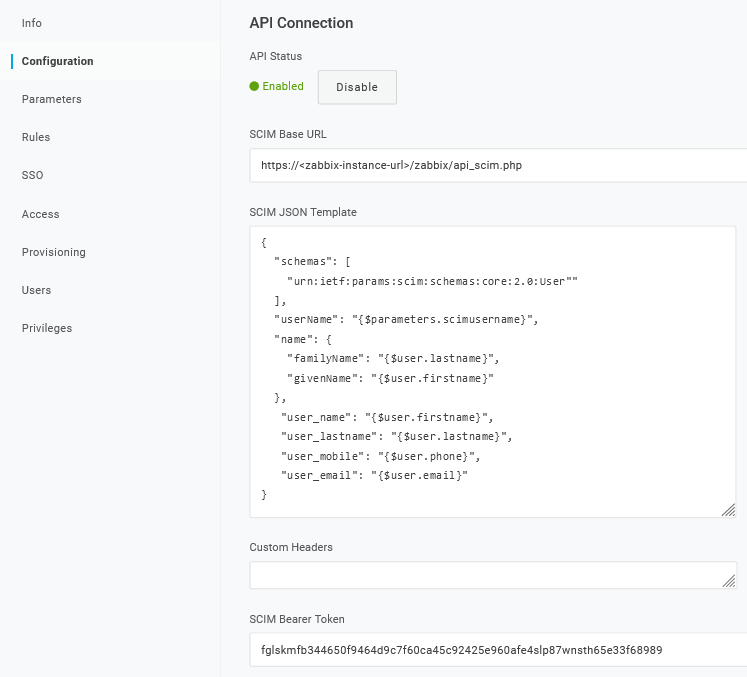
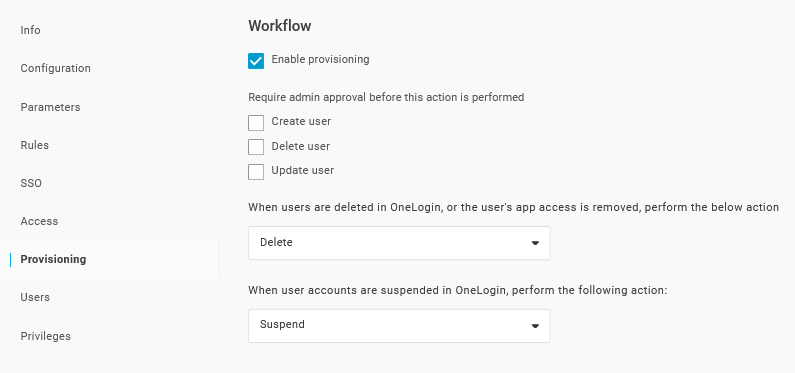
3. In the Provisioning page, enable the Provisioning option:
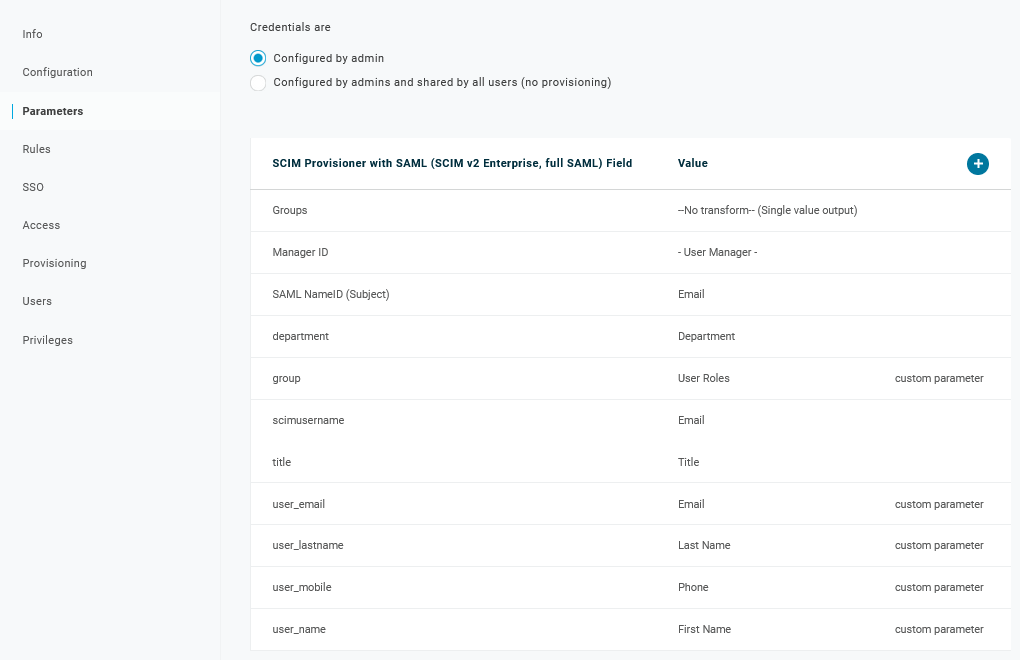
4. The Parameters page contains a list of default parameters:
- Make sure that the 'scimusername' matches the user login value in OneLogin (e.g. email);
- Mark the Include in User Provisioning option for the 'Groups' parameter;
- Click on "+" to create the custom parameters that are required for SAML assertions and user provisioning such as
user_name,user_lastname,user_email, anduser_mobile:
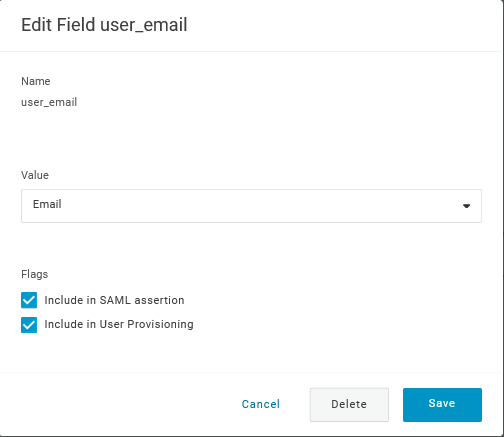
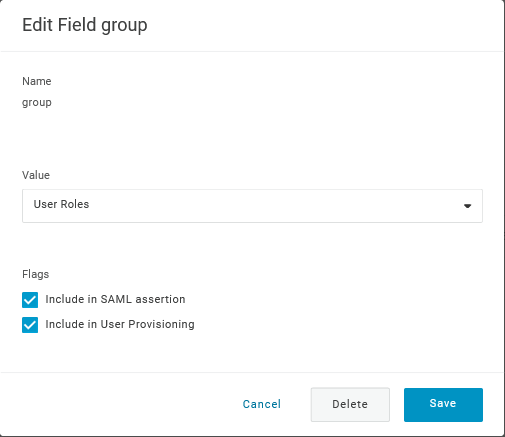
When adding a parameter, make sure to mark both the Include in SAML assertion and Include in User Provisioning options.
- Add a 'group' parameter that matches user roles in OneLogin. User roles will be passed as a string, separated by a semicolon
;. The OneLogin user roles will be the used for creating user groups in Zabbix:
Verify the list of parameters:
5. In the Rules page, create user role mappings to the default Groups parameter.
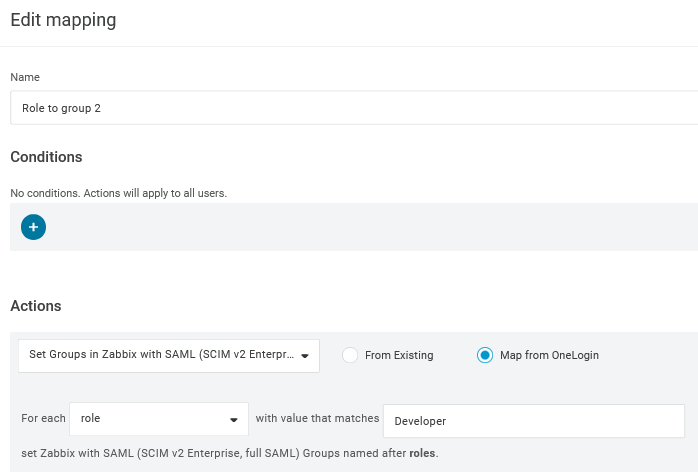
You may use a regular expression to pass specific roles as groups. The role names should not contain ; as OneLogin uses it as a separator when sending an attribute with several roles.
Zabbix-configuratie
In Zabbix ga je naar de SAML-instellingen en vul je de configuratieopties in op basis van de OneLogin-configuratie:
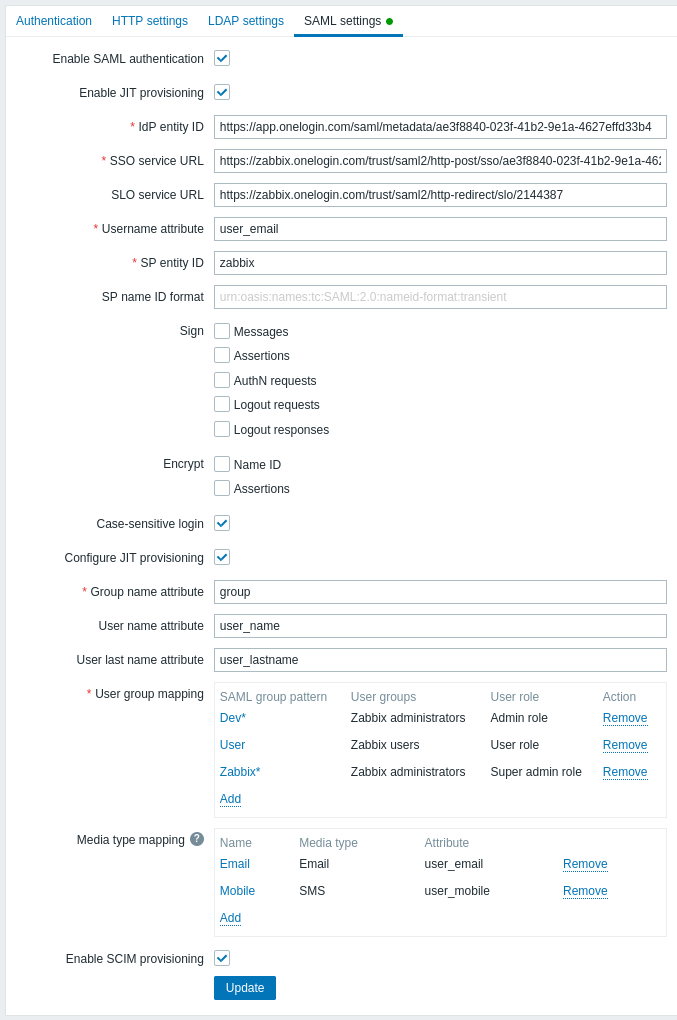
Zabbix-veld Setup-veld in OneLogin Voorbeeldwaarde IdP entity ID Issuer URL
(zie het tabblad SSO van je applicatie in OneLogin)SSO service URL SAML 2.0 Endpoint (HTTP)
(zie het tabblad SSO van je applicatie in OneLogin)SLO service URL SLO Endpoint (HTTP)
(zie het tabblad SSO van je applicatie in OneLogin)Username attribute Aangepaste parameter user_emailGroup name attribute Aangepaste parameter groupUser name attribute Aangepaste parameter user_nameUser last name attribute Aangepaste parameter user_lastnameHet is ook nodig om de gebruikersgroepmapping te configureren. Mediamapping is optioneel. Klik op Update om deze instellingen op te slaan.
Download het certificaat dat door OneLogin wordt verstrekt en plaats het in
conf/certsvan de Zabbix frontend-installatie, als idp.crt.Geef het de rechten 644 met het volgende commando:
Je kunt het certificaat downloaden in OneLogin via Applications -> SSO -> klik op View details onder het huidige certificaat.
Het is mogelijk om een andere certificaatnaam en -locatie te gebruiken. Voeg in dat geval de volgende regel toe aan
conf/zabbix.conf.php:$SSO['IDP_CERT'] = 'path/naar/certnaam.crt';
Met gebruikersvoorziening ingeschakeld, is het nu mogelijk om gebruikers en hun rollen toe te voegen/wijzigen in OneLogin en ze onmiddellijk te voorzien in Zabbix.
Bijvoorbeeld, je kunt een nieuwe gebruiker aanmaken:
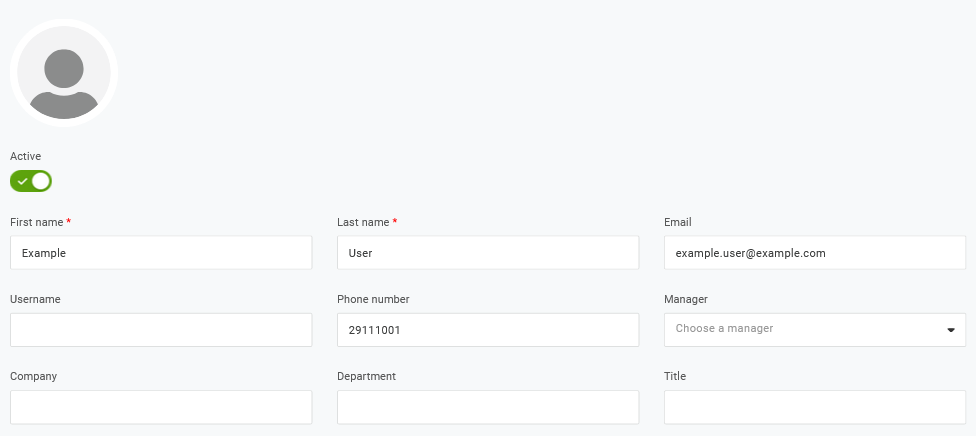
Voeg deze gebruiker toe aan een gebruikersrol en de applicatie die de gebruiker zal voorzien:

Wanneer je de gebruiker opslaat, wordt deze voorzien in Zabbix. In Application -> Users kun je de voorzieningsstatus van huidige applicatiegebruikers controleren:

Indien succesvol voorzien, is de gebruiker zichtbaar in de Zabbix-gebruikerslijst.


