Documentation

Table of Contents
3 Recebendo notificações sobre itens não suportados
Visão geral
O recebimento de notificações sobre itens não suportados é suportado desde o Zabbix 2.2.
É parte do conceito de eventos internos do Zabbix permitir que os usuários sejam notificados nestas situações. Eventos internos refletem modificações de estados:
- quando itens alternam entre o estado 'normal' e 'não suportado'
- quando triggers alteram entre o estado 'normal' e 'desconhecido'
- quando regras de autobusca alternam entre o estado 'normal' e 'não suportado'
Esta seção apresenta como receber notificações quando um item passa para o estado 'não suportado'.
Configuração
Este processo de notificação é bem similar aos demais processos de notificação que você já deve ter configurado no Zabbix antes.
- Configurar algum tipo de mídia para uso na notificação.
Para notificações de eventos internos a severidade padrão é ('Não classificada'), então garanta que a mídia do usuário tenha este nível de severidade marcado, senão ele não receberá as notificações sobre eventos internos.
- Acesse Configuração → Ações
- Selecione Interno como origem do evento.
- Clique no botão Criar ação situado no canto superior direito.

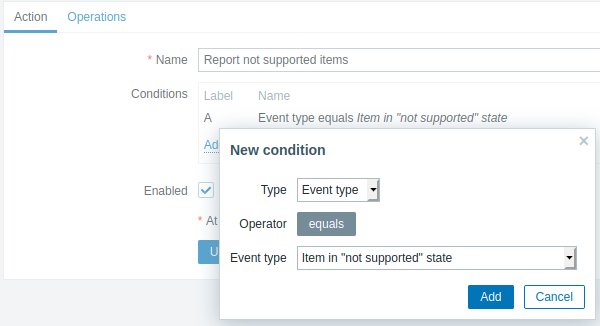
- Na aba Ação preencha os dados conforme exemplo a seguir.
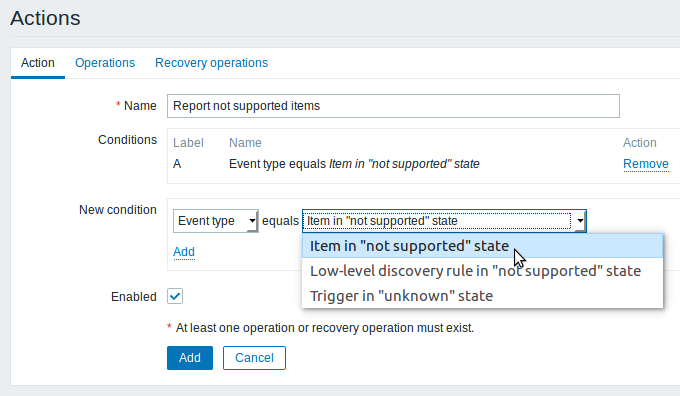
- Na aba Condições, no bloco de Nova condição, selecione o Tipo do evento O item está como "não suportado".
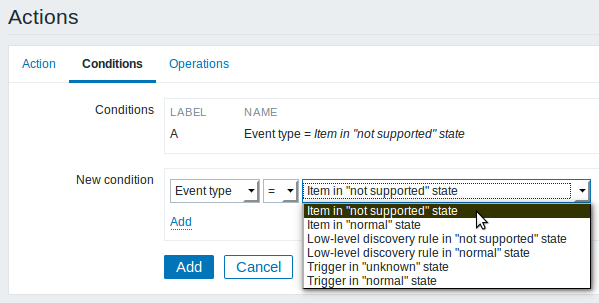
- Clique no link Adicionar existente no bloco de Nova condição.
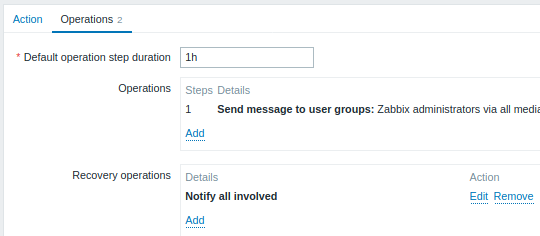
- Clique na aba Operações
- Dentro do bloco Operações da ação clique no link Nova
- No bloco de Detalhes da operação, defina o destinatário da mensagem e o tipo de mídia (ou deixe como Todos)
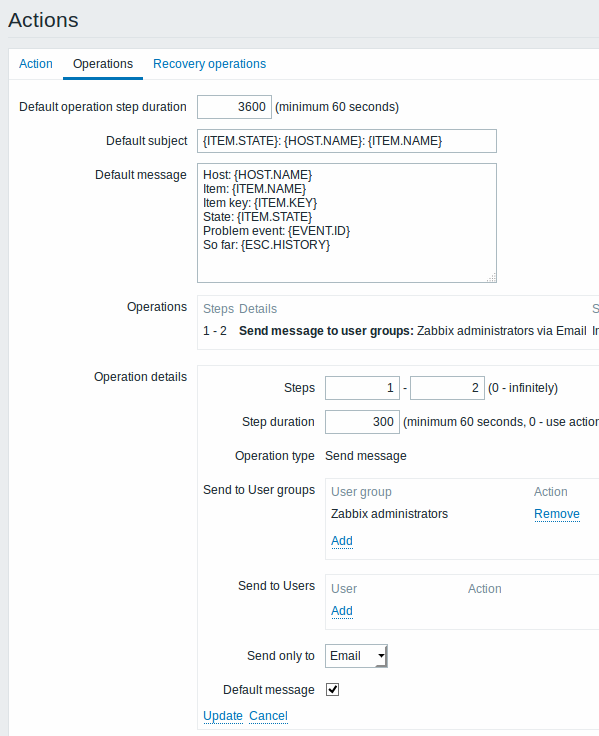
- Clique no link Adicionar dentro do bloco de Detalhes da operação
Se você desejar receber a notificação mais de uma vez, configure a duração do passo e adicione outra operação. Quando terminar, clique no botão Adicionar existente na parte inferior do formulário.
E é isso! Você terminou! Agora pode receber e acompanhar quando o estado de algum item no Zabbix passar para 'não suportado'.
Step 1
Configure some media, such as e-mail, SMS, or script to use for the notifications. Refer to the corresponding sections of the manual to perform this task.
For notifying on internal events the default severity ('Not classified') is used, so leave it checked when configuring user media if you want to receive notifications for internal events.
Step 2
Go to Configuration → Actions and select Internal actions from the page title dropdown.

Click on Create action to the right to open an action configuration form.
Step 3
In the Action tab enter a name for the action. Then click on Add in the condition block to add a new condition.
In the new condition popup window select Event type as the condition type and then select Item in "not supported" state as the event type value.
Don't forget to click on Add to actually list the condition in the Conditions block.
Step 4
In the Operations tab, click on Add in the Operations block and select some recipients of the message (user groups/users) and the media types (or 'All') to use for delivery.
Select Custom message checkbox if you wish to enter the custom subject/content of the problem message.

Click on Add to actually list the operation in the Operations block.
If you wish to receive more than one notification, set the operation step duration (interval between messages sent) and add another step.
Step 5
The Recovery operations block allows to configure a recovery notification when an item goes back to the normal state. Click on Add in the Recovery operations block, select the operation type, the recipients of the message (user groups/users) and the media types (or 'All') to use for delivery.
Select Custom message checkbox if you wish to enter the custom subject/content of the problem message.
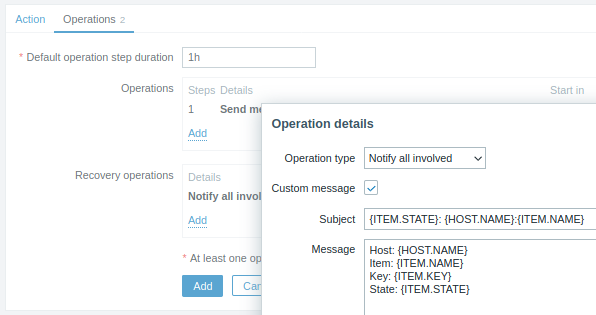
Click on Add in the Operation details popup window to actually list the operation in the Recovery operations block.
Step 6
When finished, click on the Add button at the bottom of the form.
And that's it, you're done! Now you can look forward to receiving your first notification from Zabbix if some item turns unsupported.