
3 Откриће ниског нивоа
Преглед
Откривање ниског нивоа пружа начин за аутоматско креирање ставки, окидача и графикона за различите ентитете на рачунару. На пример, Zabbix може аутоматски да почне да прати системе датотека или мрежне интерфејсе на вашем рачунару, без потребе да ручно креирате ставке за сваки систем датотека или мрежни интерфејс. Поред тога, могуће је конфигурисати Zabbix да аутоматски уклања непотребне ентитете на основу стварних резултата периодично извршеног откривања.
Корисник може да дефинише сопствене типове откривања, под условом да прате одређени JSON протокол.
Општа архитектура процеса откривања је следећа.
Прво, корисник креира правило откривања у Прикупљање података → Шаблони, у колони Откривање. Правило откривања се састоји од (1) ставке која открива потребне ентитете (на пример, системе датотека или мрежне интерфејсе) и (2) прототипова ставки, окидача и графикона који треба да се креирају на основу вредности те ставке.
Ставка која открива потребне ентитете је као обична ставка која се види негде другде: сервер тражи од Zabbix агента (или било ког типа ставке који је подешен) вредност те ставке, агент одговара са текстуалном вредношћу. Разлика је у томе што вредност којом агент одговара треба да садржи листу откривених ентитета у JSON формату. Иако су детаљи овог формата важни само за имплементаторе прилагођених провера откривања, неопходно је знати да враћена вредност садржи листу парова макро → вредност. На пример, ставка "net.if.discovery" може вратити два пара: "{#IFNAME}" → "lo" и "{#IFNAME}" → "eth0".
Ови макрои се користе у именима, кључевима и другим пољима прототипа где се затим замењују примљеним вредностима за креирање стварних ставки, окидача, графикона или чак домаћина за сваки откривени ентитет. Погледајте комплетну листу опција за коришћење LLD макроа.
Када сервер прими вредност за ставку откривања, он прегледа парове макро → вредност и за сваки пар генерише стварне ставке, окидаче и графиконе, на основу њихових прототипова. У примеру са "net.if.discovery" изнад, сервер би генерисао један скуп ставки, окидача и графикона за интерфејс петље "lo", и други скуп за интерфејс "eth0".
Имајте на уму да је од Zabbix 4.2 формат JSON-а који враћају правила откривања ниског нивоа промењен. Више се не очекује да ће JSON садржати објекат "data". Откривање ниског нивоа ће сада прихватати нормалан JSON који садржи низ, како би се подржале нове функције као што су претходна обрада вредности ставке и прилагођене путање до вредности макроа откривања ниског нивоа у JSON документу.
Уграђени кључеви за откривање су ажурирани да би вратили низ LLD редова
у корену JSON документа. Zabbix ће аутоматски издвојити макро
и вредност ако поље низа користи синтаксу {#MACRO} као кључ. Све нове
провере изворног откривања користиће нову синтаксу без елемената "data". Приликом обраде вредности откривања ниског нивоа, прво се налази корен
(низ на $. или $.data).
Иако је елемент "data" уклоњен из свих изворних ставки везаних
за откривање, ради компатибилности са уназад, Zabbix ће и даље прихватати
JSON нотацију са елементом "data", иако се њена употреба не препоручује. Ако
JSON садржи објекат са само једним елементом низа "data", онда ће
аутоматски издвојити садржај елемента користећи JSONPath
$.data. Откривање ниског нивоа сада прихвата опционе кориснички дефинисане LLD
макрое са прилагођеном путањом наведеном у JSONPath синтакси.
Као резултат горе наведених промена, новији агенти више неће моћи да раде са старијим Zabbix сервером.
Види такође: Откривени ентитети
Конфигурисање откривања ниског нивоа
Илустроваћемо откривање ниског нивоа на основу примера откривања система датотека.
Да бисте конфигурисали откривање, урадите следеће:
- Идите на: Прикупљање података → Шаблони или Домаћини
- Кликните на Откривање у реду одговарајућег шаблона/домаћина

- Кликните на Креирај правило откривања у горњем десном углу екрана
- Попуните образац правила откривања са потребним детаљима
Правило откривања
Образац правила откривања садржи пет картица, које представљају, с лева на десно, ток података током откривања:
- Правило откривања - одређује, што је најважније, уграђену ставку или прилагођену скрипту за преузимање података откривања
- Претходна обрада - примењује одређену претходну обраду на откривене податке
- LLD макрои - омогућава издвајање неких макро вредности за употребу у откривеним ставкама, окидачима итд.
- Филтери - омогућава филтрирање откривених вредности
- Надомеђивања - омогућава модификовање ставки, окидача, графикона или прототипова домаћина када се примењује на одређене откривене објекте
Картица Правило откривања садржи кључ ставке који се користи за откривање (као и неке опште атрибуте правила откривања):
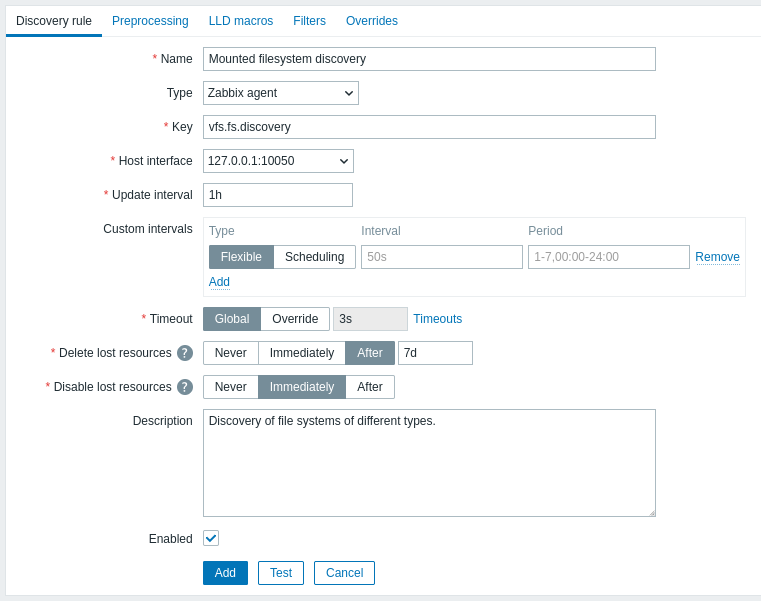
Сва обавезна поља за унос су означена црвеном звездицом.
| Parameter | Description |
|---|---|
| Name* | Назив правила откривања. |
| Type | Тип провере за извођење откривања. У овом примеру користимо тип ставке Zabbix агент. Правило откривања може бити и зависна ставка, која зависи од регуларне ставке. Не може зависити од другог правила откривања. За зависну ставку, изаберите одговарајући тип (Зависна ставка) и наведите главну ставку у пољу „Главна ставка“. Главна ставка мора постојати. |
| Key | Унесите кључ ставке за откривање (до 2048 знакова). На пример, можете користити уграђени кључ ставке „vfs.fs.discovery“ да бисте вратили JSON стринг са листом фајл система присутних на рачунару, њиховим типовима и опцијама монтирања. Имајте на уму да је друга опција за откривање фајл система коришћење резултата откривања помоћу кључа агента "vfs.fs.get" (погледајте пример). |
| Update interval | Ово поље одређује колико често Zabbix врши откривање. На почетку, када тек подешавате откривање фајл система, можда ћете желети да га подесите на мали интервал, али када знате да функционише, можете га подесити на 30 минута или више, јер се фајл системи обично не мењају веома често. Подржани су временски суфикси, нпр. 30 с, 1 мин, 2 сата, 1 д. Кориснички макрои су подржани. Напомена: Интервал ажурирања може се подесити на "0" само ако постоје прилагођени интервали са вредношћу која није нула. Ако је подешено на "0" и постоји прилагођени интервал (флексибилни или заказани) са вредношћу која није нула, ставка ће бити анкетирана током трајања прилагођеног интервала. Нова правила откривања биће проверена у року од 60 секунди од њиховог креирања, осим ако немају интервал заказивања или флексибилни интервал ажурирања и Интервал ажурирања је подешен на 0. Напомена да се за постојеће правило откривања откривање може извршити одмах притиском на дугме Изврши сада дугме. |
| Custom intervals | Можете креирати прилагођена правила за проверу ставке: Флексибилно - креирајте изузетак за Интервал ажурирања (интервал са различитом учесталошћу) Заказивање - креирајте прилагођени распоред анкетирања. За детаљније информације погледајте Прилагођени интервали. |
| Timeout | Подесите временско ограничење провере откривања. Изаберите опцију временског ограничења: Глобално - користи се прокси/глобално временско ограничење (приказано у сивом пољу Временско ограничење); Надмет - користи се прилагођено временско ограничење (подешено у пољу Временско ограничење; дозвољени опсег: 1 - 600 с). Временски суфикси, нпр. Подржани су макрои од 30 с, 1 м и кориснички макрои. Кликом на везу Временска ограничења можете конфигурисати временска ограничења прокси или глобална (ако се прокси не користи). Имајте на уму да је веза Временска ограничења видљива само корисницима типа Супер администратор са дозволама за Администрација → Опште или Администрација → Проксији фронтенд секције. |
| Delete lost resources | Наведите колико брзо ће откривени ентитет бити обрисан када његов статус откривања постане „Више није откривен“: Никада - неће бити обрисан; Одмах - биће одмах обрисан; Након - биће обрисан након наведеног временског периода. Вредност мора бити већа од вредности Онемогући изгубљене ресурсе. Подржани су Временски суфикси, нпр. 2h, 1d. Подржани су Кориснички макрои. Напомена: Коришћење „Одмах“ се не препоручује, јер само погрешно уређивање филтера може довести до брисања ентитета са свим историјским подацима. Имајте на уму да ручно онемогућени ресурси неће бити обрисани откривањем ниског нивоа. |
| Disable lost resources | Наведите колико брзо ће откривени ентитет бити онемогућен када његов статус откривања постане „Више није откривен“: Никада - неће бити онемогућен; Одмах - биће одмах онемогућен; Након - биће онемогућен након наведеног временског периода. Вредност треба да буде већа од интервала ажурирања правила откривања. Имајте на уму да ће аутоматски онемогућени ресурси поново постати омогућени ако се поново открију откривањем ниског нивоа. Ручно онемогућени ресурси неће поново постати омогућени ако се поново открију. Ово поље се не приказује ако је Обриши изгубљене ресурсе подешено на "Одмах". Подржани су Временски суфикси, нпр. 2h, 1d. Подржани су Кориснички макрои. |
| Description | Унесите опис. |
| Enabled | Ако је означено, правило ће бити обрађено. |
Историја правила откривања се не чува.
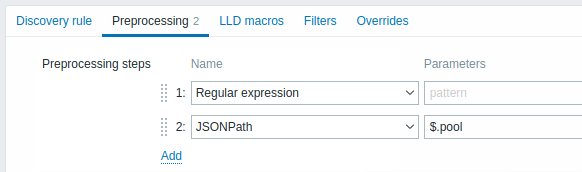
Претходна обрада
Картица Претходна обрада омогућава дефинисање правила трансформације која ће се применити на резултат откривања. У овом кораку је могућа једна или више трансформација. Трансформације се извршавају редоследом којим су дефинисане. Сву претходну обраду обавља Zabbix сервер.
Погледајте такође:
| Type | ||
|---|---|---|
| Transformation | Description | |
| Text | ||
| Regular expression | Ускладите примљену вредност са регуларним изразом <pattern> и замените вредност екстрахованим <output>. Регуларни израз подржава екстракцију највише 10 снимљених група са \N секвенцом. Параметри: pattern - регуларни израз output - шаблон за форматирање излаза. \N (где је N=1…9) escape секвенца се замењује N-том подударном групом. \0 escape секвенца се замењује подударним текстом. Ако означите поље за потврду Прилагођено при неуспеху, могуће је навести прилагођене опције за руковање грешкама: или одбацити вредност, подесити наведену вредност или подесити наведену поруку о грешци. |
|
| Replace | Пронађите стринг за претрагу и замените га другим (или ничим). Сва појављивања стринга за претрагу биће замењена. Параметри: string за претрагу - стринг за проналажење и замену, разликује велика и мала слова (обавезно) replacement - стринг за замену стринга за претрагу. Заменски стринг може бити празан, што ефикасно омогућава брисање стринга за претрагу када се пронађе. Могуће је користити escape секвенце за претрагу или замену прелома реда, повратка реда, табулатора и размака "\n \r \t \s"; обрнута коса црта може се escape-овати као "\\", а escape секвенце могу се escape-овати као "\\n". Escape-овање прелома реда, повратка реда и табулатора се аутоматски врши током откривања ниског нивоа. |
|
|Structured data|<|<|
|<|JSONPath|Издвајање вредности или фрагмента из JSON података коришћењем JSONPath функционалности.
Ако означите поље за потврду Прилагођено при неуспеху, могуће је одредити прилагођене опције за руковање грешкама: или одбацивање вредности, постављање одређене вредности или постављање одређене поруке о грешци.|
|<|XML XPath|Издвоји вредност или фрагмент из XML података користећи XPath функционалност.
Да би ова опција радила, Zabbix сервер мора бити компајлиран са libxml подршком.
Примери:number(/document/item/value) ће издвојити 10 из <document><item><value>10</value></item></document>/document/item ће издвојити <item><value>10</value></item> из <document><item><value>10</value></item></document>
Имајте на уму да именски простори нису подржани.
Ако означите поље за потврду Прилагођено при неуспеху, могуће је навести прилагођене опције за руковање грешкама: или да одбаците вредност, поставите одређену вредност или поставите одређену порука о грешци.|
|<|CSV to JSON|Конвертујте податке CSV датотеке у JSON формат.
За више информација, погледајте: Претходна обрада CSV у JSON.|
|^|XML to JSON|Конвертујте податке из XML формата у JSON.
За више информација, погледајте: Правила серијализације.
Ако означите поље за потврду Прилагођено при неуспеху, могуће је навести прилагођене опције за руковање грешкама: или одбацити вредност, подесити одређену вредност или подесити одређену поруку о грешци.|
|SNMP|<|<|
| |*SNMP walk value|Издвоји вредност према наведеном OID/MIB имену и примени опције форматирања:
Непромењено - врати Hex-STRING као неекскапирани хексадецимални стринг;
UTF-8 из Hex-STRING - конвертује Hex-STRING у UTF-8 стринг;
MAC из Hex-STRING - конвертује Hex-STRING у MAC адресни стринг (који ће ' '' бити замењен са `':'');
Цео број из BITS - конвертује првих 8 бајтова битовског стринга израженог као низ хексадецималних знакова (нпр. "1A 2B 3C 4D") у 64-битни неозначени цео број. У битовским стринговима дужим од 8 бајтова, наредни бајтови ће бити игнорисани.
Ако означите поље за потврду Прилагођено при неуспеху, могуће је одредити прилагођене опције за руковање грешкама: или одбацити вредност, подесити наведену вредност или подесити наведену поруку о грешци.|
| |SNMP walk to JSON|Конвертујте SNMP вредности у JSON. Наведите назив поља у JSON-у и одговарајућу SNMP OID путању. Вредности поља ће бити попуњене вредностима у наведеној SNMP OID путањи.
Можете користити овај корак претходне обраде за SNMP OID откривање.
Доступне су сличне опције форматирања вредности као у кораку SNMP шетња вредност.
Ако означите поље за потврду Прилагођено при неуспеху, могуће је навести прилагођене опције за руковање грешкама: или одбацити вредност, подесити наведену вредност или подесити наведену поруку о грешци.|
| |SNMP get value|Примени опције форматирања на SNMP вредност за добијање:
UTF-8 из Hex-STRING - конвертује Hex-STRING у UTF-8 стринг;
MAC из Hex-STRING - конвертује Hex-STRING у стринг MAC адресе (који ће ' '' заменити са `':'');
Цео број из BITS* - конвертује првих 8 бајтова стринга битова израженог као низ хексадецималних знакова (нпр. "1A 2B 3C 4D") у 64-битни неозначени цео број. У стринговима битова дужим од 8 бајтова, наредни бајтови ће бити игнорисани.
Ако означите поље за потврду Прилагођено при неуспеху, могуће је одредити прилагођене опције за руковање грешкама: или одбацити вредност, подесити одређену вредност или подесити одређену поруку о грешци.|
|Custom scripts|<|<|
|<|JavaScript|Унесите JavaScript код у блок који се појављује када кликнете на поље параметра или на икону оловке.
Имајте на уму да доступна дужина JavaScript кода зависи од коришћене базе података.
За више информација, погледајте: Претходна обрада Javascript-а|
|Validation|<|<|
|<|Does not match regular expression|Наведите регуларни израз чија вредност не сме да се подудара.
Нпр. `Грешка:(.?).<br>Ако означите поље за потврду *Прилагођено при неуспеху*, могуће је навести прилагођене опције за руковање грешкама: или да се одбаци вредност, постави одређена вредност или постави одређена порука о грешци.| |^|*Check for error in JSON*|Провери поруку о грешци на нивоу апликације која се налази на JSONPath. Заустави обраду ако је успешна и порука није празна; у супротном наставите са обрадом са вредношћу која је била пре овог корака претходне обраде. Имајте на уму да се ове спољне грешке сервиса пријављују кориснику какве јесу, без додавања информација о кораку претходне обраде.<br>Нпр.$.errors. Ако се прими JSON као што је{"errors":"e1"}, следећи корак претходне обраде неће бити извршен.<br>Ако означите поље за потврду *Прилагођено при неуспеху*, могуће је одредити прилагођене опције за руковање грешкама: или одбацити вредност, подесити одређену вредност или подесити одређену поруку о грешци.| |^|*Check for error in XML*|Провери поруку о грешци на нивоу апликације која се налази на Xpath-у. Заустави обраду ако је успешна и порука није празна; у супротном настави обраду са вредношћу која је била пре овог корака претходне обраде. Имајте на уму да се ове грешке екстерних сервиса пријављују кориснику какве јесу, без додавања информација о кораку претходне обраде.<br>Неће бити пријављена грешка у случају неуспешног рашчлањивања неважећег XML-а.<br>Ако означите поље за потврду *Прилагођено при неуспеху*, могуће је навести прилагођене опције за руковање грешкама: или да одбаците вредност, поставите одређену вредност или поставите одређену поруку о грешци.| |<|*Matches regular expression*|Наведите регуларни израз који вредност мора да подудара.<br>Ако означите поље за потврду *Прилагођено при неуспеху*, могуће је навести прилагођене опције за руковање грешкама: или да одбаците вредност, поставите одређену вредност или поставите одређену поруку о грешци.| |Throttling|<|<| |<|*Discard unchanged with heartbeat*|Одбаци вредност ако се није променила у дефинисаном временском периоду (у секундама).<br>Подржане су позитивне целобројне вредности за одређивање секунди (минимум - 1 секунда). Временски суфикси могу се користити у овом пољу (нпр. 30s, 1m, 2h, 1d). Кориснички макрои и макрои за откривање ниског нивоа могу се користити у овом пољу.<br>За ставку откривања може се навести само једна опција за ограничавање.<br>Нпр.1m`. Ако се идентичан текст проследи у ово правило два пута у року од 60 секунди, биће одбачен.
Напомена: Промена прототипова ставки не ресетује ограничавање. Ограничавање се ресетује само када се промене кораци претходне обраде.|
|Prometheus|<|<|
|<|Prometheus to JSON|Конвертујте потребне Прометеј метрике у JSON.
Погледајте Прометеј провере за више детаља.|
Имајте на уму да ако је правило откривања примењено на домаћину путем шаблона, онда је садржај ове картице само за читање.
Прилагођени макрои
Картица LLD макрои омогућава одређивање прилагођених макроа за откривање ниског нивоа.
Прилагођени макрои су корисни у случајевима када враћени JSON нема већ дефинисане потребне макрое. На пример:
- Изворни кључ
vfs.fs.discoveryза откривање фајл система враћа JSON са неким унапред дефинисаним LLD макроима као што су {#FSNAME}, {#FSTYPE}. Ови макрои се могу користити у ставкама, директно покретати прототипове (погледајте следеће одељке странице); дефинисање прилагођених макроа није потребно; - Ставка агента
vfs.fs.getтакође враћа JSON са фајл системом подацима, али без икаквих унапред дефинисаних LLD макроа. У овом случају можете сами дефинисати макрое и мапирати их на вредности у JSON-у користећи JSONPath:
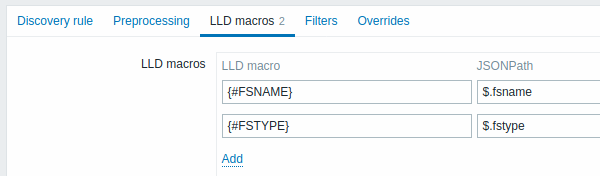
Издвојене вредности могу се користити у откривеним ставкама, окидачима итд. Имајте на уму да ће вредности бити издвојене из резултата откривања и свих корака претходне обраде до сада.
| Parameter | Description |
|---|---|
| LLD макро | Назив макроа за откривање ниског нивоа, користећи следећу синтаксу: {#MACRO}. |
| JSONPath | Путања која се користи за издвајање вредности LLD макроа из LLD реда, користећи JSONPath синтаксу. Вредности извучене из враћеног JSON-а користе се за замену LLD макроа у пољима прототипа ставке, окидача итд. JSONPath се може навести помоћу тачкасте нотације или нотације заграда. Заграде треба користити у случају било којих специјалних карактера и Уникода, као што је $['unicode + special chars #1']['unicode + special chars #2'].На пример, $.foo ће издвојити "bar" и "baz" из овог JSON-а: [{"foo":"bar"}, {"foo":"baz"}]Имајте на уму да ће $.foo издвојити "bar" и "baz" такође из овог JSON-а: {"data":[{"foo":"bar"}, {"foo":"baz"}]} јер се један објекат "data" обрађује аутоматски (због компатибилности уназад са имплементацијом откривања ниског нивоа у Zabbix верзијама пре 4.2). |
Филтер
Филтер се може користити за генерисање стварних ставки, окидача и графикона само за ентитете који одговарају критеријумима. Картица Филтери садржи дефиниције филтера правила откривања које омогућавају филтрирање вредности откривања:
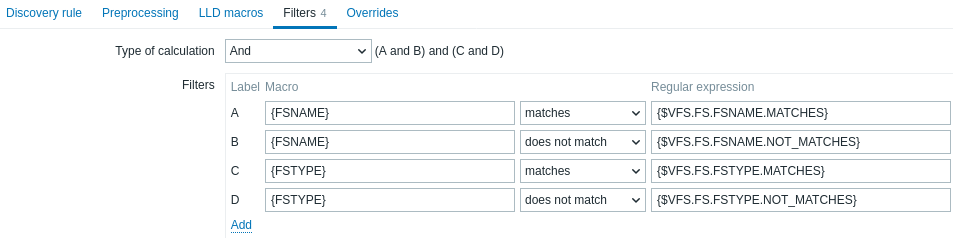
| Parameter | Description |
|---|---|
| Врста израчунавања | Доступне су следеће опције за израчунавање филтера: И - сви филтери морају бити прослеђени; Или - довољно је ако је прослеђен један филтер; И/Или - користи И са различитим називима макроа и Или са истим називом макроа; Прилагођени израз - нуди могућност дефинисања прилагођеног израчунавања филтера. Формула мора да садржи све филтере са листе. Ограничено на 255 симбола. |
| Филтери | Доступни су следећи оператори услова филтера: подудара се, не подудара се, постоји, не постоји. Оператори подудара се и не подудара се очекују Perl компатибилан регуларни израз (PCRE). На пример, ако сте заинтересовани само за фајл системе C:, D: и E:, можете да ставите {#FSNAME} у „Макро“ и регуларни израз „\C|\D|\E“ у текстуална поља „Регуларни израз“. Филтрирање је такође могуће по типовима фајл система коришћењем макроа {#FSTYPE} (нпр. "\ext|\reiserfs") и по типовима дискова (подржано само од стране Windows агента) коришћењем макроа {#FSDRIVETYPE} (нпр. "fixed"). Можете унети регуларни израз или референцирати глобални регуларни израз у поље „Регуларни израз“. Да бисте тестирали регуларни израз, можете користити „grep -E“, на пример: ````for f in ext2 nfs reiserfs smbfs; do echo $f | grep -E 'ext|^reiserfs' || echo "SKIP: $f"; done```` Оператори Exists и does not exists омогућавају филтрирање ентитета на основу присуства или одсуства наведеног LLD макроа у одговору. Имајте на уму да ако макро из филтера недостаје у одговору, пронађени ентитет ће бити игнорисан, осим ако за овај макро није наведен услов „не постоји“. Упозорење ће бити приказано ако одсуство макроа утиче на резултат израза. На пример, ако {#B} недостаје у: {#A} одговара 1 и {#B} одговара 2 - даће упозорење {#A} одговара 1 или {#B} одговара 2 - нема упозорења |
Грешка или грешка у куцању у регуларном изразу који се користи у LLD правилу (на пример, нетачан регуларни израз "Системи датотека за откривање") може проузроковати брисање хиљада конфигурационих елемената, историјских вредности и догађаја за многе домаћине.
Zabbix база података у MySQL-у мора бити креирана као сензитивна на велика и мала слова ако се жели да имена фајл система која се разликују само по великим и малим словима буду правилно откривена.
Override
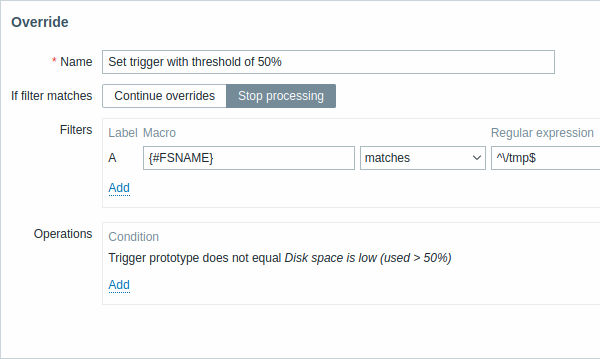
Картица Замена омогућава подешавање правила за измену листе ставки, окидача, графикона и прототипова хоста или њихових атрибута за откривене објекте који испуњавају дате критеријуме.
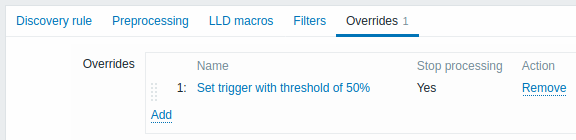
Замене (ако постоје) се приказују у листи која се може преуредити превлачењем и испуштањем и
извршавају се редоследом којим су дефинисане. Да бисте конфигурисали детаље
нове замене, кликните на
 у блоку Замене. Да бисте изменили постојећу замену, кликните на име замене. Отвориће се искачући
прозор који омогућава уређивање детаља правила замене.
у блоку Замене. Да бисте изменили постојећу замену, кликните на име замене. Отвориће се искачући
прозор који омогућава уређивање детаља правила замене.
Сви обавезни параметри су означени црвеним звездицама.
| Параметар | Опис |
|---|---|
| Name | Јединствено (по LLD правилу) име замене. |
| If filter matches | Дефинише да ли следећа замене треба обрадити када су испуњени услови филтера: Настави са заменама - наредне замене ће бити обрађене. Заустави обраду - операције из претходних (ако их има) и ове замене ће бити извршене, наредне замене ће бити игнорисане за подударне LLD редове. |
| Filters | Одређује на које откривене ентитете треба применити замену. Филтери за замену се обрађују након правила откривања filters и имају исту функционалност. |
| Operations | Операције замене се приказују са овим детаљима: Услов - тип објекта (прототип ставке/прототип окидача/прототип графикона/прототип хоста) и услов који треба испунити (једнако/није једнако/садржи/не садржи/поклапа се/не поклапа се) Акција - приказују се линкови за уређивање и уклањање операције. |
Конфигурисање операције
Да бисте конфигурисали детаље нове операције, кликните на
у блоку Операције. Да бисте изменили постојећу операцију, кликните на
 поред
операције. Отвориће се искачући прозор где можете да измените детаље операције.
поред
операције. Отвориће се искачући прозор где можете да измените детаље операције.
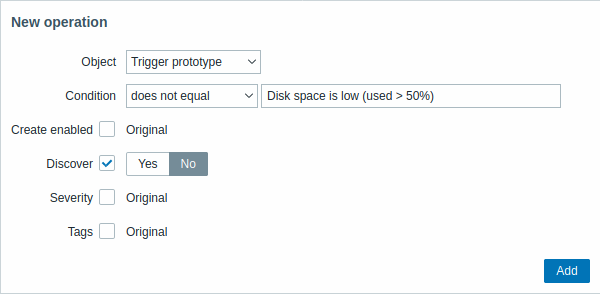
| Parameter | Description | ||
|---|---|---|---|
| Object | < | < | Доступна су четири типа објеката: Прототип ставке Прототип окидача Прототип графикона Прототип хоста |
| Condition | < | < | Омогућава филтрирање ентитета на које треба применити операцију. |
| Operator | < | Подржани оператори: једнако - примењује се на овај прототип није једнако - примењује се на све прототипове, осим овог садржи - примењује се, ако назив прототипа садржи овај стринг не садржи - примењује се, ако назив прототипа не садржи овај стринг подудара се - примењује се, ако назив прототипа подудара се са регуларним изразом не подудара се - примењује се, ако назив прототипа не подудара се са регуларним изразом |
|
| ^ | Pattern | < | Регуларни израз или стринг за претрагу. |
| ^ | Object: Прототип ставке | < | < |
| ^ | Create enabled | Када је поље за потврду означено, појавиће се дугмад која омогућавају замену оригиналних подешавања прототипа ставке: Да - ставка ће бити додата у омогућеном стању. Не - ставка ће бити додата откривеном ентитету, али у онемогућеном стању. |
|
| ^ | ^ | Discover | Када је поље за потврду означено, појавиће се дугмад која омогућавају превазилажење оригиналних подешавања прототипа ставке: Да - ставка ће бити додата. Не - ставка неће бити додата. |
| ^ | ^ | Update interval | Када је поље за потврду означено, појавиће се две опције које омогућавају подешавање различитих интервала за ставку: Кашњење - Интервал ажурирања ставке. Подржани су кориснички макрои и временски суфикси (нпр. 30s, 1m, 2h, 1d). Требало би да се подеси на 0 ако се користи Прилагођени интервал. Прилагођени интервал - кликните да бисте одредили флексибилне/заказане интервале. За детаљније информације погледајте Прилагођени интервали. |
| ^ | ^ | History | Када је поље за потврду означено, појавиће се дугмад која омогућавају подешавање различитих периода чувања историје за ставку: Не чувај - ако је изабрано, историја се неће чувати. Чувати до - ако је изабрано, поље за унос за одређивање периода чувања ће се појавити са десне стране. Подржани су Кориснички макрои и LLD макрои. |
| ^ | ^ | Trends | Када је поље за потврду означено, појавиће се дугмад која омогућавају подешавање различитих периода чувања трендова за ставку: Не чувај - ако је изабрано, трендови се неће чувати. Чувати до - ако је изабрано, поље за унос за одређивање периода чувања ће се појавити са десне стране. Подржани су Кориснички макрои и LLD макрои. |
| ^ | ^ | Tags | Када је поље за потврду означено, појавиће се нови блок који омогућава навођење парова ознака-вредност. Ове ознаке ће бити додате ознакама наведеним у прототипу ставке, чак и ако се називи ознака подударају. |
| ^ | Објекат: Прототип окидача | < | < |
| ^ | Create enabled | Када је поље за потврду означено, појавиће се дугмад која омогућавају превазилажење оригиналних подешавања прототипа окидача: Да - окидач ће бити додат у омогућеном стању. Не - окидач ће бити додат откривеном ентитету, али у онемогућеном стању. |
|
| ^ | ^ | Discover | Када је поље за потврду означено, појавиће се дугмад која омогућавају превиђање оригиналних подешавања прототипа окидача: Да - окидач ће бити додат. Не - окидач неће бити додат. |
| ^ | ^ | Severity | Када је поље за потврду означено, појавиће се дугмад за озбиљност окидача, која омогућавају измену озбиљности окидача. |
| ^ | ^ | Tags | Када је поље за потврду означено, појавиће се нови блок који омогућава навођење парова ознака-вредност. Ове ознаке ће бити додате ознакама наведеним у прототипу окидача, чак и ако се имена ознака подударају. |
| ^ | Објекат: Прототип графика | < | < |
| ^ | Discover | Када је поље за потврду означено, појавиће се дугмад која омогућавају превиђање оригиналних подешавања прототипа графика: Да - график ће бити додат. Не - график неће бити додат. |
|^|Објекат: Прототип домаћина|<|<|
|^| |Create enabled|Када је поље за потврду означено, појавиће се дугмад која омогућавају превиђање оригиналних подешавања прототипа домаћина:
Да - домаћин ће бити креиран у омогућеном стању.
Не - домаћин ће бити креиран у онемогућеном стању.|
||| Discover|Када је поље за потврду означено, појавиће се дугмад која омогућавају превиђање оригиналних подешавања прототипа домаћина:
Да - домаћин ће бити откривен.
Не - домаћин неће бити откривен.|
|||Link templates|Када је поље за потврду означено, појавиће се поље за унос за одређивање шаблона. Почните да куцате име шаблона или кликните на Изабери поред поља и изаберите шаблоне са листе у искачућем прозору.
Сви шаблони повезани са прототипом домаћина биће замењени шаблонима из овог превиђања.|
||| Tags|Када је поље за потврду означено, појавиће се нови блок који омогућава навођење парова ознака-вредност.
Ове ознаке ће бити додате ознакама наведеним у прототипу хоста, чак и ако се називи ознака подударају.|
|||*Host inventory*|Када је поље за потврду означено, појавиће се дугмад која омогућавају избор различитог режима инвентара режим за прототип домаћина:
Онемогућено - не попуњавајте инвентар домаћина
Ручно - ручно унесите детаље
Аутоматизовано* - аутоматски попуњавајте податке о инвентару домаћина на основу прикупљених метрика.|
Дугмад форме
Дугмад на дну форме омогућавају извршавање неколико операција.
 |
Додај правило откривања. Ово дугме је доступно само за нова правила откривања. |
 |
Ажурирај својства правила откривања. Ово дугме је доступно само за постојећа правила откривања. |
 |
Креирај друго правило откривања на основу својстава тренутног правила откривања. |
 |
Одмах изврши откривање на основу правила откривања. Правило откривања мора већ постојати. Погледајте више детаља. Напомена да се приликом тренутног извршавања откривања кеш конфигурације не ажурира, па резултат неће одражавати најновије измене конфигурације правила откривања. |
 |
Тестирајте конфигурацију правила откривања. Користите ово дугме да бисте проверили подешавања конфигурације (као што су повезивање и исправност параметара) без трајне примене било каквих промена. |
 |
Избришите правило откривања. |
 |
Откажите уређивање својстава правила откривања. |
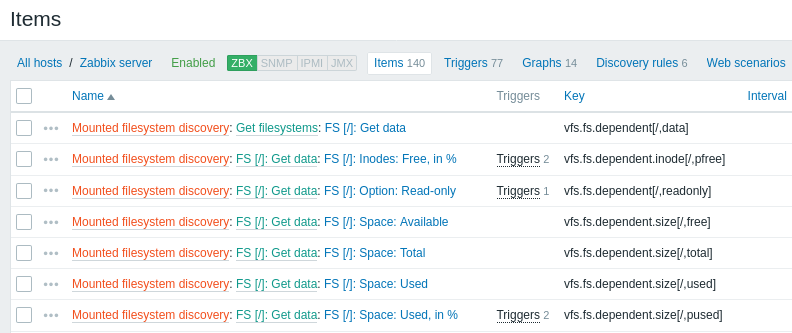
Откривени ентитети
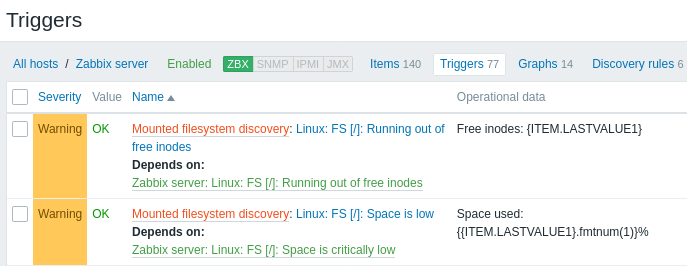
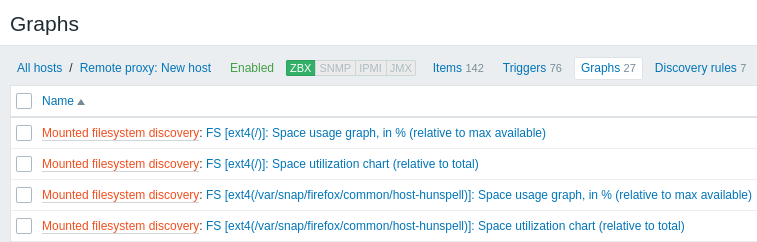
Снимци екрана испод илуструју како откривени елементи, окидачи и графикони изгледају у конфигурацији домаћина. Откривени ентитети имају префикс од наранџасте везе до правила откривања из којег долазе.
Имајте на уму да откривени ентитети неће бити креирани у случају да већ постоје ентитети са истим критеријумима јединствености, на пример, ставка са истим кључем или графикон са истим именом. У овом случају се приказује порука о грешци у предњем делу да правило откривања ниског нивоа није могло да креира одређене ентитете. Међутим, само правило откривања неће постати неподржано јер неки ентитет није могао да се креира и морао је да се прескочи. Правило откривања ће наставити да креира/ажурира друге ентитете.
Ако откривени ентитет (домаћин, фајл систем, интерфејс итд.) престане да се открива (или више не пролази филтер), ентитети који су креирани на основу њега могу бити аутоматски онемогућени и на крају обрисани.
Изгубљени ресурси могу бити аутоматски онемогућени на основу вредности параметра Онемогући изгубљене ресурсе. Ово утиче на изгубљене хостове, ставке и окидаче.
Изгубљени ресурси могу бити аутоматски обрисани на основу вредности параметра Обриши изгубљене ресурсе. Ово утиче на изгубљене домаћине, групе домаћина, ставке, окидаче и графиконе.
Када откривени ентитети постану 'Више нису откривени', приказује се индикатор трајања у листи ентитета. Померите показивач миша преко њега и приказаће се порука која приказује детаље његовог статуса.

Ако су ентитети означени за брисање, али нису обрисани у очекивано време (онемогућено правило откривања или домаћин ставке), биће избрисани следећи пут када се правило откривања обради.
Ентитети који садрже друге ентитете, који су означени за брисање, неће се ажурирати ако се промене на нивоу правила откривања. На пример, окидачи засновани на LLD-у се неће ажурирати ако садрже ставке које су означене за брисање.
Друге врсте откривања
Више детаља и упутстава о другим врстама унапред инсталираног откривања доступно је у следећим одељцима:
- откривање мрежних интерфејса;
- откривање процесора и језгара процесора језгара;
- откривање SNMP OID-ова;
- откривање JMX објеката;
- откривање помоћу ODBC SQL упита;
- откривање Windows сервиса;
- откривање host интерфејса у Zabbix-у.
За више детаља о JSON формату за ставке откривања и пример како да имплементирате сопствени програм за откривање система датотека као Perl скрипту, погледајте креирање прилагођених LLD правила.