This template is for Zabbix version: 7.4
Source: https://git.zabbix.com/projects/ZBX/repos/zabbix/browse/templates/media/msteams-workflow?at=release/7.4

MS Teams Workflow webhook
Overview
This guide describes how to integrate Zabbix with MS Teams Workflow using the Zabbix webhook feature, providing instructions on setting up a media type, a user, and an action in Zabbix.
This integration is supported only on Teams as part of Office 365. Note that the Teams free plan does not support the MS Teams Workflow feature.
Requirements
Zabbix version: 7.4 and higher.
Parameters
After importing the webhook, you can configure it using webhook parameters.
Configurable parameters
The configurable parameters are intended to be changed according to the webhook setup as well as the user's preferences and environment.
| Name |
Value |
Description |
| zabbix_url |
{$ZABBIX.URL} |
Current Zabbix URL. |
Internal parameters
Internal parameters are reserved for predefined macros that are not meant to be changed.
| Name |
Value |
Description |
| event_source |
{EVENT.SOURCE} |
Numeric value of the event source. Possible values: 0 - Trigger, 1 - Discovery, 2 - Autoregistration, 3 - Internal, 4 - Service. |
| event_value |
{EVENT.VALUE} |
Numeric value of the event that triggered an action (1 for problem, 0 for recovering). |
| event_update_status |
{EVENT.UPDATE.STATUS} |
Numeric value of the problem update status. Possible values: 0 - Webhook was called because of problem/recovery event, 1 - Update operation. |
| event_nseverity |
{EVENT.NSEVERITY} |
Numeric value of the event severity. Possible values: 0 - Not classified, 1 - Information, 2 - Warning, 3 - Average, 4 - High, 5 - Disaster. |
| event_severity |
{EVENT.SEVERITY} |
Name of the event severity. |
| event_update_nseverity |
{EVENT.UPDATE.NSEVERITY} |
Numeric value of the event update severity. Possible values: 0 - Not classified, 1 - Information, 2 - Warning, 3 - Average, 4 - High, 5 - Disaster. |
| event_update_severity |
{EVENT.UPDATE.SEVERITY} |
Name of the event update severity. |
| alert_message |
{ALERT.MESSAGE} |
'Default message' value from action configuration. |
| alert_subject |
{ALERT.SUBJECT} |
'Default subject' value from action configuration. |
| event_id |
{EVENT.ID} |
Numeric ID of the event that triggered an action. |
| trigger_id |
{TRIGGER.ID} |
Numeric ID of the trigger of this action. |
| teams_endpoint |
{ALERT.SENDTO} |
MS Teams workflow-webhook URL. |
Please be aware that each webhook supports an HTTP proxy. To use this feature, add a new media type parameter with the name http_proxy and set its value to the proxy URL.
Service setup
To set up a MS Teams Workflow webhook, follow these steps:
-
Open Teams:
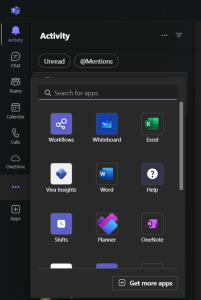
- On the left vertical hotbar, find the three dots for additional apps.
-
Find the Workflows app:
- In the opened window, find and click on the Workflows app.
-
Create a new flow:
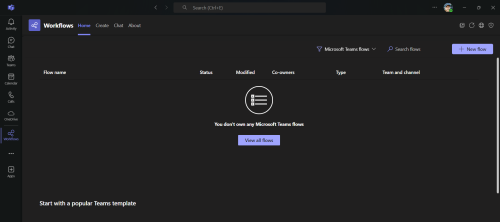
- In the top-right corner, click
+ New flow.
-
Search for a template:
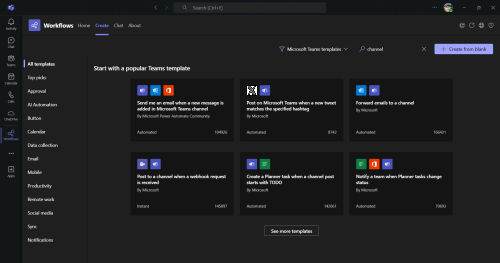
- In the search bar, enter the keyword "channel" and from the search results, select the template "Post a channel when a webhook request is received".
-
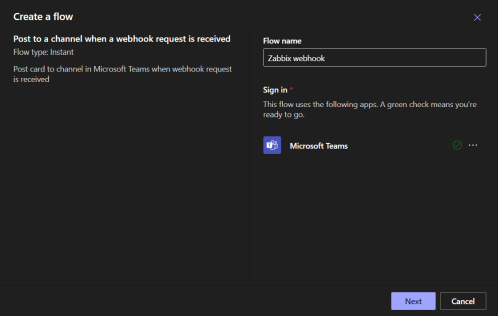
Name your flow:
- Enter "Zabbix webhook" in the "Flow name" field.
- Select the appropriate user in the "Sign in" menu. This user will be used to create channel posts.
- Click
Next.
-
Configure the flow:
- Select the appropriate Microsoft Teams team and Microsoft Teams channel where Zabbix events will be posted.
- Click
Create Flow.
-
Save the Workflow endpoint URL:
- A message stating "Workflow added successfully" will appear.
- Copy the workflow endpoint URL and save it! It will be used in the Zabbix webhook later.
-
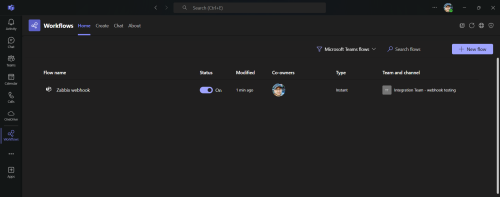
Verify the new Workflow:
- You can now close this window and press the home button in the top-left corner of the workflow menu.
- On this page, the new workflow called "Zabbix webhook" should appear.
-
View flow details:
- Click on the "Zabbix webhook". A window with detailed info about this flow will appear.
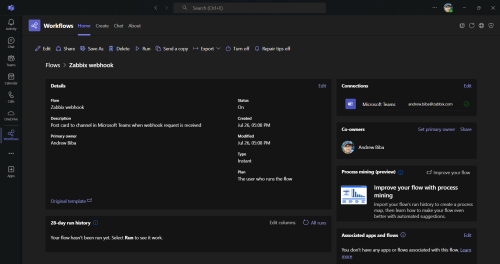
Note: If you want to remove the footer message "USERNAME used a Workflow to send this card. Get template", you need to make a copy of the created from the template workflow. To do this, after step 9 click on Save as button and save a new copy. Do not forget to copy endpoint URL from the new copied workflow instead of using the one from step 7.
Zabbix configuration
-
Set up the global macro:
- In the Zabbix web interface, go to the
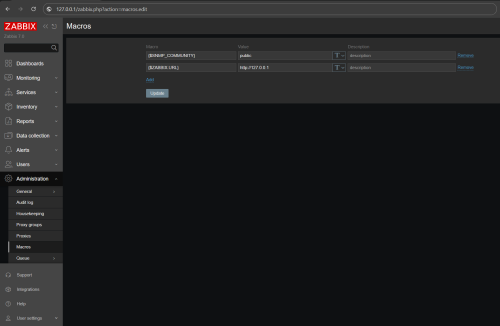
Administration → Macros section in the menu on the left-hand side.
- Set up the global macro
{$ZABBIX.URL} which will contain the URL to the Zabbix frontend. The URL should be either an IP address, a fully qualified domain name, or a localhost.
- Specifying a protocol is mandatory, whereas the port is optional. Good examples:
http://zabbix.com
https://zabbix.lan/
http://server.zabbix.lan/
http://localhost
http://127.0.0.1:8080
- Bad examples:
zabbix.com
http://zabbix/

-
Import the media type:
-
Create a Zabbix user and add media:
- In the
Users → Users section, click the Create user button in the top-right corner. In the User tab, fill in all the required fields (marked with red asterisks).
- In the
Media tab, add a new media type and select MS Teams Workflow from the drop-down list. In the Send to field place the incoming webhook URL created during step 7 of the MS Teams workflow setup.
- Make sure the user has access to all the hosts for which you would like problem notifications to be sent to MS Teams. You can do so by selecting the appropriate user role in the
Permissions tab.
-
You can now start receiving alerts!
Note: The MS Teams Workflow webhook supports Markdown format for Adaptive Cards syntax in the alert message and subject. If you want to make use of it, go to Alerts → Media types, find the "MS Teams Workflow" media type, click on it, and in the Message templates tab, choose the desired message template and edit it using Markdown syntax.

For more information, see Zabbix Documentation and MS Teams Workflow Documentation.
Feedback
Please report any issues with the media type at https://support.zabbix.com.
You can also provide feedback, discuss the media type, or ask for help at ZABBIX forums.
This template is for Zabbix version: 7.2
Source: https://git.zabbix.com/projects/ZBX/repos/zabbix/browse/templates/media/msteams-workflow?at=release/7.2

MS Teams Workflow webhook
Overview
This guide describes how to integrate Zabbix with MS Teams Workflow using the Zabbix webhook feature, providing instructions on setting up a media type, a user, and an action in Zabbix.
This integration is supported only on Teams as part of Office 365. Note that the Teams free plan does not support the MS Teams Workflow feature.
Requirements
Zabbix version: 7.2 and higher.
Parameters
After importing the webhook, you can configure it using webhook parameters.
Configurable parameters
The configurable parameters are intended to be changed according to the webhook setup as well as the user's preferences and environment.
| Name |
Value |
Description |
| teams_endpoint |
<PLACE WEBHOOK URL HERE> |
MS Teams workflow-webhook URL. |
| zabbix_url |
{$ZABBIX.URL} |
Current Zabbix URL. |
Internal parameters
Internal parameters are reserved for predefined macros that are not meant to be changed.
| Name |
Value |
Description |
| event_source |
{EVENT.SOURCE} |
Numeric value of the event source. Possible values: 0 - Trigger, 1 - Discovery, 2 - Autoregistration, 3 - Internal, 4 - Service. |
| event_value |
{EVENT.VALUE} |
Numeric value of the event that triggered an action (1 for problem, 0 for recovering). |
| event_update_status |
{EVENT.UPDATE.STATUS} |
Numeric value of the problem update status. Possible values: 0 - Webhook was called because of problem/recovery event, 1 - Update operation. |
| event_nseverity |
{EVENT.NSEVERITY} |
Numeric value of the event severity. Possible values: 0 - Not classified, 1 - Information, 2 - Warning, 3 - Average, 4 - High, 5 - Disaster. |
| event_severity |
{EVENT.SEVERITY} |
Name of the event severity. |
| event_update_nseverity |
{EVENT.UPDATE.NSEVERITY} |
Numeric value of the event update severity. Possible values: 0 - Not classified, 1 - Information, 2 - Warning, 3 - Average, 4 - High, 5 - Disaster. |
| event_update_severity |
{EVENT.UPDATE.SEVERITY} |
Name of the event update severity. |
| alert_message |
{ALERT.MESSAGE} |
'Default message' value from action configuration. |
| alert_subject |
{ALERT.SUBJECT} |
'Default subject' value from action configuration. |
| event_id |
{EVENT.ID} |
Numeric ID of the event that triggered an action. |
| trigger_id |
{TRIGGER.ID} |
Numeric ID of the trigger of this action. |
Please be aware that each webhook supports an HTTP proxy. To use this feature, add a new media type parameter with the name http_proxy and set its value to the proxy URL.
Service setup
To set up a MS Teams Workflow webhook, follow these steps:
-
Open Teams:
- On the left vertical hotbar, find the three dots for additional apps.

-
Find the Workflows app:
- In the opened window, find and click on the Workflows app.
-
Create a new flow:
- In the top-right corner, click
+ New flow.

-
Search for a template:
- In the search bar, enter the keyword "channel" and from the search results, select the template "Post a channel when a webhook request is received".

-
Name your flow:
- Enter "Zabbix webhook" in the "Flow name" field.
- Select the appropriate user in the "Sign in" menu. This user will be used to create channel posts.
- Click
Next.

-
Configure the flow:
- Select the appropriate Microsoft Teams team and Microsoft Teams channel where Zabbix events will be posted.
- Click
Create Flow.
-
Save the Workflow endpoint URL:
- A message stating "Workflow added successfully" will appear.
- Copy the workflow endpoint URL and save it! It will be used in the Zabbix webhook later.
-
Verify the new Workflow:
- You can now close this window and press the home button in the top-left corner of the workflow menu.
- On this page, the new workflow called "Zabbix webhook" should appear.

-
View flow details:
- Click on the "Zabbix webhook". A window with detailed info about this flow will appear.

Note: If you want to remove the footer message "USERNAME used a Workflow to send this card. Get template", you need to make a copy of the created from the template workflow. To do this, after step 9 click on Save as button and save a new copy. Do not forget to copy endpoint URL from the new copied workflow instead of using the one from step 7.
Zabbix configuration
-
Set up the global macro:
- In the Zabbix web interface, go to the
Administration → Macros section in the menu on the left-hand side.
- Set up the global macro
{$ZABBIX.URL} which will contain the URL to the Zabbix frontend. The URL should be either an IP address, a fully qualified domain name, or a localhost.
- Specifying a protocol is mandatory, whereas the port is optional. Good examples:
http://zabbix.com
https://zabbix.lan/
http://server.zabbix.lan/
http://localhost
http://127.0.0.1:8080
- Bad examples:
zabbix.com
http://zabbix/

-
Import the media type:
-
Configure the MS Teams Workflow media type:
- Open the newly added MS Teams Workflow media type and replace the placeholder
<PLACE WEBHOOK URL HERE> with the incoming webhook URL created during step 7 of the MS Teams workflow setup.
-
Create a Zabbix user and add media:
- In the
Users → Users section, click the Create user button in the top-right corner. In the User tab, fill in all the required fields (marked with red asterisks).
- In the
Media tab, add a new media type and select MS Teams Workflow from the drop-down list. Although the Send to field is not used in MS Teams Workflow media, it cannot be empty. To comply with frontend requirements, fill in the field with any symbol.
- Make sure the user has access to all the hosts for which you would like problem notifications to be sent to MS Teams. You can do so by selecting the appropriate user role in the
Permissions tab.
-
You can now start receiving alerts!
Note: The MS Teams Workflow webhook supports Markdown format for Adaptive Cards syntax in the alert message and subject. If you want to make use of it, go to Alerts → Media types, find the "MS Teams Workflow" media type, click on it, and in the Message templates tab, choose the desired message template and edit it using Markdown syntax.

For more information, see Zabbix Documentation and MS Teams Workflow Documentation.
Feedback
Please report any issues with the media type at https://support.zabbix.com.
You can also provide feedback, discuss the media type, or ask for help at ZABBIX forums.
This template is for Zabbix version: 7.0
Source: https://git.zabbix.com/projects/ZBX/repos/zabbix/browse/templates/media/msteams-workflow?at=release/7.0

MS Teams Workflow webhook
Overview
This guide describes how to integrate Zabbix with MS Teams Workflow using the Zabbix webhook feature, providing instructions on setting up a media type, a user, and an action in Zabbix.
This integration is supported only on Teams as part of Office 365. Note that the Teams free plan does not support the MS Teams Workflow feature.
Requirements
Zabbix version: 7.0 and higher.
Parameters
After importing the webhook, you can configure it using webhook parameters.
Configurable parameters
The configurable parameters are intended to be changed according to the webhook setup as well as the user's preferences and environment.
| Name |
Value |
Description |
| zabbix_url |
{$ZABBIX.URL} |
Current Zabbix URL. |
Internal parameters
Internal parameters are reserved for predefined macros that are not meant to be changed.
| Name |
Value |
Description |
| event_source |
{EVENT.SOURCE} |
Numeric value of the event source. Possible values: 0 - Trigger, 1 - Discovery, 2 - Autoregistration, 3 - Internal, 4 - Service. |
| event_value |
{EVENT.VALUE} |
Numeric value of the event that triggered an action (1 for problem, 0 for recovering). |
| event_update_status |
{EVENT.UPDATE.STATUS} |
Numeric value of the problem update status. Possible values: 0 - Webhook was called because of problem/recovery event, 1 - Update operation. |
| event_nseverity |
{EVENT.NSEVERITY} |
Numeric value of the event severity. Possible values: 0 - Not classified, 1 - Information, 2 - Warning, 3 - Average, 4 - High, 5 - Disaster. |
| event_severity |
{EVENT.SEVERITY} |
Name of the event severity. |
| event_update_nseverity |
{EVENT.UPDATE.NSEVERITY} |
Numeric value of the event update severity. Possible values: 0 - Not classified, 1 - Information, 2 - Warning, 3 - Average, 4 - High, 5 - Disaster. |
| event_update_severity |
{EVENT.UPDATE.SEVERITY} |
Name of the event update severity. |
| alert_message |
{ALERT.MESSAGE} |
'Default message' value from action configuration. |
| alert_subject |
{ALERT.SUBJECT} |
'Default subject' value from action configuration. |
| event_id |
{EVENT.ID} |
Numeric ID of the event that triggered an action. |
| trigger_id |
{TRIGGER.ID} |
Numeric ID of the trigger of this action. |
| teams_endpoint |
{ALERT.SENDTO} |
MS Teams workflow-webhook URL. |
Please be aware that each webhook supports an HTTP proxy. To use this feature, add a new media type parameter with the name http_proxy and set its value to the proxy URL.
Service setup
To set up a MS Teams Workflow webhook, follow these steps:
-
Open Teams:
- On the left vertical hotbar, find the three dots for additional apps.

-
Find the Workflows app:
- In the opened window, find and click on the Workflows app.
-
Create a new flow:
- In the top-right corner, click
+ New flow.

-
Search for a template:
- In the search bar, enter the keyword "channel" and from the search results, select the template "Post a channel when a webhook request is received".

-
Name your flow:
- Enter "Zabbix webhook" in the "Flow name" field.
- Select the appropriate user in the "Sign in" menu. This user will be used to create channel posts.
- Click
Next.

-
Configure the flow:
- Select the appropriate Microsoft Teams team and Microsoft Teams channel where Zabbix events will be posted.
- Click
Create Flow.
-
Save the Workflow endpoint URL:
- A message stating "Workflow added successfully" will appear.
- Copy the workflow endpoint URL and save it! It will be used in the Zabbix webhook later.
-
Verify the new Workflow:
- You can now close this window and press the home button in the top-left corner of the workflow menu.
- On this page, the new workflow called "Zabbix webhook" should appear.

-
View flow details:
- Click on the "Zabbix webhook". A window with detailed info about this flow will appear.

Note: If you want to remove the footer message "USERNAME used a Workflow to send this card. Get template", you need to make a copy of the created from the template workflow. To do this, after step 9 click on Save as button and save a new copy. Do not forget to copy endpoint URL from the new copied workflow instead of using the one from step 7.
Zabbix configuration
-
Set up the global macro:
- In the Zabbix web interface, go to the
Administration → Macros section in the menu on the left-hand side.
- Set up the global macro
{$ZABBIX.URL} which will contain the URL to the Zabbix frontend. The URL should be either an IP address, a fully qualified domain name, or a localhost.
- Specifying a protocol is mandatory, whereas the port is optional. Good examples:
http://zabbix.com
https://zabbix.lan/
http://server.zabbix.lan/
http://localhost
http://127.0.0.1:8080
- Bad examples:
zabbix.com
http://zabbix/

-
Import the media type:
-
Create a Zabbix user and add media:
- In the
Users → Users section, click the Create user button in the top-right corner. In the User tab, fill in all the required fields (marked with red asterisks).
- In the
Media tab, add a new media type and select MS Teams Workflow from the drop-down list. In the Send to field place the incoming webhook URL created during step 7 of the MS Teams workflow setup.
- Make sure the user has access to all the hosts for which you would like problem notifications to be sent to MS Teams. You can do so by selecting the appropriate user role in the
Permissions tab.
-
You can now start receiving alerts!
Note: The MS Teams Workflow webhook supports Markdown format for Adaptive Cards syntax in the alert message and subject. If you want to make use of it, go to Alerts → Media types, find the "MS Teams Workflow" media type, click on it, and in the Message templates tab, choose the desired message template and edit it using Markdown syntax.

For more information, see Zabbix Documentation and MS Teams Workflow Documentation.
Feedback
Please report any issues with the media type at https://support.zabbix.com.
You can also provide feedback, discuss the media type, or ask for help at ZABBIX forums.
This template is for Zabbix version: 6.0
Source: https://git.zabbix.com/projects/ZBX/repos/zabbix/browse/templates/media/msteams-workflow?at=release/6.0

MS Teams Workflow webhook
Overview
This guide describes how to integrate Zabbix 6.0 with MS Teams Workflow using the Zabbix webhook feature, providing instructions on setting up a media type, a user, and an action in Zabbix.
This integration is supported only on Teams as part of Office 365. Note that the Teams free plan does not support the MS Teams Workflow feature.
Requirements
Zabbix version: 6.0 and higher.
Parameters
User parameters
User parameters are intended to be changed according to the webhook setup as well as the user's preferences and environment.
| Name |
Value |
Description |
| teams_endpoint |
<PLACE WEBHOOK URL HERE> |
MS Teams workflow-webhook URL. |
| zabbix_url |
{$ZABBIX.URL} |
Current Zabbix URL. |
System parameters
System parameters are reserved for predefined macros that are not meant to be changed.
| Name |
Value |
Description |
| event_source |
{EVENT.SOURCE} |
Numeric value of the event source. Possible values: 0 - Trigger, 1 - Discovery, 2 - Autoregistration, 3 - Internal, 4 - Service. |
| event_value |
{EVENT.VALUE} |
Numeric value of the event that triggered an action (1 for problem, 0 for recovering). |
| event_update_status |
{EVENT.UPDATE.STATUS} |
Numeric value of the problem update status. Possible values: 0 - Webhook was called because of problem/recovery event, 1 - Update operation. |
| event_nseverity |
{EVENT.NSEVERITY} |
Numeric value of the event severity. Possible values: 0 - Not classified, 1 - Information, 2 - Warning, 3 - Average, 4 - High, 5 - Disaster. |
| event_severity |
{EVENT.SEVERITY} |
Name of the event severity. |
| event_update_nseverity |
{EVENT.UPDATE.NSEVERITY} |
Numeric value of the event update severity. Possible values: 0 - Not classified, 1 - Information, 2 - Warning, 3 - Average, 4 - High, 5 - Disaster. |
| event_update_severity |
{EVENT.UPDATE.SEVERITY} |
Name of the event update severity. |
| alert_message |
{ALERT.MESSAGE} |
'Default message' value from action configuration. |
| alert_subject |
{ALERT.SUBJECT} |
'Default subject' value from action configuration. |
| event_id |
{EVENT.ID} |
Numeric ID of the event that triggered an action. |
| trigger_id |
{TRIGGER.ID} |
Numeric ID of the trigger of this action. |
Please be aware that each webhook supports an HTTP proxy. To use this feature, add a new media type parameter with the name http_proxy and set its value to the proxy URL.
Service setup
To set up a MS Teams Workflow webhook, follow these steps:
-
Open Teams:
- On the left vertical hotbar, find the three dots for additional apps.

-
Find the Workflows app:
- In the opened window, find and click on the Workflows app.
-
Create a new flow:
- In the top-right corner, click
+ New flow.

-
Search for a template:
- In the search bar, enter the keyword "channel" and from the search results, select the template "Post a channel when a webhook request is received".

-
Name your flow:
- Enter "Zabbix webhook" in the "Flow name" field.
- Select the appropriate user in the "Sign in" menu. This user will be used to create channel posts.
- Click
Next.

-
Configure the flow:
- Select the appropriate Microsoft Teams team and Microsoft Teams channel where Zabbix events will be posted.
- Click
Create Flow.
-
Save the Workflow endpoint URL:
- A message stating "Workflow added successfully" will appear.
- Copy the workflow endpoint URL and save it! It will be used in the Zabbix webhook later.
-
Verify the new Workflow:
- You can now close this window and press the home button in the top-left corner of the workflow menu.
- On this page, the new workflow called "Zabbix webhook" should appear.

-
View flow details:
- Click on the "Zabbix webhook". A window with detailed info about this flow will appear.

Note: If you want to remove the footer message "USERNAME used a Workflow to send this card. Get template", you need to make a copy of the created from the template workflow. To do this, after step 9 click on Save as button and save a new copy. Do not forget to copy endpoint URL from the new copied workflow instead of using the one from step 7.
Zabbix configuration
-
Set up the global macro:
- In the Zabbix web interface, go to the
Administration → Macros section in the menu on the left-hand side.
- Set up the global macro
{$ZABBIX.URL} which will contain the URL to the Zabbix frontend. The URL should be either an IP address, a fully qualified domain name, or a localhost.
- Specifying a protocol is mandatory, whereas the port is optional. Good examples:
http://zabbix.com
https://zabbix.lan/
http://server.zabbix.lan/
http://localhost
http://127.0.0.1:8080
- Bad examples:
zabbix.com
http://zabbix/

-
Import the media type:
-
Configure the MS Teams Workflow media type:
- Open the newly added MS Teams Workflow media type and replace the placeholder
<PLACE WEBHOOK URL HERE> with the incoming webhook URL created during step 7 of the MS Teams workflow setup.
-
Create a Zabbix user and add media:
- In the
Administration → Users section, click the Create user button in the top-right corner. In the User tab, fill in all the required fields (marked with red asterisks).
- In the
Media tab, add a new media type and select MS Teams Workflow from the drop-down list. Although the Send to field is not used in MS Teams Workflow media, it cannot be empty. To comply with frontend requirements, fill in the field with any symbol.
- Make sure the user has access to all the hosts for which you would like problem notifications to be sent to MS Teams. You can do so by selecting the appropriate user role in the
Permissions tab.
-
You can now start receiving alerts!
Note: The MS Teams Workflow webhook supports Markdown format for Adaptive Cards syntax in the alert message and subject. If you want to make use of it, go to Alerts → Media types, find the "MS Teams Workflow" media type, click on it, and in the Message templates tab, choose the desired message template and edit it using Markdown syntax.

For more information, see Zabbix Documentation and MS Teams Workflow Documentation.
Feedback
Please report any issues with the media type at https://support.zabbix.com.
You can also provide feedback, discuss the media type, or ask for help at ZABBIX forums.
| Link |
Source |
Compatibility |
Type, Technology |
Created Updated |
Rating |
Send Zabbix notifications to multiple services
20+ channels: Skype, Telegram, Viber, SMS, Slack, Jabber / XMPP, Discord, Web Push, Microsoft Teams, Voice call, etc
github.com/notify-events/zabbix
|
See all Zabbix community templates