Is this not what you were looking for? Switch to the current version or choose one from the drop-down menu.
5. Zabbix appliance
As an alternative to setting up manually or reusing existing server for Zabbix, users may download Zabbix appliance.
To get started, boot the appliance and point your browser at the IP it has received over DHCP.
Starting with appliance version 2.4.6, allow for a few minutes after the first boot for the Zabbix installation to be set up.
|<| |<| |-|
Zabbix appliance versions are based upon the following OpenSUSE versions:
| Zabbix appliance version | OpenSUSE version |
|---|---|
| 2.4.1 | 13.1 |
| 2.4.5 | |
| 2.4.6 |
It is available in the following formats:
- vmdk (VMware/Virtualbox)
- OVF (Open Virtualisation Format)
- KVM
- CD ISO
- HDD/flash image
- Preload ISO
- Xen guest
- Microsoft VHD (Azure)
- Microsoft VHD (Hyper-V)
- Preload USB
It has Zabbix server configured and running on MySQL, as well as frontend available.
The appliance has been built using SUSE Studio.
It is not required to download full appliance to get the latest Zabbix version. Zabbix packages may be upgraded. See the #upgrading section for instructions.
1 Changes from appliance version 2.2
Most notably, all utility names and file names have been changed to use a dash instead of an underscore to comply with distribution guidelines. See changes to Zabbix configuration for more information.
2 Changes to SUSE configuration
There are some changed applied to the base OpenSUSE configuration.
2.1 MySQL configuration changes
- Binary log is enabled and set to expire in one day
- Maximum packet size is changed from 1MB to 2MB
2.2 Using a static IP address
By default the appliance uses DHCP to obtain IP address. To specify a static IP address:
- Log in as root user;
- Open file /etc/sysconfig/network/ifcfg-<interface> in your favourite editor;
- Set BOOTPROTO variable to static;
- Set IPADDR, NETMASK and any other parameters as required for your network;
- Create file /etc/sysconfig/network/routes. For the default route, use default 192.168.1.1 - - (replacing with your gateway address).
- Run the command rcnetwork restart.
To configure DNS, add nameserver entries in /etc/resolv.conf, specifying each nameserver on its own line: nameserver 192.168.1.2.
Alternatively, just use yast configuration utility to update network settings.
2.3 Changing time zone
By default the appliance uses UTC for the system clock. To change the time zone, copy appropriate file from /usr/share/zoneinfo to /etc/localtime, for example:
2.4 Other changes
- Network is configured to use DHCP to obtain IP address;
- Utility fping is set to have permissions 4710 and is owned by group zabbix - suid and only alowed to be used by zabbix group;
- ntpd configured to synchronise to the public pool servers;
- Various basic utilities have been added that could make working with Zabbix and monitoring in general easier.
3 Zabbix configuration
Appliance Zabbix setup has the following passwords and other configuration changes:
3.1 Passwords
System:
- root:zabbix
- zabbix:zabbix
Database:
- root:zabbix
- zabbix:zabbix
Zabbix frontend:
- Admin:zabbix
If you change frontend password, do not forget to update password setting web monitoring (Configuration → Hosts, Web for host "Zabbix server").
To change the database user password it has to be changed in the following locations:
- MySQL;
- zabbix-server.conf;
- zabbix.conf.php.
3.2 File locations
- Configuration files are placed in /etc/zabbix.
- Zabbix agent logfiles are placed in /var/log/zabbix.
- Zabbix server logfiles are placed in /var/log/zabbixs.
- Zabbix frontend is placed in /usr/share/zabbix.
- Home directory for user zabbix is /var/lib/zabbix.
3.3 Changes to Zabbix configuration
- Utility names and file names have underscore replaced with a dash to match distribution guidelines. For example, zabbix-get is to be used instead of zabbix_get.
- Server name for Zabbix frontend set to "Zabbix 2.4 Appliance";
- Frontend timezone is set to Europe/Riga, Zabbix home (this can be modified in /etc/php5/apache2/php.ini);
- Disabled triggers and web scenarios are shown by default to reduce confusion.
3.4 Preserving configuration
If you are running live CD version of the appliance or for some other reason can't have persistent storage, you can create a backup of whole database, including all configuration and gathered data.
To create the backup, run:
Now you can transfer file dbdump.bz2 to another machine.
To restore from the backup, transfer it to the appliance and execute:
Make sure that Zabbix server is stopped while performing the restore.
4 Frontend access
Access to frontend by default is allowed from:
- 127.0.0.1
- 192.168.0.0/16
- 10.0.0.0/8
- ::1
Root (/) is redirected to /zabbix on the webserver, thus frontend can be accessed both as http://<host> and http://<host>/zabbix.
This can be customised in /etc/apache2/conf.d/zabbix.conf. You have to restart webserver after modifying this file. To do so, log in using SSH as root user and execute:
5 Firewall
By default, only ports 22 (SSH), 80 (HTTP) and 443 (HTTPS) are open. To open additional ports - for example, Zabbix server and agent ports - modify iptables rules with SuSEfirewall2 utility:
Then reload the firewall rules:
6 Monitoring capabilities
Zabbix server is compiled with support for the following:
- SNMP
- IPMI
- Web monitoring
- VMware monitoring
- Jabber notifications
- EZ Texting notifications
- ODBC
- SSH2
- IPv6
In the provided configuration Zabbix server itself is monitored with the help of locally installed agent for some base parameters, additionally Zabbix frontend is monitored as well using web monitoring.
|<| |<| |-|
Note that web frontend monitoring logs in - this can add lots of entries to the audit log.
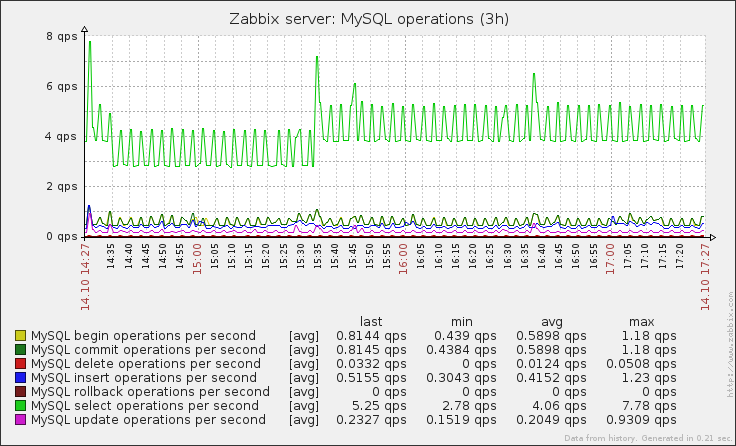
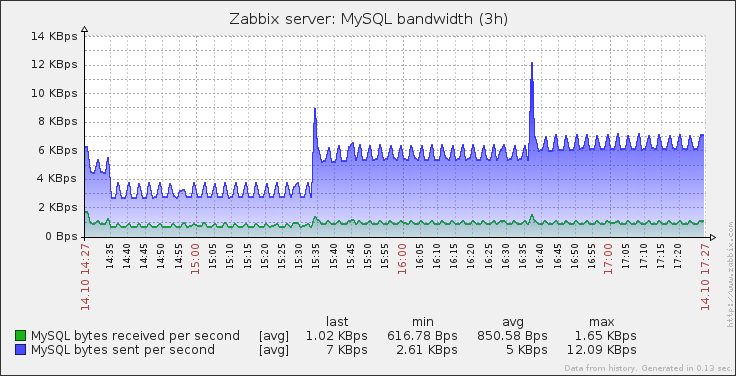
Basic MySQL monitoring is demonstrated using user parameters. Operations per second and bandwidth graphs are provided.


7 Upgrading
Starting with Zabbix 2.4, the appliance packages may be upgraded. To do so, run:
The last command will prompt to accept repository signing key (this has to be done only once):
New repository or package signing key received:
       Key ID: 6F1385F1A0875A36
       Key Name: home:zabbix OBS Project <home:[email protected]>
       Key Fingerprint: DF41712BF09B250CF033AC2D6F1385F1A0875A36
       Key Created: Thu 11 Sep 2014 12:36:12 EEST
       Key Expires: Sat 19 Nov 2016 11:36:12 EET
       Repository: home:zabbix_openSUSE_13_1

       Do you want to reject the key, trust temporarily, or trust always? [r/t/a/? shows all options] (r): a
Accept the key by entering 'a'. Confirm package upgrade. After the upgrade, it is necessary to manually restart Zabbix daemons. To do so, run:
7.1 Bash completion
Bash completion for Zabbix daemons and utilities has been included since the appliance version 2.4.6, but was not included with the previous versions. To install it, run:
Confirm the installation and close your login session, then log in again.
8 Naming, init and other scripts
Appropriate init scripts are provided. To control Zabbix server, use any of these:
Replace server with agentd for Zabbix agent daemon.
8.1 Increasing available diskspace
Create a backup of all data before attempting any of the steps.
Available diskspace on the appliance might not be sufficient. In that case it is possible to expand the disk. To do so, first expand the block device in your virtualisation environment, then follow these steps.
Start fdisk to change the partition size. As root, execute:
This will start fdisk on disk sda. Next, switch to sectors by issuing:
Don't disable DOS compatibility mode by entering c. Proceeding with it disabled will damage the partition.
Then delete the existing partition and create new one with desired size. In majority of cases you will accept the available maximum, which will expand the filesystem to whatever size you made available for the virtual disk. To do so, enter the following sequence in fdisk prompt:
If you wish to leave some space for additional partitions (swap etc), you can enter another value for last sector. When done, save the changes by issuing:
Reboot the virtual machine (as the partition we modified is in use currently). After reboot, filesystem resizing can take place.
That's it, filesystem should be grown to the partition size now.
9 Format-specific notes
9.1 Xen
To use images in Xen server, run:
See the following pages for more information on using Xen images:
- http://en.opensuse.org/openSUSE:How_to_use_downloaded_SUSE_Studio_appliances#Using_Xen_guests
- http://old-en.opensuse.org/SUSE_Studio_Xen_Howtos
Converting image for XenServer
To use Xen images with Citrix Xenserver you have to convert the disk image. To do so:
- Create a virtual disk which is at least as large as the image
- Find out the UUID for this disk
- If there are lots of disks, they can be filtered by name parameter name-label, as assigned when creating the virtual disk
- Import the image
Instructions from Brian Radford blog.
9.2 VMware
The images in vmdk format are usable directly in VMware Player, Server and Workstation products. For use in ESX, ESXi and vSphere they must be converted using VMware converter.
9.3 HDD/flash image (raw)
See http://en.opensuse.org/openSUSE:SUSE_Studio_Disc_Image_Howtos for more information on disk images.
10 Known issues
10.1 Extracting on Windows
Windows archive management software is known to mishandle the appliance archives. If extraction fails, try different software. Open source tool 7-zip might work.
10.2 Connectivity problems with IPv6
In some environments, the appliance might obtain IPv6 addresses (for example, for operating system updates), but be unable to use IPv6. To disable IPv6, add net.ipv6.conf.all.disable_ipv6 = 1 in /etc/sysctl.conf and restart the appliance.
10.3 Appliance fails to boot
If appliance seems to stop booting while loading initrd, more memory might be needed - 256MB has been shown to be too little. At least 512MB of memory is suggested.

