
1 Configuring a trigger
Overview
To configure a trigger, do the following:
- Go to: Configuration → Hosts
- Click on Triggers in the row of the host
- Click on Create trigger to the right (or on the trigger name to edit an existing trigger)
- Enter parameters of the trigger in the form
See also general information on triggers and their calculation times.
Configuration
The Trigger tab contains all the essential trigger attributes.
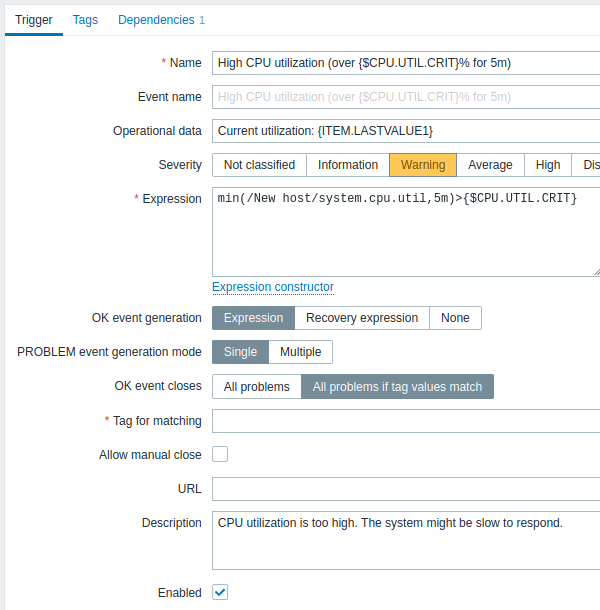
All mandatory input fields are marked with a red asterisk.
| Parameter | Description |
|---|---|
| Name | Trigger name. Supported macros are: {HOST.HOST}, {HOST.NAME}, {HOST.PORT}, {HOST.CONN}, {HOST.DNS}, {HOST.IP}, {ITEM.VALUE}, {ITEM.LASTVALUE}, {ITEM.LOG.*} and {$MACRO} user macros. $1, $2...$9 macros can be used to refer to the first, second...ninth constant of the expression. Note: $1-$9 macros will resolve correctly if referring to constants in relatively simple, straightforward expressions. For example, the name "Processor load above $1 on {HOST.NAME}" will automatically change to "Processor load above 5 on New host" if the expression is last(/New host/system.cpu.load[percpu,avg1])>5 |
| Event name | If defined, this name will be used to create the problem event name, instead of the trigger name. The event name may be used to build meaningful alerts containing problem data (see example). The same set of macros is supported as in the trigger name, plus {TIME} and {?EXPRESSION} expression macros. Supported since Zabbix 5.2.0. |
| Operational data | Operational data allow to define arbitrary strings along with macros. The macros will resolve dynamically to real time data in Monitoring → Problems. While macros in the trigger name (see above) will resolve to their values at the moment of a problem happening and will become the basis of a static problem name, the macros in the operational data maintain the ability to display the very latest information dynamically. If no operational data is configured on a trigger level, the latest values of all items from the expression will be displayed. The same set of macros is supported as in the trigger name. |
| Severity | Set the required trigger severity by clicking the buttons. |
| Expression | Logical expression used to define the conditions of a problem. A problem is created after all the conditions included in the expression are met, i.e. the expression evaluates to TRUE. The problem will be resolved as soon as the expression evaluates to FALSE, unless additional recovery conditions are specified in Recovery expression. |
| OK event generation | OK event generation options: Expression - OK events are generated based on the same expression as problem events; Recovery expression - OK events are generated if the problem expression evaluates to FALSE and the recovery expression evaluates to TRUE; None - in this case the trigger will never return to an OK state on its own. |
| Recovery expression | Logical expression (optional) defining additional conditions that have to be met before the problem is resolved, after the original problem expression has already been evaluated as FALSE. Recovery expression is useful for trigger hysteresis. It is not possible to resolve a problem by recovery expression alone if the problem expression is still TRUE. This field is only available if 'Recovery expression' is selected for OK event generation. |
| PROBLEM event generation mode | Mode for generating problem events: Single - a single event is generated when a trigger goes into the 'Problem' state for the first time; Multiple - an event is generated upon every 'Problem' evaluation of the trigger. |
| OK event closes | Select if OK event closes: All problems - all problems of this trigger All problems if tag values match - only those trigger problems with matching event tag values |
| Tag for matching | Enter event tag name to use for event correlation. This field is displayed if 'All problems if tag values match' is selected for the OK event closes property and is mandatory in this case. |
| Allow manual close | Check to allow manual closing of problem events generated by this trigger. Manual closing is possible when acknowledging problem events. |
| URL | If not empty, the URL entered here is available as a link in several frontend locations, e.g. when clicking on the problem name in Monitoring → Problems (URL option in the Trigger menu) and Problems dashboard widget. The same set of macros is supported as in the trigger name, plus {EVENT.ID}, {HOST.ID} and {TRIGGER.ID}. Note that user macros with secret values will not be resolved in the URL. |
| Description | Text field used to provide more information about this trigger. May contain instructions for fixing specific problem, contact detail of responsible staff, etc. The same set of macros is supported as in the trigger name. |
| Enabled | Unchecking this box will disable the trigger if required. Problems of a disabled trigger are no longer displayed in the frontend, but are not deleted. |
The Tags tab allows you to define trigger-level tags. All problems of this trigger will be tagged with the values entered here.
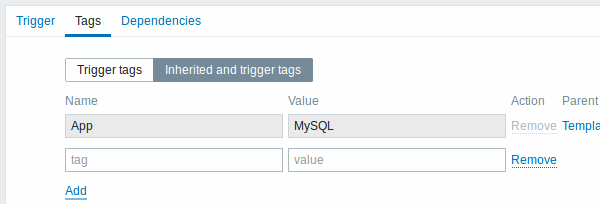
In addition the Inherited and trigger tags option allows to view tags defined on template level, if the trigger comes from that template. If there are multiple templates with the same tag, these tags are displayed once and template names are separated with commas. A trigger does not "inherit" and display host-level tags.
| Parameter | Description |
|---|---|
| Name/Value | Set custom tags to mark trigger events. Tags are a pair of tag name and value. You can use only the name or pair it with a value. A trigger may have several tags with the same name, but different values. User macros, user macros with context, low-level discovery macros, and macro functions with {{ITEM.VALUE}}, {{ITEM.LASTVALUE}} are supported in event tags. Low-level discovery macros can be used inside macro context.{TRIGGER.ID} macro is supported in trigger tag values. It may be useful for identifying triggers created from trigger prototypes and, for example, suppressing problems from these triggers during maintenance. If the total length of expanded value exceeds 255, it will be cut to 255 characters. See all macros supported for event tags. Event tags can be used for event correlation, in action conditions and will also be seen in Monitoring → Problems or the Problems widget. |
The Dependencies tab contains all the dependencies of the trigger.
Click on Add to add a new dependency.
You can also configure a trigger by opening an existing one, pressing the Clone button and then saving under a different name.
Testing expressions
It is possible to test the configured trigger expression as to what the expression result would be depending on the received value.
The following expression from an official template is taken as an example:
avg(/Cisco IOS SNMPv2/sensor.temp.value[ciscoEnvMonTemperatureValue.{#SNMPINDEX}],5m)>{$TEMP_WARN}
or
last(/Cisco IOS SNMPv2/sensor.temp.status[ciscoEnvMonTemperatureState.{#SNMPINDEX}])={$TEMP_WARN_STATUS}
To test the expression, click on Expression constructor under the expression field.
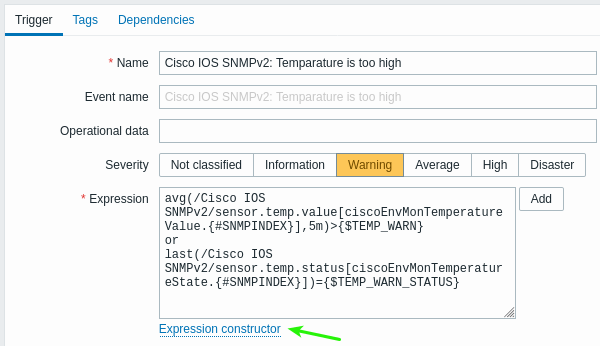
In the Expression constructor, all individual expressions are listed. To open the testing window, click on Test below the expression list.

In the testing window you can enter sample values ('80', '70', '0', '1' in this example) and then see the expression result, by clicking on the Test button.
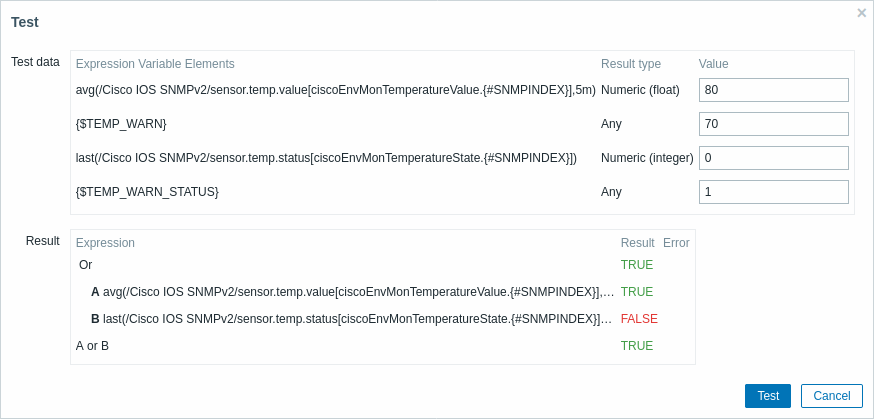
The result of the individual expressions as well as the whole expression can be seen.
"TRUE" means that the specified expression is correct. In this particular case A, "80" is greater than the {$TEMP_WARN} specified value, "70" in this example. As expected, a "TRUE" result appears.
"FALSE" means that the specified expression is incorrect. In this particular case B, {$TEMP_WARN_STATUS} "1" needs to be equal with specified value, "0" in this example. As expected, a "FALSE" result appears.
The chosen expression type is "OR". If at least one of the specified conditions (A or B in this case) is TRUE, the overall result will be TRUE as well. Meaning that the current value exceeds the warning value and a problem has occurred.