
14 Setting up scheduled reports
Overview
This section provides instructions on installing Zabbix web service and configuring Zabbix to enable generation of scheduled reports.
Currently the support of scheduled reports is experimental.
Installation
A new Zabbix web service process and Google Chrome browser should be installed to enable generation of scheduled reports. The web service may be installed on the same machine where the Zabbix server is installed or on a different machine. Google Chrome browser should be installed on the same machine, where the web service is installed.
The official zabbix-web-service package is available in the Zabbix repository. Google Chrome browser is not included into these packages and has to be installed separately.
To compile Zabbix web service from sources, see Installing Zabbix web service.
After the installation, run zabbix_web_service on the machine, where the web service is installed:
zabbix_web_serviceConfiguration
To ensure proper communication between all elements involved make sure server configuration file and frontend configuration parameters are properly configured.
Zabbix server
The following parameters in Zabbix server configuration file need to be updated: WebServiceURL and StartReportWriters.
WebServiceURL
This parameter is required to enable communication with the web service. The URL should be in the format <host:port>/report.
- By default, the web service listens on port 10053. A different port can be specified in the web service configuration file.
- Specifying the
/reportpath is mandatory (the path is hardcoded and cannot be changed).
Example:
WebServiceURL=http://localhost:10053/reportIt is strongly recommended to set up encryption between Zabbix server and Zabbix web service using certificates. By default, data transmitted between Zabbix server and Zabbix web service is not encrypted, which can lead to unauthorized access.
StartReportWriters
This parameter determines how many report writer processes should be started. If it is not set or equals 0, report generation is disabled. Based on the number and frequency of reports required, it is possible to enable from 1 to 100 report writer processes.
Example:
StartReportWriters=3Zabbix frontend
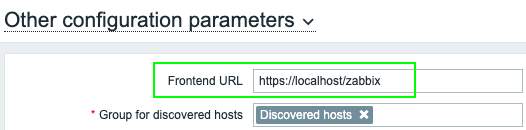
A Frontend URL parameter should be set to enable communication between Zabbix frontend and Zabbix web service:
- Proceed to the Administration > General > Other frontend menu section
- Specify the full URL of the Zabbix web interface in the Frontend URL parameter
Once the setup procedure is completed, you may want to configure and send a test report to make sure everything works correctly.