
6 Zabbix appliance
Преглед
Zabbix уређај пружа начин за тренутно распоређивање Zabbix сервера и корисничког интерфејса, уместо ручног подешавања или поновног коришћења постојећег сервера за Zabbix.
Уређај је базиран на AlmaLinux 8 (x86_64) и садржи унапред конфигурисани Zabbix сервер који ради на MySQL-у и корисничког интерфејса који ради на Nginx веб серверу.
Овај уређај је дизајниран за процену Zabbix-а. Његово коришћење у озбиљним производним окружењима се не препоручује.
Слике уређаја су доступне за преузимање у следећим форматима:
- Инсталациони CD/DVD (.iso)
- VMware (.vmx) - видети напомене
- Отворени формат за виртуелизацију (.ovf)
- Microsoft Hyper-V (.vhd/.vhdx) - видети напомене
- KVM, Parallels, QEMU, USB стик, VirtualBox, Xen (.raw) - видети напомене
- KVM, QEMU (.qcow2)
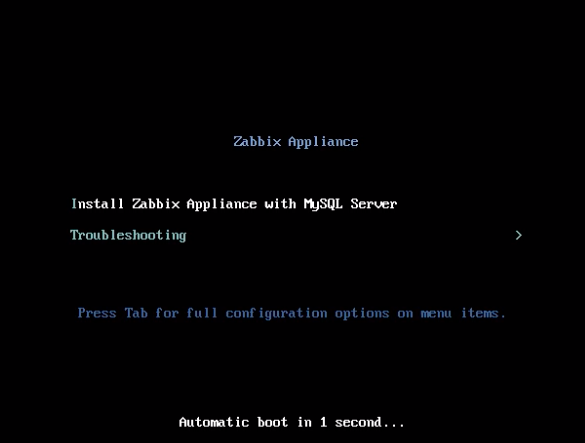
Мени за покретање Zabbix инсталационог CD/DVD-а:
Брзи почетак
Предуслови
- Уверите се да главна машина има довољно ресурса да испуни системске захтеве виртуелне машине:
- RAM: 4 GB
- Простор на диску: најмање 8 GB треба да буде додељено за виртуелну машину
- CPU: минимум 2 језгра
-
Ако још није инсталиран, инсталирајте софтвер за виртуелизацију за покретање слике уређаја (на пример, VirtualBox).
-
Преузмите уређај у формату који подржава ваш софтвер за виртуелизацију.
-
Проверите мрежна подешавања да бисте се уверили да је DHCP омогућен на главној машини.
Инсталација
-
Покрените виртуелну машину уређаја са преузете слике.
-
Конфигуришите мрежна подешавања виртуелне машине да бисте омогућили приступ из прегледача на главној машини. Ово се може постићи омогућавањем Bridged mode.
-
Пријавите се на виртуелну машину користећи подразумеване системске credentials.
-
Да бисте преузели IP адресу, покрените следећу команду на виртуелној машини:
ip addr show-
Отворите прегледач на главној машини и усмерите га на IP адресу коју је уређај добио преко DHCP-а.
-
Пријавите се на Zabbix користећи подразумеване акредитиви и почните са праћењем.
Конфигурација
Овај одељак описује често потребна подразумевана подешавања конфигурације заједно са доступним опцијама прилагођавања.
Акредитиви
Систем
- Корисничко име: root
- Лозинка: zabbix
Zabbix кориснички интерфејс
- Корисничко име: Admin
- Лозинка: zabbix
Након пријављивања, можете променити подразумевану лозинку у подешавањима корисничког профила или креирати нове кориснике и обрисати подразумевану.
База података
Лозинке за све кориснике базе података се насумично генеришу током процеса инсталације. За базу података су дефинисани следећи корисници:
Root:
- Корисничко име: root
- Лозинка: лозинка је сачувана у датотеци
/root/.my.cnf. Није потребно уносити лозинку под root налогом.
Zabbix сервер:
- Корисничко име: zabbix_srv
- Лозинка: лозинка је сачувана у
/etc/zabbix/zabbix\_server.conf
Zabbix кориснички интерфејс:
- Корисничко име: zabbix_web
- Лозинка: лозинка је сачувана у
/etc/zabbix/web/zabbix.conf.php
Да бисте променили лозинку корисника базе података, измените је у MySQL-у и одговарајућој конфигурационој датотеци.
Приступ корисничком интерфејсу
Zabbix кориснички интерфејс се може приступити на http://<ИП адреса виртуелне машине>.
Подразумевано, приступ је дозвољен са било ког места. Да бисте ограничили приступ, измените /etc/nginx/conf.d/zabbix.conf.
Након чувања измењене датотеке, поново покрените Nginx пријављивањем путем SSH као root корисник и извршавањем:
systemctl restart nginxСтатичка IP адреса
Подразумевано, уређај користи DHCP за добијање IP адресе. Да бисте подесили статичку IP адресу:
- Пријавите се као root корисник.
- Покрените следеће команде, замењујући вредности својим прилагођеним IP адресама:
nmcli connection modify eth0 ipv4.addresses 192.168.1.10/24 # IP адреса уређаја/CIDR префикс
nmcli connection modify eth0 ipv4.gateway 192.168.1.1 # IP адреса гејтвеја
nmcli connection modify eth0 ipv4.dns 8.8.8.8 # IP адреса DNS сервера
nmcli connection modify eth0 ipv4.method manual
systemctl restart network
Алтернативно, можете отворити датотеку /etc/NetworkManager/system-connections/eth0.nmconnection и додати следеће линије:
[ipv4]
address1=192.168.1.10/24,192.168.1.1
dns=8.8.8.8
method=manual
Након чувања измењене датотеке, покрените команду systemctl restart network.
- Firewall конфигурација
Уређај користи iptables заштитни зид са унапред дефинисаним правилима:
- Отворен SSH порт (22 TCP);
- Отворен Zabbix агент (10050 TCP) и Zabbix трапер (10051 TCP) портови;
- Отворени HTTP (80 TCP) и HTTPS (443 TCP) портови;
- Отворен SNMP трап порт (162 UDP);
- Отворен одлазне везе на NTP порт (53 UDP);
- ICMP пакети ограничени на 5 пакета у секунди;
- Све остале долазне везе се прекидају.
Да бисте отворили додатне портове, измените датотеку /etc/sysconfig/iptables и поново учитајте правила заштитног зида:
systemctl reload iptablesРепозиторијуми
Zabbix уређај користи пакет zabbix-release из Zabbix репозиторијума.
Репозиторијуми су конфигурисани у директоријуму /etc/yum.repos.d/*.
Временска зона
Подразумевано, уређај користи UTC за системски сат.
Да бисте променили временску зону, копирајте одговарајућу датотеку из /usr/share/zoneinfo у /etc/localtime, на пример:
cp /usr/share/zoneinfo/Europe/Riga /etc/localtimeZabbix временска зона за кориснички интерфејс се подешава посебно и може се променити у подешавањима корисничког интерфејса. Подразумевана временска зона за Zabbix кориснички интерфејс је Европа/Рига.
Локације датотека
- Конфигурационе датотеке се налазе у /etc/zabbix.
- Zabbix сервер, проки и лог фајлови агента се налазе у/var/log/zabbix.
- Zabbix кориснички интерфејс се налази у /usr/share/zabbix.
- Почетни директоријум за корисника zabbix је /var/lib/zabbix.
Системске услуге
Системске услуге су доступне. Да бисте видели листу Zabbix услуга, покрените следећу команду на виртуелној машини:
systemctl list-units zabbix*Image format-specific notes
VMware
Слике у vmdk формату могу се директно користити у VMware Player, Server и Workstation производима. За употребу у ESX, ESXi и vSphere, морају се конвертовати помоћу VMware vCenter Converter (потребна је аутентификација за преузимање). Ако користите VMware vCenter Converter, можете наићи на проблеме са хибридним мрежним адаптером. У том случају, можете покушати да наведете E1000 адаптер током процеса конверзије. Алтернативно, након што је конверзија завршена, можете избрисати постојећи адаптер и додати E1000 адаптер.
HDD/flash image (raw)
Да бисте покренули слику, покрените:
dd if=./zabbix_appliance_7.0.0.raw of=/dev/sdc bs=4k conv=fdatasyncЗамените /dev/sdc путањом до вашег флеш/HDD диска.
Hyper-V
Ако се уређај не покрене у Hyper-V-у, покушајте да притиснете Ctrl+Alt+F2 да бисте пребацили TTY сесију.
Решавање проблема
Ако наиђете на поруку о грешци Приступ одбијен за корисника 'replace_user'@'localhost' (користећи лозинку: ДА) док покушавате да се пријавите на кориснички интерфејс, то може указивати на то да је инсталација још увек у току.
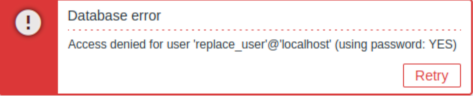
Ако грешка и даље постоји након неколико минута чекања или ако приметите било какво друго неочекивано понашање, то вероватно значи да процес инсталације није успешно завршен. У овом случају, препоручујемо да избришете тренутни уређај и поново га инсталирате пратећи иста упутства за инсталацију. Овај корак обично решава проблем.
Имајте на уму да се не препоручује покушај ручног поправљања неисправне инсталације, јер може довести до даљих компликација.