1 Конфигурисање мрежне мапе
Преглед
Конфигурисање мапе у Zabbix-у захтева да прво креирате мапу дефинисањем њених општих параметара, а затим почнете да попуњавате стварну мапу елементима и њиховим везама.
Можете попунити мапу елементима који су хост, група хостова, окидач, слика или нека друга мапа.
Иконе се користе за представљање елемената мапе. Можете дефинисати информације које ће се приказивати помоћу икона и подесити да се недавни проблеми приказују на посебан начин. Можете повезати иконе и дефинисати информације које ће се приказивати на везама.
Можете додати прилагођене URL-ове којима ће бити доступно кликом на иконе. Тако можете повезати икону хоста са својствима хоста или икону мапе са другом мапом.
Број проблема на мапама се приказује само за узрок проблема.
Мапе се управљају у Праћење → Мапе, где се могу конфигурисати, управљати и прегледати. У приказу за праћење, можете кликнути на иконе и искористити везе до неких скрипти и URL-ова.
Мрежне мапе су засноване на векторској графици (SVG).
Јавне и приватне мапе
Сви корисници у Zabbix-у (укључујући и кориснике који нису администратори) могу да креирају мрежне мапе. Мапе имају власника - корисника који их је креирао. Мапе могу бити јавне или приватне.
- Јавне мапе су видљиве свим корисницима, мада да би их видео, корисник мора имати приступ за читање барем једног елемента мапе. Јавне мапе могу се уређивати у случају да корисник/корисничка група има дозволе за читање и писање за ову мапу и барем дозволе за читање свих елемената одговарајуће мапе, укључујући окидаче у линковима.
<!-- -->- Приватне мапе су видљиве само њиховом власнику и корисницима/корисничким групама са којима је мапа дељена од стране власника. Редовни корисници (корисници који нису супер администратори) могу да деле само са групама и корисницима чији су чланови. Корисници са администраторским нивоом могу да виде приватне мапе без обзира да ли су власник или припадају листи дељених корисника. Приватне мапе може да уређује власник мапе и у случају да корисник/корисничка група има дозволе за читање и писање за ову мапу и бар дозволе за читање свих елемената одговарајуће мапе, укључујући окидаче у линковима.
Елементи мапе за које корисник нема дозволу за читање приказују се сивом иконом, а све текстуалне информације о елементу су скривене. Међутим, ознака окидача је видљива чак и ако корисник нема дозволу за окидач.
Да би додао елемент на мапу, корисник мора имати и бар дозволу за читање елемента.
Креирање мапе
Да бисте креирали мапу, урадите следеће:
- Идите на Праћење → Мапе
- Идите на приказ са свим мапама
- Кликните на Креирај мапу
Такође можете користити дугме Клонирај у форми за конфигурацију постојеће мапе да бисте креирали нову мапу. Ова мапа ће имати сва својства постојеће мапе, укључујући опште атрибуте распореда, као и елементе постојеће мапе.
Картица Мапа садржи опште атрибуте мапе:

Сва обавезна поља за унос су означена црвеном звездицом.
Општи атрибути мапе:
| Parameter | Description |
|---|---|
| Власник | Име власника мапе. |
| Име | Јединствено име мапе. |
| Ширина | Ширина мапе у пикселима. |
| Висина | Висина мапе у пикселима. |
| Позадинска слика | Користи позадинску слику: Без слике - нема позадинске слике (бела позадина) Слика - изабрана слика која ће се користити као позадинска слика. Можете користити географску мапу или било коју другу слику да бисте побољшали своју мапу. |
| Размера позадине | Користи скалирање позадине: Ниједно - без скалирања; Пропорционално - покрива целу позадину мапе, али задржи пропорције слике (подразумевано). |
| Аутоматско мапирање икона | Можете подесити да користите аутоматско мапирање икона, конфигурисано у Администрација → Опште → Мапирање икона. Мапирање икона омогућава мапирање одређених икона на одређена поља инвентара домаћина. |
| Истицање икона | Ако означите ово поље, елементи мапе ће бити истакнути. Елементи са активним окидачем добиће округлу позадину, у истој боји као и окидач највише озбиљности. Штавише, око круга ће се приказати дебела зелена линија ако су сви проблеми потврђени. Елементи са статусом "онемогућено" или "у одржавању" добиће квадратну позадину, сиву и наранџасту, респективно. Погледајте такође: Преглед мапа |
| Означавање елемената при промени статуса окидача | Недавна промена статуса окидача (недавни проблем или решење) биће истакнути маркерима (црвени троуглови усмерени ка унутра) са три стране иконе елемента које су слободне од ознаке. Маркери се приказују 30 минута. |
| Приказ проблема | Изаберите како се проблеми приказују са елементом мапе: Прошири један проблем - ако постоји само један проблем, приказује се назив проблема. У супротном, приказује се укупан број проблема. Број проблема - приказује се укупан број проблема Број проблема и проширивање најкритичнијег - приказује се назив најкритичнијег проблема и укупан број проблема. 'Most critical' се одређује на основу озбиљности проблема и, ако је једнак, ID проблема догађаја (прво се приказује већи ID или каснији проблем). За елемент мапе окидача, заснива се на озбиљности проблема и, ако је једнака, на позицији окидача на листи окидача. У случају више проблема истог окидача, приказаће се најновији. |
| Напредне ознаке | Ако означите ово поље, моћи ћете да дефинишете одвојене типове ознака за одвојене типове елемената. |
| Тип ознаке елемента мапе | Тип ознаке који се користи за елементе мапе: Ознака - ознака елемента мапе IP адреса - IP адреса Назив елемента - назив елемента (на пример, име домаћина) Само статус - само статус (ОК или ПРОБЛЕМ) Ништа - ознаке се не приказују |
| Локација ознаке елемента мапе | Локација ознаке у односу на елемент мапе: Доле - испод елемента мапе Лево - лево Десно - десно Горе - изнад елемента мапе |
| Приказ ознака елемената мапе | Изаберите како да се приказују ознаке елемената мапе: Увек - увек се приказује (подразумевано); Аутоматски сакриј - сакриј ознаку ако се не пређе мишем преко ње или се не изабере. |
| Приказ ознака линкова | Изаберите како да се приказују ознаке линкова: Увек - увек се приказује (подразумевано); Аутоматски сакриј - сакриј ознаку ако се не пређе мишем преко ње или се не изабере. |
| Приказ проблема | Прикажи број проблема као: Све - биће приказан цео број проблема Раздвојено - број непотврђених проблема биће приказан одвојено као број од укупног броја проблема Само непотврђени - биће приказан само број непотврђених проблема |
| Минимална озбиљност окидача | Проблеми испод изабраног минималног нивоа озбиљности неће бити приказани на мапи. На пример, ако је изабрано Упозорење, промене са окидачима нивоа Информације и Није класификовано неће бити одражене на мапи. |
| Приказ потиснутих проблема | Означите поље за потврду да бисте приказали проблеме који би иначе били потиснути (не би били приказани) због одржавања домаћина. |
| URL-ови | URL-ови (до 2048 карактера) могу се дефинисати за сваки тип елемента. Такође се може дефинисати ознака за URL. Они ће бити приказани као линкови када корисник кликне на елемент у режиму прегледа мапе. Макрои се могу користити у именима и вредностима URL-ова мапе. За комплетну листу погледајте подржане макрое и потражите 'map URL names and values'. |
Дељење
Картица Дељење садржи тип карте, као и опције дељења (корисничке групе, корисници) за приватне мапе:

| Parameter | Description |
|---|---|
| Type | Изаберите тип карте: Приватна - мапа је видљива само одабраним групама корисника и корисницима Јавна - мапа је видљива свима |
| List of user group shares | Изаберите групе корисника којима је мапа доступна. Можете дозволити приступ само за читање или за читање-уписивање. |
| List of user shares | Изаберите кориснике којима је мапа доступна. Можете дозволити приступ само за читање или за читање-уписивање. |
Када кликнете на Додај да сачувате ову мапу, направили сте празну мапу са именом, димензијама и одређеним преференцама. Сада треба да додате неки елементи. За то кликните на Уреди на листи мапа да бисте отворили област за уређивање.
Додавање елемената
Да бисте додали елемент, кликните на Додај поред Map element. Нови елемент
ће се појавити у горњем левом углу мапе. Превуците га и испустите где год
желите.
Имајте на уму да ће се са опцијом мреже "Укључено", елементи увек поравнати са мрежом (можете одабрати различите величине мреже из падајућег менија, а такође и сакрити/приказати мрежу). Ако желите да поставите елементе било где без поравнања, кликните на опцију "Искључити". (Можете касније поравнати насумичне елементе са мрежом, кликом на Поравнај елементе мапе.)
Сада када имате неке елементе на свом месту, можда ћете желети да почнете да их диференцирате давањем имена, итд. Кликом на елемент, приказује се форма и можете подесити тип елемента, дати име, изабрати другу икону, итд.
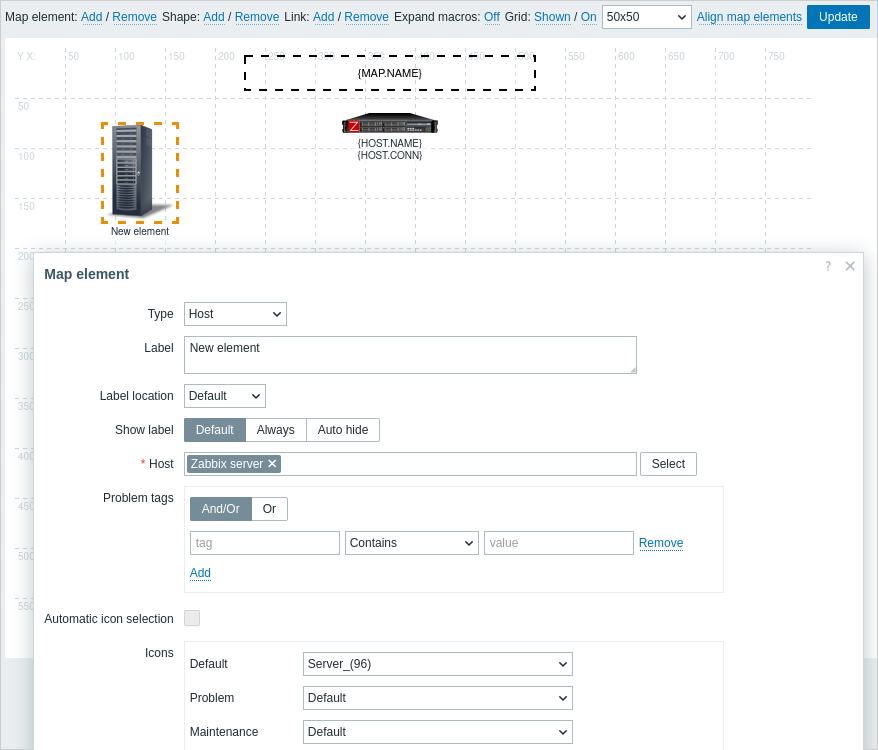
Атрибути елемента мапе:
| Parameter | Description |
|---|---|
| Тип | Тип елемента: Домаћин - икона која представља статус свих окидача изабраног домаћоина Мапа - икона која представља статус свих елемената мапе Окидач - икона која представља статус једног или више окидача Група домаћина - икона која представља статус свих окидача свих домаћина који припадају изабраној групи Слика - икона која није повезана ни са једним ресурсом |
| Ознака | Ознака иконе, било који стринг. Могу се користити макрои и вишередни стрингови. Израз макрои је подржан у овом пољу, али само са функцијама avg, last, min и max, са временом као параметром (на пример, {?avg(/host/key,1h)}).За комплетну листу подржаних макроа, погледајте подржане макрое и потражите 'map element labels'. |
| Приказ ознаке | Изаберите како да се прикаже ознака елемента: Подразумевано - користите подешавања Приказ ознаке елемената мапе из конфигурације мапе (подразумевано); Увек - увек се приказује (подразумевано); Аутоматско сакривање - сакријте ознаку ако се на њу не задржи показивач миша или није изабрана. |
| Локација ознаке | Локација ознаке у односу на икону: Подразумевано - подразумевана локација ознаке мапе Доле - испод иконе Лево - лево Десно - десно Горе - изнад иконе |
| Домаћин | Унесите домаћина ако је тип елемента 'Host'. Ово поље се аутоматски попуњава, тако да ће се приликом почетка куцања имена домаћина појавити падајући мени са одговарајућим домаћинима. Померите се надоле да бисте изабрали. Кликните на 'x' да бисте уклонили изабрано. |
| Мапа | Изаберите мапу ако је тип елемента 'Map'. Ово поље се аутоматски попуњава, тако да ће се приликом почетка куцања имена мапе појавити падајући мени са одговарајућим мапама. Померите се надоле да бисте изабрали. Кликните на 'x' да бисте уклонили изабрано. |
| Окидачи | Ако је тип елемента 'Trigger', изаберите један или више окидача у пољу Нови окидачи испод и кликните на Додај. Редослед изабраних окидача може се променити, али само у оквиру исте озбиљности окидача. Вишеструки избор окидача такође утиче на резолуцију макроа {HOST.*} и у режиму уређивања и у режиму прегледа. // 1 У режиму уређивања// први приказани макрои {HOST.*} биће решени у зависности од првог окидача на листи (на основу озбиљности окидача). // 2 Режим прегледа// зависи од параметра Приказ проблема у Општим атрибутима мапе. * Ако је изабран режим Прошири један проблем, први приказани макрои {HOST.*} биће решени у зависности од последњег откривеног окидача проблема (без обзира на озбиљност) или првог окидача на листи (у случају да није откривен проблем); * Ако је изабран режим Број проблема и прошири најкритичнији, први приказани макрои {HOST.*} биће решени у зависности од озбиљности окидача. |
| Група домаћина | Унесите групу домаћина ако је тип елемента 'Host group'. Ово поље се аутоматски попуњава, тако да када почнете да куцате име групе, појавиће се падајући мени са одговарајућим групама. Померите се надоле да бисте изабрали. Кликните на 'x' да бисте уклонили изабрано. |
| Ознаке | Наведите ознаке да бисте ограничили број проблема приказаних у виџету. Могуће је укључити, као и искључити одређене ознаке и вредности ознака. Може се подесити неколико услова. Подударање имена ознака је увек осетљиво на велика и мала слова. За сваки услов је доступно неколико оператора: Постоји - укључује наведене називе ознака Једнако - укључује наведене називе и вредности ознака (разликује велика и мала слова) Садржи - укључује наведене називе ознака где вредности ознака садрже унети стринг (подударање подстринга, не разликује велика и мала слова) Не постоји - искључује наведене називе ознака Није једнако - искључује наведене називе и вредности ознака (разликује велика и мала слова) Не садржи - искључује наведене називе ознака где вредности ознака садрже унети стринг (подударање подстринга, не разликује велика и мала слова) Постоје два типа израчунавања за услове: И/Или - сви услови морају бити испуњени, услови са истим називом ознаке биће груписани условом Или Или - довољно је ако је испуњен један услов Ово поље је доступно за типове елемената домаћин и група домаћина. |
| Аутоматски избор икона | У овом случају, мапирање икона ће се користити да би се одредило која икона ће се приказати. |
| Иконе | Можете изабрати да прикажете различите иконе за елемент у овим случајевима: подразумевано, проблем, одржавање, онемогућено. |
| Координата X | X координата елемента мапе. |
| Координата Y | Y координата елемента мапе. |
| URL-ови | URL-ови специфични за елемент (до 2048 карактера) могу се подесити за елемент. Такође се може дефинисати ознака за URL. Они ће се приказивати као линкови када корисник кликне на елемент у режиму прегледа мапе. Ако елемент има своје URL-ове и постоје URL-ови на нивоу мапе за његов тип дефинисани, они ће бити комбиновани у истом менију. Макрои се могу користити у именима и вредностима елемената мапе. За комплетну листу погледајте подржане макрое и потражите 'map URL names and values'. |
Додати елементи се не чувају аутоматски. Ако напустите страницу, све измене могу бити изгубљене.
Стога је добра идеја да кликнете на дугме Ажурирај у горњем десном углу. Након клика, измене се чувају без обзира на то шта изаберете у следећем искачућем прозору.
Изабране опције мреже се такође чувају са сваком мапом.
Избор елемената
Да бисте изабрали елементе, изаберите један, а затим држите Ctrl да бисте изабрали други.
Такође можете да изаберете више елемената тако што ћете превући правоугаоник у област која се може уређивати и избор свих елемената у њој.
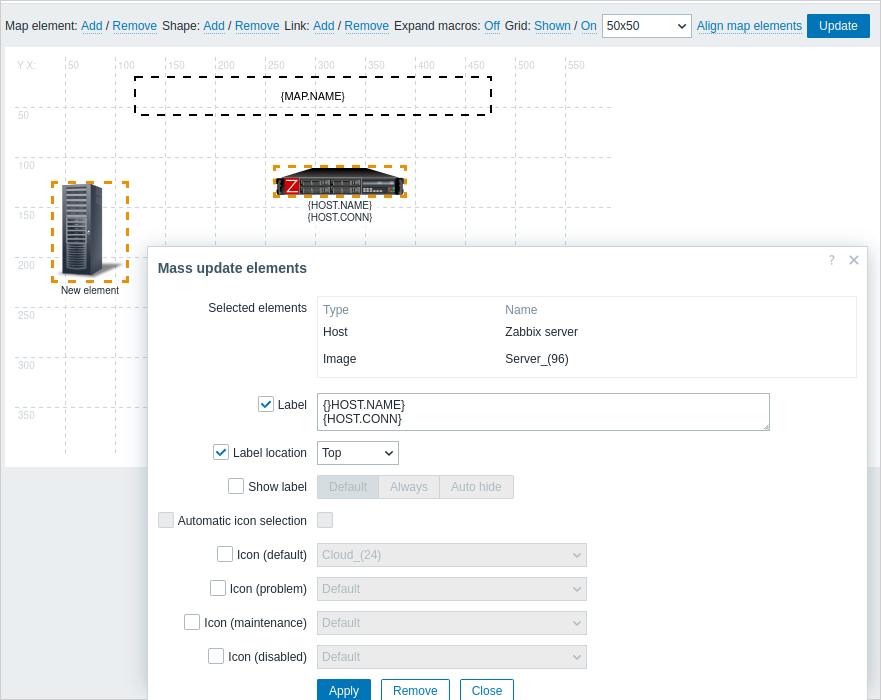
Када изаберете више од једног елемента, образац својства елемента се помера у режим масовног ажурирања тако да можете променити атрибуте изабраног елемената у једном потезу. Да бисте то урадили, означите атрибут користећи поље за потврду и унесите нову вредност за то. Овде можете користити макрое (нпр. {HOST.NAME} за ознаку елемента).
Повезивање елемената
Када поставите неке елементе на мапу, време је да почнете са њиховим повезивањем. Да бисте повезали два елемента, прво их морате изабрати. Када су елементи изабрани, кликните на Додај поред Линка.
Када је линк креиран, образац за један елемент сада садржи додатни одељак Линкови. Кликните на Уреди да бисте изменили атрибуте линка.

Атрибути линка:
| Parameter | Description |
|---|---|
| Ознака | Ознака која ће се приказивати преко линка. Изрази макрои су подржани у овом пољу, али само са функцијама avg, last, min и max, са временом као параметром (на пример, {?avg(/host/key,1h)}). |
| Прикажи ознаку | Изаберите како да се приказује ознака везе: Подразумевано - користите подешавања Прикажи ознаке елемената мапе из конфигурације мапе (подразумевано); Увек - увек се приказује (подразумевано); Аутоматско сакривање - сакријте ознаку ако се преко ње не задржи показивач миша или ако се не изабере. |
| Повежи се са | Елемент са којим се линк повезује. |
| Тип (ОК) | Подразумевани стил линка: Линија - једна линија Подебљана линија - подебљана линија Тачка - тачке Испрекидана линија - испрекидана линија |
| Боја (ОК) | Подразумевана боја линка. |
| Тип индикатора | Изаберите тип индикатора везе: Статичка веза - без индикатора; Окидач - дозвољава индикаторе везе засноване на окидачима; Вредност ставке - дозвољава индикаторе везе засноване на вредности ставке. |
| Ставка | Изаберите ставку. Вредност ове ставке ће утицати на стил везе. Ово поље је доступно само ако је у пољу Тип индикатора изабрана опција "Вредност ставке". |
| Индикатори | Листа индикатора линкова. Окидачи Ако је у пољу Тип индикатора изабрано "Окидач", кликните на Додај да бисте додали окидаче. Изаберите стил окидача (боја, тип линије). У случају да окидач има статус ПРОБЛЕМ, његов стил ће бити примењен на линк. Прагови/шаблони вредности ставке Ако је у пољу Тип индикатора изабрано "Вредност ставке", додајте прагове вредности ставке (за нумеричку ставку) или обрасце (за текстуалну ставку). Изаберите стил прага/шаблона (боја, тип линије). Ако вредност ставке достигне наведени праг (или се подудара са шаблоном), њен стил ће бити примењен на линк. |
Померање и копирање и лепљење елемената
Неколико изабраних елемената може да се премести на друго место на мапи кликом на један од изабраних елемената, држећи миш дугме и померање курсора на жељену локацију.
Један или више елемената се могу копирати тако што ћете изабрати елементе кликом на изабрани елемент десним тастером миша и избором Копирај из менија.
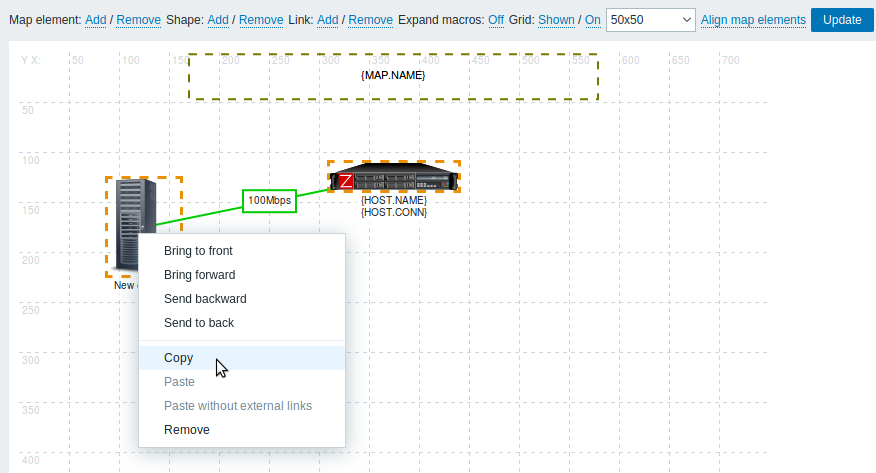
Да бисте налепили елементе, кликните на област мапе десним тастером миша и изаберите Налепи из менија. Налепи без спољних веза опција ће налепити елементе задржавајући само везе које су између изабране елементе.
Копирање и лепљење ради у оквиру истог прозора прегледача. Пречице на тастатури нису подржани.
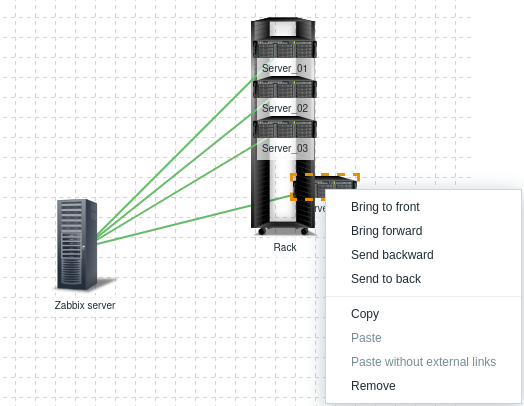
Редослед елемената
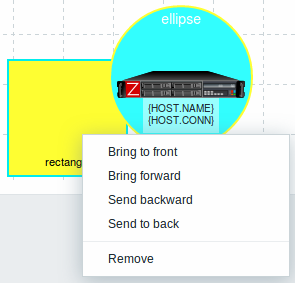
Да бисте један елемент поставили испред другог (или обрнуто), кликните на елемент десним тастером миша и изаберите Премести напред/Премести у први план или Пошаљи уназад/Пошаљи позади.
Додавање облика
Поред елемената мапе, могуће је додати и неке облике. Облици нису елементи мапе; они су само визуелни приказ. На пример, правоугаони облик може се користити као позадина за груписање неких домаћина. Могу се додати правоугаони и облици елипсе.
Да бисте додали облик, кликните на Додај поред Облика. Нови облик ће се појавити у горњем левом углу мапе. Превуците га и испустите где год желите.
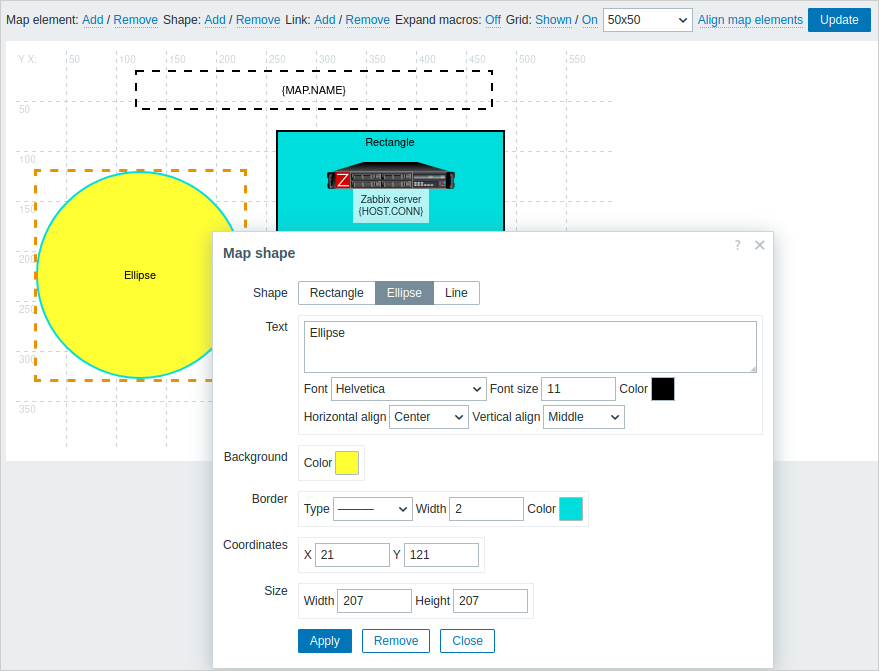
Нови облик се додаје са подразумеваним бојама. Кликом на облик, приказује се форма и можете прилагодити изглед облика, додати текст, итд.
Да бисте изабрали облике, изаберите један, а затим држите притиснут Ctrl да бисте изабрали остале. Када је изабрано неколико облика, заједничка својства се могу масовно ажурирати, слично као и код елемената.
Текст се може додати у облике. Израз
макрои су подржани у
тексту, али само са функцијама avg, last, min и max, са
временом као параметром (на пример, {?avg(/host/key,1h)}).
Да би се приказивао само текст, облик се може учинити невидљивим уклањањем ивице облика (изаберите 'None' у пољу Ивица). На пример, обратите пажњу на то како је макро {MAP.NAME}, видљив на горњем снимку екрана, заправо правоугаони облик са текстом, што се може видети када се кликне на макро:
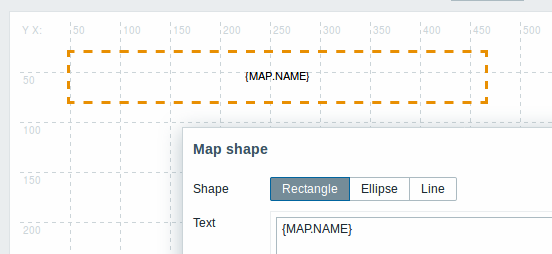
{MAP.NAME} се разрешава као конфигурисано име мапе приликом прегледа мапе.
Ако се хиперлинкови користе у тексту, они постају кликабилни приликом прегледа мапе.
Прелом редова за текст је увек "укључен" унутар облика. Међутим, унутар елипсе, линије се преламају као да је елипса правоугаоник. Прелом речи није имплементиран, тако да се дугачке речи (речи које не одговарају облику) не преламају, већ се маскирају (на страници за уређивање мапе) или се исецају (друге странице са мапама).
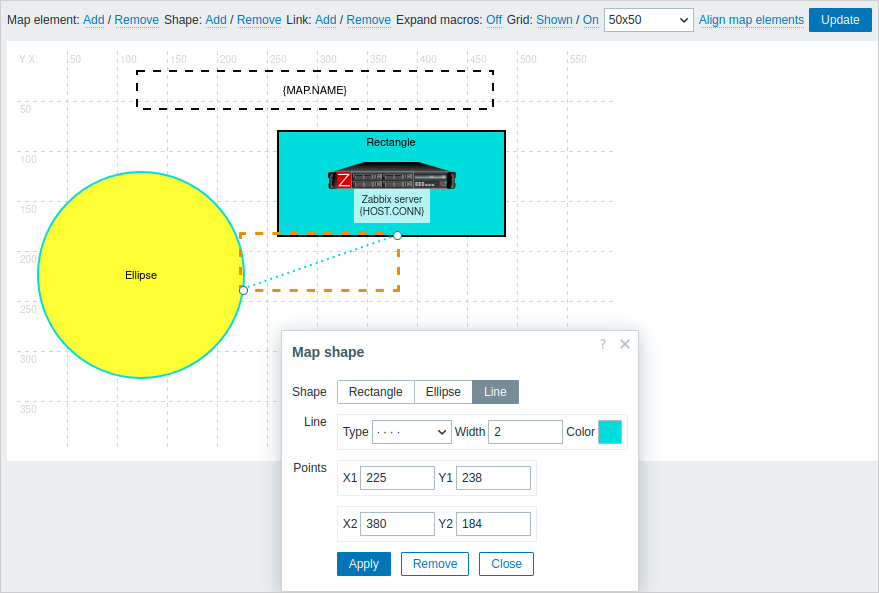
Додавање линија
Поред облика, могуће је додати и неке линије. Линије се могу користити за повезивање елемената или облика на мапи.
Да бисте додали линију, кликните на Додај поред Облика. Нови облик ће се појавити на горњем левом углу мапе. Изаберите га и кликните на Линија у уређивању форме да бисте променили облик у линију. Затим подесите линију својства, као што су тип линије, ширина, боја итд.
Наручивање облика и линија
Да бисте поставили један облик испред другог (или обрнуто), кликните на облик десним тастером миша који отвара мени облика карте.