
Available solutions

PagerDuty webhook
Overview
This guide describes how to integrate your Zabbix installation with PagerDuty using the Zabbix webhook feature, providing instructions on setting up a media type, user, and action in Zabbix.
Why PagerDuty + Zabbix
- Notify on-call responders based on alerts sent from Zabbix.
- Send enriched event data from Zabbix, including operational data triggered during the event.
- Create high- and low-urgency incidents based on the severity of the event from Zabbix.
- Problem updates are synchronized to PagerDuty from Zabbix.
- Incidents will automatically resolve in PagerDuty when the metric in Zabbix returns to normal.
How it works
- When a trigger fires, Zabbix sends an event to a service in PagerDuty. Events from Zabbix will trigger a new incident on the corresponding PagerDuty service or will be grouped as alerts into an existing incident.
- Once the trigger is resolved, a resolving event will be sent to the PagerDuty service to resolve the alert and the associated incident on that service.
Supported versions
PagerDuty integrations with Zabbix require an Events API v2 key. If you do not have permission to create an Event API v2 key, please reach out to an Admin or Account Owner within your organization to help you configure the integration.
Requirements
Zabbix version: 7.4 and higher.
Parameters
After importing the webhook, you can configure it using webhook parameters.
Configurable parameters
The configurable parameters are intended to be changed according to the webhook setup as well as the user's preferences and environment.
| Name | Value | Description |
|---|---|---|
| tls_verify | {$HTTP.TLS.VERIFY:"PagerDuty"} | TLS certificate verification for HTTP requests: "none" - disabled, "peer" - verify the certificate chain and expiration, "full" - full verification. Any other value enables full verification. To override the setting for this media type only, define the global macro with the context "PagerDuty", e.g. {$HTTP.TLS.VERIFY:"PagerDuty"}. |
| zabbix_url | {$ZABBIX.URL} | Current Zabbix URL. |
Internal parameters
Internal parameters are reserved for predefined macros that are not meant to be changed.
| Name | Value | Description |
|---|---|---|
| event_source | {EVENT.SOURCE} | Numeric value of the event source. Possible values: 0 - Trigger, 1 - Discovery, 2 - Autoregistration, 3 - Internal, 4 - Service. |
| event_value | {EVENT.VALUE} | Numeric value of the event that triggered an action (1 for problem, 0 for recovering). |
| event_nseverity | {EVENT.NSEVERITY} | Numeric value of the event severity. Possible values: 0 - Not classified, 1 - Information, 2 - Warning, 3 - Average, 4 - High, 5 - Disaster. |
| event_severity | {EVENT.SEVERITY} | Name of the event severity. |
| event_update_nseverity | {EVENT.UPDATE.NSEVERITY} | Numeric value of the event update severity. Possible values: 0 - Not classified, 1 - Information, 2 - Warning, 3 - Average, 4 - High, 5 - Disaster. |
| event_update_severity | {EVENT.UPDATE.SEVERITY} | Name of the event update severity. |
| event_update_status | {EVENT.UPDATE.STATUS} | Numeric value of the problem update status. Possible values: 0 - Webhook was called because of problem/recovery event, 1 - Update operation. |
| alert_subject | {ALERT.SUBJECT} | 'Default subject' value from action configuration. |
| alert_message | {ALERT.MESSAGE} | 'Default message' value from action configuration. |
| event_ack | {EVENT.ACK.STATUS} | Acknowledgment status of the event (Yes/No). |
| event_id | {EVENT.ID} | Numeric ID of the event that triggered an action. |
| trigger_id | {TRIGGER.ID} | Numeric ID of the trigger of this action. |
| host_ip | {HOST.IP} | Host IP address |
| host_name | {HOST.NAME} | Visible host name. |
| api_token | {ALERT.SENDTO} | Integration token that is used to access the PagerDuty HTTP API. |
Please be aware that each webhook supports an HTTP proxy. To use this feature, add a new media type parameter with the name
http_proxyand set its value to the proxy URL.
Service setup
-
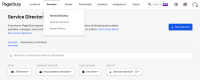
From the PagerDuty Service menu, select Service Directory.
-
On your Services page:
- If you are creating a new service for your integration, click +New Service.
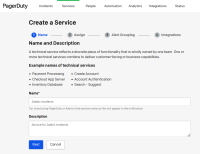
- Set the name and description for the new service.
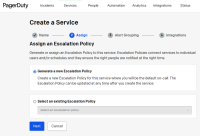
- Assign an escalation policy (required).
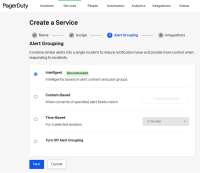
- Enable alert grouping.
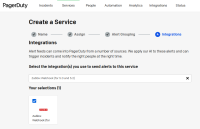
- In the Integrations section, select the Zabbix Webhook using the search field and click Create service.
-
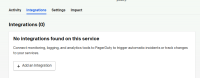
If you are adding your integration to an existing service, click the name of the service you want to add the integration to. Then click the Integrations tab and click the +Add an Integration button, select the Zabbix Webhook using the search field, and click Add.
-
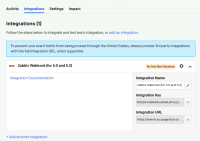
After successfully adding the integration, use its Integration Key in the token macros for the PagerDuty Zabbix media type.


Zabbix configuration
The configuration includes a media type in Zabbix that invokes a webhook to send alerts to PagerDuty through the PagerDuty Event API v2. To use this media type, we will create a Zabbix user to represent PagerDuty and set up an alert action to notify this user whenever a problem is detected.
Create global macro
1. In the Zabbix web interface, go to Administration > Macros.
2. Add the macro {$ZABBIX.URL} with Zabbix frontend URL (for example, http://192.168.7.123:8081).

3. Click the Update button to save.
Create the PagerDuty media type
1. In the Zabbix interface Alerts > Media types section, click the Import button.

2. Select the import file media_pagerduty.yaml and click the Import button at the bottom to import the PagerDuty media type.
Create the PagerDuty user for alerting
1. In the Zabbix interface, go to Users > Users and click the Create user button.

2. Assign the new user the username "PagerDuty User". The default settings should suffice as this user will not be logging into Zabbix.
3. Click the Select button next to Groups.

- Please note that in order to be able to notify on problems with host, this user must have at least read permissions for the respective host.
4. Click on the Media tab and, inside the Media box, click the Add button.

5. In the new window that appears, configure the media for the user as follows:

- For the Type, select PagerDuty (the new media type that was created).
- Specify the token as the user's Send to field.
- Make sure the Enabled box is checked.
- Click the Add button when done.
6. Click the Add button at the bottom of the user page to save the user.
7. Use the PagerDuty User in any actions of your choice.
For more information, please see the Zabbix and PagerDuty documentation.
Feedback
Please report any issues with the media type at https://support.zabbix.com.
You can also provide feedback, discuss the media type, or ask for help at ZABBIX forums.

 7
7