
14 スケジュールレポート
概要
このセクションでは、スケジュールレポートの設定について説明します。
前提条件:
- スケジュールレポートを作成するためには、Zabbix Webサービスがインストールされ、正しく設定されている必要があります。 Setting up scheduled reports に手順が記載されています。
-
ユーザーは、Admin または Super admin タイプの user role を持ち、以下の権限を持つ必要があります。:
- *Access to UI elements* ブロックの *Scheduled reports*(レポートを表示する)
- *Access to actions* ブロックの *Manage scheduled reports* (レポートの作成/編集) をクリックします。
現在、スケジュールレポートのサポートは実験的なものです。
Zabbixフロントエンドでスケジュールレポートを作成するには、以下の手順で行います:
- Reports → Scheduled reports にアクセスします。
- 画面右上の Create report をクリックします。
- レポートのパラメータをフォームに入力します。
また、既存のレポートを開いてCloneボタンを押し、別の名前で保存することでレポートを作成することも可能です。
設定
スケジュールレポートタブには、一般的なレポート属性が含まれています。
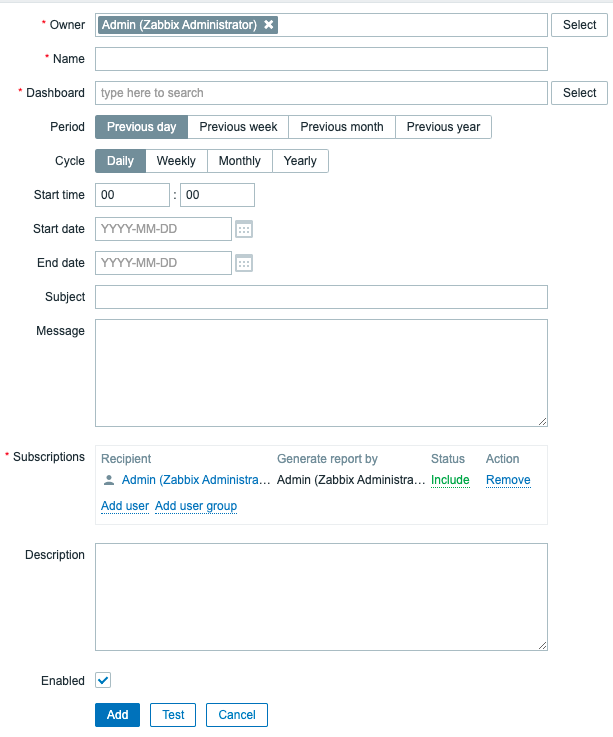
必須入力項目には、赤いアスタリスクが表示されています。
| パラメータ | 説明 |
|---|---|
| Owner | User that creates a report. Super admin level users are allowed to change the owner. For Admin level users, this field is read-only. |
| Name | Name of the report; must be unique. |
| Dashboard | Dashboard on which the report is based; only one dashboard can be selected at a time. To select a dashboard, start typing the name - a list of matching dashboards will appear; scroll down to select. Alternatively, you may click on Select next to the field and select a dashboard from the list in a popup window. If a dashboard contains multiple pages, only the first page will be sent as a report. |
| Period | Period for which the report will be prepared. Select one of the available options: Previous day, Previous week, Previous month, Previous year. |
| Cycle | Report generation frequency. The reports can be sent daily, weekly, monthly, or yearly. Weekly mode allows to select days of the week when the report will be sent. |
| Start time | Time of the day in the format hh:mm when the report will be prepared. |
| Repeat on | Days of the week when the report will be sent. This field is available only if Cycle is set to weekly. |
| Start date | The date when regular report generation should be started |
| End date | The date when regular report generation should be stopped. |
| Subject | Subject of the report email. Supports {TIME} macro. |
| Message | Body of the report email. Supports {TIME} macro. |
| Subscriptions | List of report recipients. By default, includes only the report owner. Any Zabbix user with configured email media may be specified as a report recipient. Press Add user or Add user group to add more recipients. Press on the username to edit settings: Generate report by - whether the report should be generated on behalf of the report owner or the recipient. Status - select Include to send the report to user or Exclude to prevent sending the report to this user. At least one user must have Include status. Exclude status can be used to exclude specific users from a user group that is included. Note that users with insufficient permissions***** will see Inaccessible user or Inaccessible user group instead of the actual names in the fields Recipient and Generate report by; the fields Status and Action will be displayed as read-only. |
| Enabled | Report status. Clearing this checkbox will disable the report. |
| Description | An optional description of the report. This description is for internal use and will not be sent to report recipients. |
*権限不足のユーザーとは、Adminユーザータイプに基づくロールを持ち、受信者またはレポート所有者が所属する
ユーザーグループのメンバーでないユーザーのことを指します。
フォームのボタン
フォームの下部にあるボタンで、いくつかの操作を行うことができます。
 |
Add a report. This button is only available for new reports. |
 |
Update the properties of a report. |
 |
Create another report based on the properties of the current report. |
 |
Test if report configuration is correct by sending a report to the current user. |
 |
Delete the report. |
 |
Cancel the editing of report properties. |
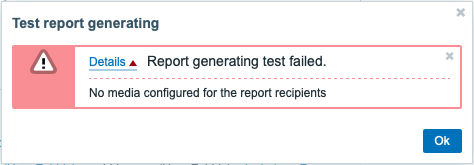
テスト
レポートをテストするには、レポート設定フォームの下部にあるTest ボタンをクリックします。
ダッシュボードaction menu. からレポート設定フォームが開かれている場合、テストボタンは使用できません。
設定が正しければ、テストレポートは現在のユーザーに直ちに送信されます。テストレポートでは、購読者と 'generated by'
ユーザーの設定は無視されます。
設定が正しくない場合、考えられる原因を説明するエラーメッセージが表示されます。
レポートの更新
既存のレポートを更新するには、レポート名を押して、必要な設定変更を行い、更新ボタンを押します。
既存のレポートを他のユーザーが更新し、そのユーザーがダッシュボードを変更した場合、更新ボタンを押すと、
「他のユーザーによって生成されたレポートは、現在のユーザーに変更されます」という警告メッセージが表示されます。
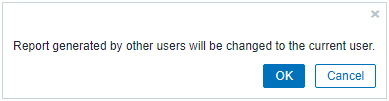
このステップでOKを押すと、以下のように変更されます:
- Generated by 設定は、レポートを最後に編集したユーザーを表示するように更新されます(Generated by が Recipientに設定されている場合を除く)。
- アクセスできないユーザー または アクセスできないユーザーグループ として表示されていたユーザーは、 レポートサブスクライバーのリストから削除されます。
キャンセル を押すと、ポップアップウィンドウが閉じられ、レポートの更新がキャンセルされます。
レポートのクローン
既存のレポートを複製するには、既存のレポート設定フォームの下にある Clone ボタンをクリックします。
他のユーザーによって作成されたレポートを複製する場合、現在のユーザーは新しいレポートの所有者になります。
レポート設定は、ユーザー権限に従って新しいレポート設定フォームにコピーされます。
- レポートのクローンを作成するユーザにダッシュボードに対するパーミッションがない場合、Dashboard フィールドは クリアされます。
- レポートのクローンを作成したユーザーが、Subscriptions リストの一部のユーザーまたはユーザー グループに対する権限を 持っていない場合、アクセスできない受信者はクローン作成されません。
- Generated by の設定は、現在のユーザーを表示するように更新されます(Generated by が受信者に設定されている 場合を除く)
必要な設定とレポート名を変更し、Add を押します。