
11 SAML beállítás az Okta segítségével
Ez a szakasz leírja, hogyan konfigurálható az Okta a SAML 2.0 engedélyezéséhez hitelesítés a Zabbix számára.
Okta configuration
1. Go to https://okta.com and register or sign in to your account.
2. In the Okta web interface navigate to Applications → Applications
and press "Add Application" button
( ).
).
3. Press "Create New App" button
( ).
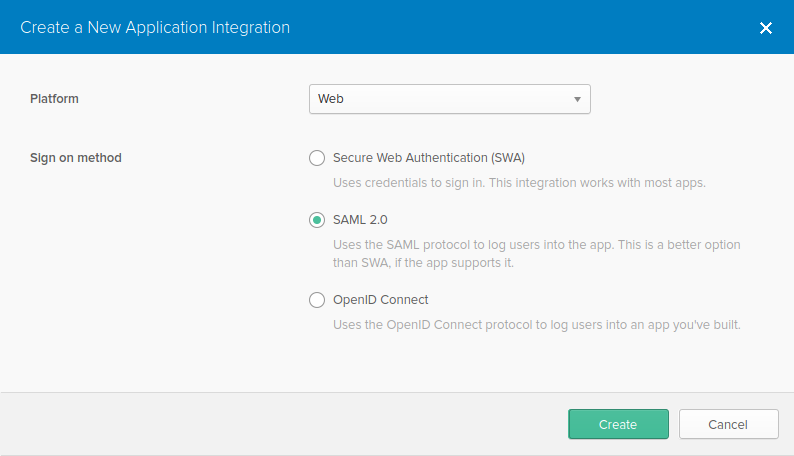
In a popup window select Platform: Web, Sign on method: SAML 2.0 and
press "Create" button.
).
In a popup window select Platform: Web, Sign on method: SAML 2.0 and
press "Create" button.
4. Fill in the fields in the General settings tab (the first tab that appears) according to your preferences and press "Next".
5. In the Configure SAML tab enter the values provided below, then press "Next".
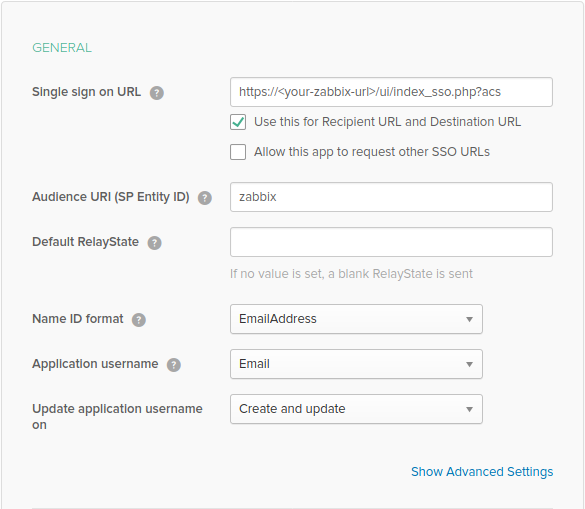
- In the GENERAL section:
- Single sign on URL:
https://<your-zabbix-url>/ui/index_sso.php?acs
The checkbox Use this for Recipient URL and Destination URL should be marked) - Audience URI (SP Entity ID): zabbix
Note, that this value will be used within the SAML assertion as a unique service provider identifier (if not matching, the operation will be rejected). It is possible to specify a URL or any string of data in this field. - Default RelayState:
Leave this field blank; if a custom redirect is required, it can be added in Zabbix in the Administration → Users settings. - Fill in other fields according to your preferences.
- Single sign on URL:
https://<your-zabbix-url>/ui/index_sso.php?acs
If planning to use encrypted connection, generate private and public encryption certificates, then upload public certificate to Okta. Certificate upload form appears when Assertion Encryption is set to Encrypted (click Show Advanced Settings to find this parameter).
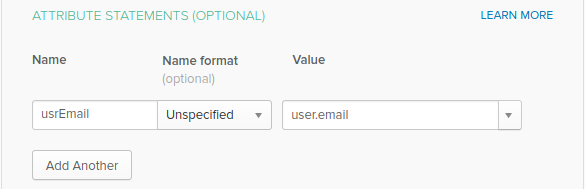
- In the ATTRIBUTE STATEMENTS (OPTIONAL) section add an attribute
statement with:
- Name: usrEmail
- Name format: Unspecified
- Value: user.email
6. At the next tab, select "I'm a software vendor. I'd like to integrate my app with Okta" and press "Finish".
7. Now, navigate to Assignments tab and press the "Assign" button, then select Assign to People from the drop-down.

8. In a popup that appears, assign created app to people that will use SAML 2.0 to authenticate with Zabbix, then press "Save and go back".
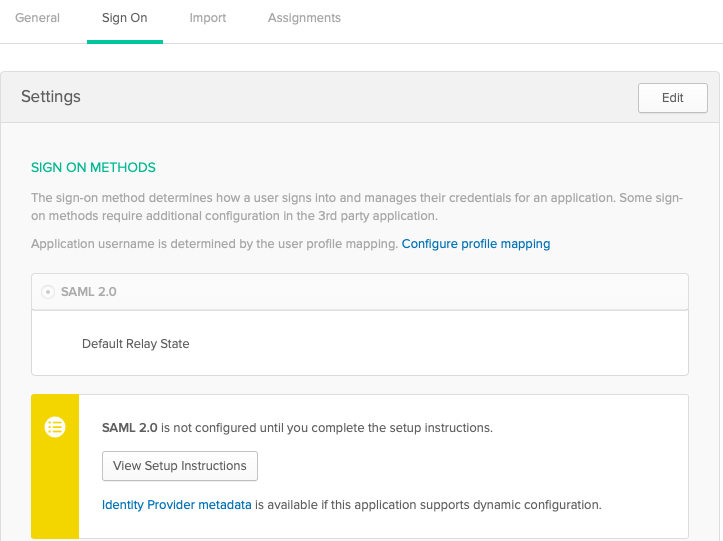
9. Navigate to the Sign On tab and press the "View Setup Instructions" button. Setup instructions will be displayed in a new tab; keep this tab open while configuring Zabbix.
Zabbix konfiguráció
1. A Zabbix alkalmazásban lépjen a SAML beállításokhoz az Adminisztráció → részben Hitelesítés rész, és másolja ki az információkat az Okta beállításból utasításokat a megfelelő mezőkbe:
- Identity Provider Single Sign-On URL → SSO szolgáltatás URL-je
- Identity Provider Issuer → IdP entitásazonosító
- Felhasználónév attribútum → Attribútum neve (usrEmail)
- SP entitásazonosító → Közönség URI
2. Töltse le az Okta beállítási útmutatójában található tanúsítványt oldalt az ui/conf/certs mappába idp.crt néven, és állítsa be a 644-es engedélyt futó:
chmod 644 idp.crtVegye figyelembe, hogy ha egy régebbi verzióról frissített a Zabbix 5.0-ra, akkor manuálisan is hozzá kell adnia ezeket a sorokat a zabbix.conf.php fájlhoz (az //ui/conf/ // könyvtárban található):
// SAML hitelesítéshez használatos.
$SSO['SP_KEY'] = 'conf/certs/sp.key'; // A privát kulcs elérési útja.
$SSO['SP_CERT'] = 'conf/certs/sp.crt'; // A nyilvános kulcs elérési útja.
$SSO['IDP_CERT'] = 'conf/certs/idp.crt'; // IdP nyilvános kulcs elérési útja.
$SSO['BEÁLLÍTÁSOK'] = []; // További beállítások
Lásd az általános SAML Hitelesítés további részletekért.
3. Ha az Assertion Encryption beállítása Titkosított az Oktában, a Az Encrypt paraméter "Assertions" jelölőnégyzetét be kell jelölni Zabbix is.
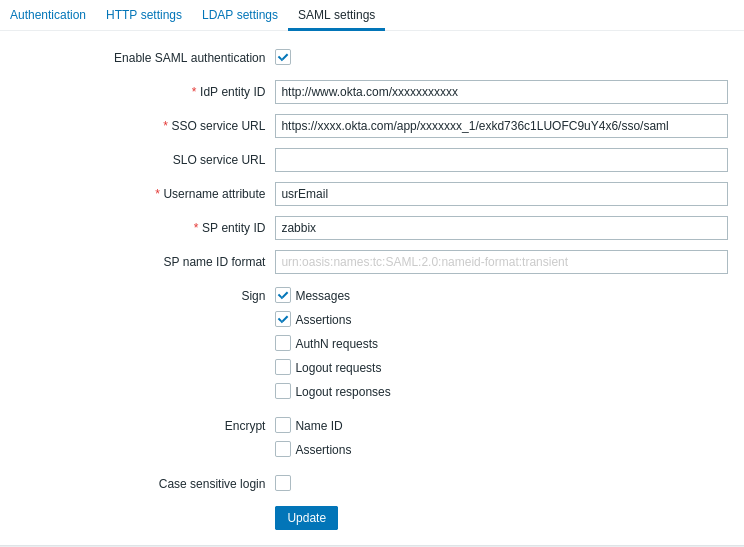
4. A beállítások mentéséhez nyomja meg a „Frissítés” gombot.
A SAML-lel való bejelentkezéshez a Zabbixban lévő felhasználónévnek egyeznie kell az Okta e-mailt. Ezek a beállítások az Adminisztráció → menüpontban módosíthatók Felhasználók rész a Zabbix webes felületén.