
13 使用 Okta 配置 SAML
本节提供有关配置 Okta 的指南,以便为 Zabbix 启用 SAML 2.0 身份验证和用户预配。
Okta 配置
1. 访问 https://developer.okta.com/signup/ 并注册/登录您的账户。
2. 在 Okta web 界面中,导航到 Applications → Applications。
3. 点击 Create App Integration。
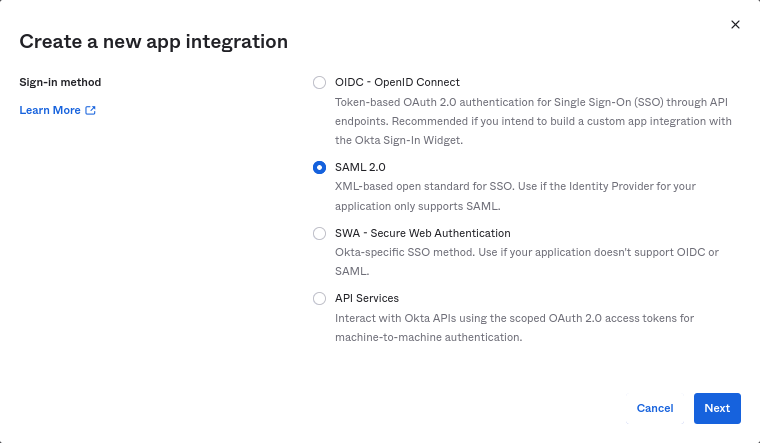
选择 "SAML 2.0" 作为登录方法,然后点击 Next。
4. 在常规设置中,填写应用名称并点击 Next。
5. 在 SAML 配置中,输入下面提供的值,然后点击 Next。
-
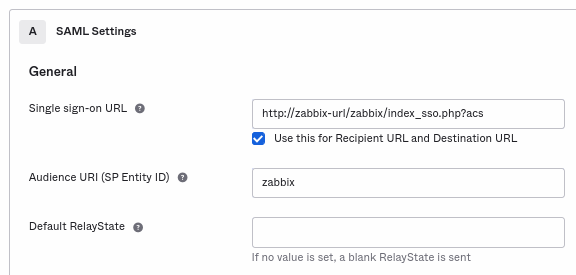
在 General 中添加:
- Single sign-on URL:
http://<your-zabbix-url>/zabbix/index_sso.php?acs
请注意这里使用的是 "http",而不是 "https",这样请求中的acs参数才不会被截断。还应勾选 Use this for Recipient URL and Destination URL 复选框。 - Audience URI (SP Entity ID):
zabbix
请注意,此值将作为唯一的服务提供商标识符用于 SAML 断言中(如果不匹配,操作将被拒绝)。此字段可以指定 URL 或任意字符串数据。 - Default RelayState:
保持此字段为空;如果需要自定义重定向,可以在 Zabbix 的 Users → Users 设置中添加。 - 其他字段请根据您的偏好填写。
- Single sign-on URL:
-
在 Attribute Statements/Group Attribute Statements 中添加:
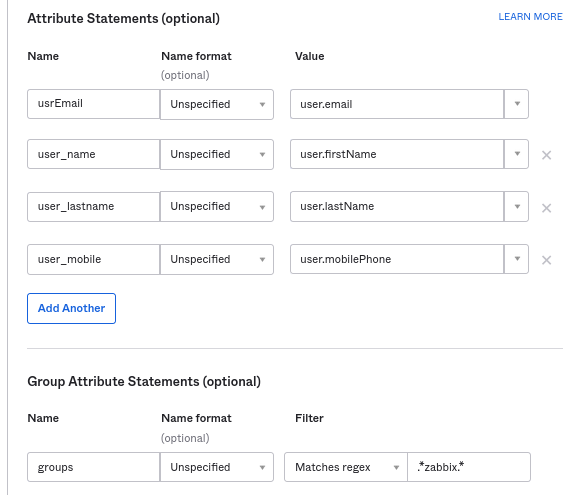
这些属性语句会被插入到与 Zabbix 共享的 SAML 断言中。
此处使用的属性名称只是任意示例。您可以使用不同的属性名称,但必须确保它们与 Zabbix SAML 设置中相应字段的值一致。
如果您想在 不使用 JIT 用户预配的情况下配置 Zabbix 的 SAML 登录,那么只需要 email 属性。
如果计划使用加密连接,请生成私有和公有加密证书,然后将公有证书上传到 Okta。当 Assertion Encryption 设置为 "Encrypted" 时,会显示证书上传表单(点击 Show Advanced Settings 可找到此参数)。
6. 在下一个选项卡中,选择 "I'm a software vendor. I'd like to integrate my app with Okta" ,然后点击 Finish。
7. 转到新创建应用程序的 "Assignments" 选项卡,点击 Assign 按钮,然后从下拉菜单中选择 "Assign to People"。

8. 在弹出的窗口中,将应用分配给将使用 SAML 2.0 通过 Zabbix 进行身份验证的用户,然后点击 Save and go back。
9. 转到 "Sign On" 选项卡并点击 View Setup Instructions 按钮。
设置 instructions 将在新选项卡中打开;在配置 Zabbix 时请保持此选项卡打开。
Zabbix 配置
1. 在 Zabbix 中,转到 SAML 设置,并根据 Okta 的设置说明填写配置选项:
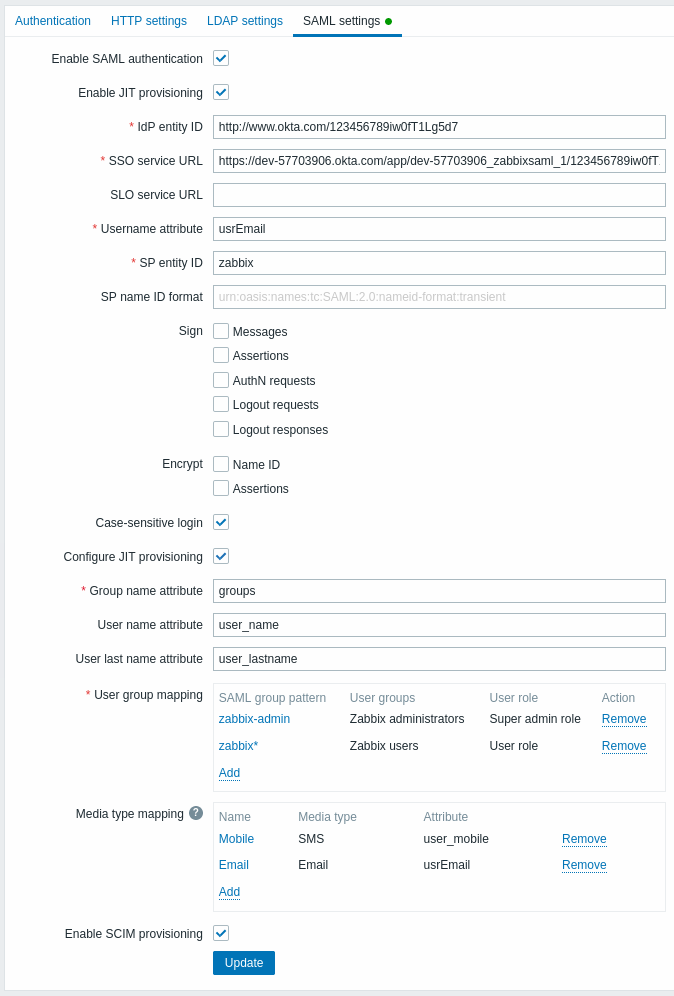
| Zabbix 字段 | Okta 中的设置字段 | 示例值 |
|---|---|---|
| IdP entity ID | Identity Provider Issuer | |
| SSO service URL | Identity Provider Single Sign-On URL | |
| Username attribute | Attribute name | usrEmail |
| SP entity ID | Audience URI | zabbix |
| Group name attribute | Attribute name | groups |
| User name attribute | Attribute name | user_name |
| User last name attribute | Attribute name | user_lastname |
还需要配置用户组和媒体映射。
2. 将 Okta SAML 设置说明中提供的证书下载到 ui/conf/certs 文件夹,并命名为 idp.crt。
通过运行以下命令将其权限设置为 644:
chmod 644 idp.crt3. 如果在 Okta 中将 Assertion Encryption 设置为 "Encrypted",那么在 Zabbix 中也应勾选 Encrypt 参数中的 "Assertions" 复选框。
4. 单击 "Update" 按钮以保存这些设置。
SCIM 预配
1. 要启用 SCIM 预配,请在 Okta 中进入应用程序的 "General" -> "App Settings"。
勾选 Enable SCIM provisioning 复选框。完成后,会出现一个新的 Provisioning 选项卡。
2. 转到 "Provisioning" 选项卡以设置 SCIM 连接:
- 在 SCIM connector base URL 中指定 Zabbix 前端的路径,并在其后追加
api_scim.php,即:
https://<your-zabbix-url>/zabbix/api_scim.php - Unique identifier field for users:
email - Authentication mode:
HTTP header - 在 Authorization 中输入一个具有 Super admin 权限的有效 API token
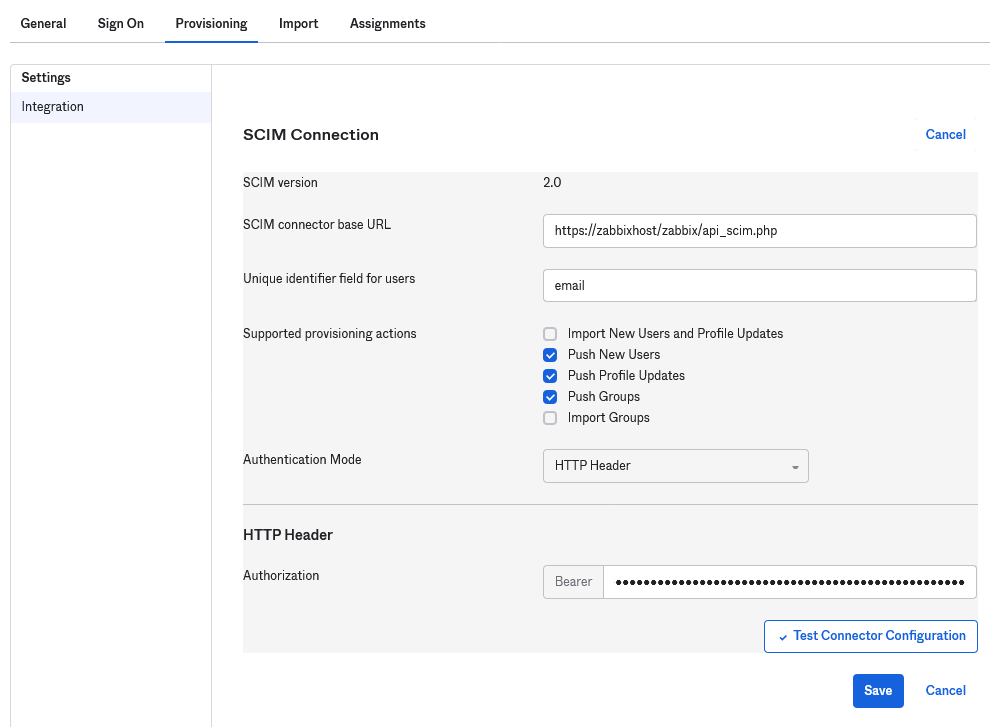
如果您遇到身份验证问题,请参阅 Authorization header forwarding。
3. 点击 Test Connector Configuration 测试连接。如果一切正常,将显示成功消息。
4. 在 "Provisioning" -> "To App" 中,确保勾选以下复选框:
- Create Users
- Update User Attributes
- Deactivate Users
这将确保这些请求类型会发送到 Zabbix。
5. 确保在 SCIM 中定义了 SAML 中定义的所有属性。您可以在 "Provisioning" -> "To App" 中,通过点击 Go to Profile Editor 打开应用程序的配置文件编辑器。
点击 Add Attribute。为 Display name、Variable name、External name 填入值,其中 External name 使用 SAML 属性名,例如 user_name。
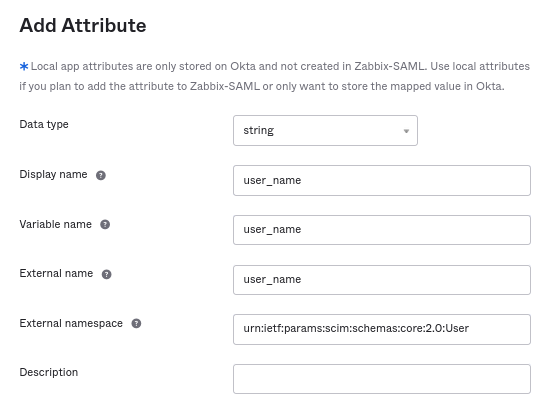
External namespace 应与用户 schema 相同:urn:ietf:params:scim:schemas:core:2.0:User
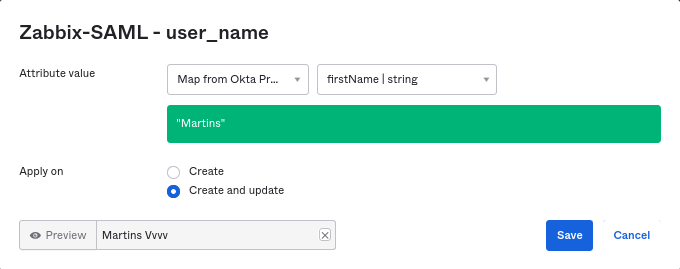
6. 转到应用程序的 "Provisioning" -> "To App" -> "Attribute Mappings"。点击底部的 Show Unmapped Attributes。新添加的属性会显示出来。
7. 映射每个已添加的属性。
8. 在 "Assignments" 选项卡中添加用户。之前需要先在 Directory -> People 中添加这些用户。所有这些分配都会作为请求发送到 Zabbix。
9. 在 "Push Groups" 选项卡中添加组。Zabbix SAML 设置中的用户组映射模式必须与此处指定的组匹配。如果不匹配,则无法在 Zabbix 中创建用户。
每次发生某些更改时,都会发送组成员信息。