
6 Zabbix appliance
Overview
Zabbix appliance provides a way to instantly deploy Zabbix server and frontend, instead of setting them up manually or reusing an existing server for Zabbix.
The appliance for Zabbix 7.4 is based on Red Hat Enterprise Linux 8 derivatives such as AlmaLinux or Rocky Linux and contains a pre-configured Zabbix server running on MySQL and the frontend running on an Nginx web server.
This appliance is designed for evaluating Zabbix. Using it in serious production environments is discouraged.
Appliance images are available for download in the following formats:
- Installation CD/DVD (.iso)
- VMware (.vmx) - see notes
- Open virtualization format (.ovf)
- Microsoft Hyper-V (.vhd/.vhdx) - see notes
- KVM, Parallels, QEMU, USB stick, VirtualBox, Xen (.raw) - see notes
- KVM, QEMU (.qcow2)
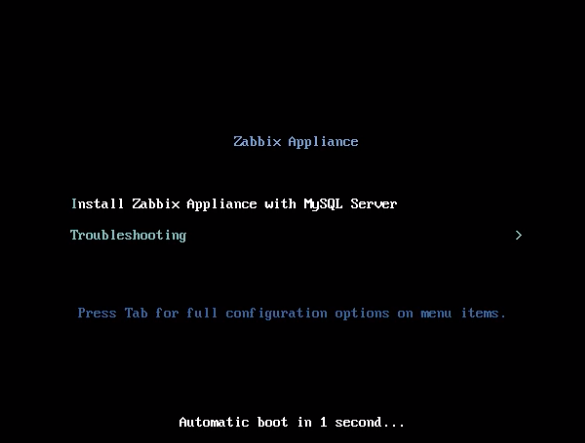
Zabbix installation CD/DVD boot menu:
Quick start
Pre-requisites
- Make sure the host machine has sufficient resources to meet the virtual machine's system requirements:
- RAM: 4 GB
- Disk space: at least 8 GB should be allocated for the virtual machine
- CPU: 2 cores minimum
-
If not yet installed, install the virtualization software for booting the appliance image (for example, VirtualBox).
-
Download the appliance in the format supported by your virtualization software.
-
Check network settings to ensure that DHCP is enabled on the host machine.
Installation
-
Boot the appliance virtual machine from the downloaded image. For instructions, please refer to the documentation of your virtualization software, for example, VirtualBox documentation.
-
Configure virtual machine network settings to allow access from a browser on the host machine. This can be achieved by enabling Bridged mode.
-
Log in to the virtual machine using default system credentials.
-
To retrieve the IP address, run the following command on the virtual machine:
ip addr show-
Open a browser on the host machine and point it to the IP address the appliance has received over DHCP.
-
Log in to Zabbix using default credentials and start monitoring.
Configuration
This section describes frequently required default configuration settings along with available customization options.
Credentials
System
- Username: root
- Password: zabbix
Zabbix frontend
- Username: Admin
- Password: zabbix
After logging in, you can change default password in the user profile settings or create new users and delete the default one.
Database
Passwords for all database users are randomly generated during the installation process. The following users are defined for the database:
Root:
- Username: root
- Password: the password is stored in the
/root/.my.cnffile. It is not required to input a password under the root account.
Zabbix server:
- Username: zabbix_srv
- Password: the password is stored in the
/etc/zabbix/zabbix\_server.conf
Zabbix frontend:
- Username: zabbix_web
- Password: the password is stored in the
/etc/zabbix/web/zabbix.conf.php
To change a database user password, modify it in MySQL and the corresponding configuration file.
Frontend access
Zabbix frontend can be accessed at http://<virtual machine's IP>.
By default, access is allowed from anywhere. To limit the access, modify /etc/nginx/conf.d/zabbix.conf.
After saving the edited file, restart Nginx by logging in via SSH as root user and executing:
systemctl restart nginxStatic IP address
By default, the appliance uses DHCP to obtain the IP address. To set a static IP address:
- Log in as root user.
- Run the following commands to install NetworkManager, enable it at boot, and start it:
dnf install NetworkManager
systemctl enable NetworkManager
systemctl start NetworkManager- Modify the
/etc/sysconfig/network-scripts/ifcfg-eth0file by setting:
NM_CONTROLLED="yes"- To apply the configuration, reload the updated connection file:
nmcli connection reload- Run the following commands, replacing values with your custom IP address:
nmcli con mod eth0 ipv4.addresses 192.168.1.10/24    # Appliance IP address/CIDR prefix
nmcli con mod eth0 ipv4.gateway 192.168.1.1     # Gateway IP address
nmcli con mod eth0 ipv4.dns 8.8.8.8    # DNS server IP address
nmcli con mod eth0 ipv4.method manual
systemctl restart network
To verify that the network configuration changes have been applied, run the following command:
nmcli dev show eth0Firewall configuration
To manage firewall settings, the appliance uses iptables with predefined rules:
- Open SSH port (22 TCP)
- Open Zabbix agent (10050 TCP) and Zabbix trapper (10051 TCP) ports
- Open HTTP (80 TCP) and HTTPS (443 TCP) ports
- Open SNMP trap port (162 UDP)
- Open outgoing connections to NTP port (123 UDP)
- Limit ICMP packets to 5 packets per second
- Drop all other incoming connections
To open additional ports, modify /etc/sysconfig/iptables file and reload firewall rules:
systemctl reload iptablesRepositories
Zabbix appliance uses zabbix-release package from the Zabbix repository.
Repositories are configured in /etc/yum.repos.d/* directory.
Time zone
By default, the appliance uses UTC for the system clock.
To change the time zone, copy the appropriate file from /usr/share/zoneinfo to /etc/localtime, for example:
cp /usr/share/zoneinfo/Europe/Riga /etc/localtimeZabbix frontend time zone is set separately and can be changed in the frontend settings. The default time zone for Zabbix frontend is Europe/Riga.
File locations
- Configuration files are located in
/etc/zabbix - Zabbix server, proxy, and agent log files are located in
/var/log/zabbix - Zabbix frontend is located in
/usr/share/zabbix - The home directory for zabbix user is
/var/lib/zabbix
System services
Systemd services are available. To see the list of Zabbix services, run the following command on the virtual machine:
systemctl list-units zabbix*Image format-specific notes
VMware
The images in vmdk format are usable directly in VMware Player, Server, and Workstation products. For use in ESX, ESXi, and vSphere they must be converted using VMware vCenter Converter (authentication required for download). If you use VMware vCenter Converter, you may encounter issues with the hybrid network adapter. In that case, you can try specifying the E1000 adapter during the conversion process. Alternatively, after the conversion is complete, you can delete the existing adapter and add an E1000 adapter.
HDD/flash image (raw)
To boot the image, run:
dd if=./zabbix_appliance_7.4.0.raw of=/dev/sdc bs=4k conv=fdatasyncReplace /dev/sdc with your Flash/HDD disk device path.
Hyper-V
If the appliance fails to start up in Hyper-V, try pressing Ctrl+Alt+F2 to switch a TTY session.
Troubleshooting
If you encounter the error message Access denied for user 'replace_user'@'localhost' (using password: YES) while trying to log in to the frontend, it may indicate that the installation is still in progress.
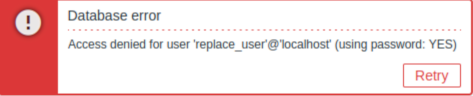
If the error persists after waiting a few minutes, or if you observe any other unexpected behavior, it likely means that the installation process has not completed successfully. In this case, we recommend deleting the current appliance and redeploying it by following the same installation instructions. This step typically resolves the issue.
Note that attempting to manually fix a broken installation is not recommended, as it may lead to further complications.