Table of Contents
1 Email
Overview
To configure email as the delivery channel for messages, you need to configure email as the media type and assign specific addresses to users.
Multiple notifications for single event will be grouped together on the same email thread.
Configuration
To configure email as the media type:
- Go to Alerts → Media types.
- Click on Create media type (or click on Email in the list of pre-defined media types).
The Media type tab contains general media type attributes:

All mandatory input fields are marked with a red asterisk.
The following parameters are specific for the email media type:
| Parameter | Description |
|---|---|
| Email provider | Select the email provider: Generic SMTP, Gmail, Gmail relay, Office365, or Office365 relay. If you select the Gmail/Office365-related options, you will only need to supply the sender email address and password; such options as SMTP server, SMTP server port, SMTP helo, and Connection security will be automatically filled by Zabbix. See also: Automated Gmail/Office365 media types. |
| SMTP server | Set an SMTP server to handle outgoing messages. This field is available if Generic SMTP is selected as the email provider. |
| SMTP server port | Set the SMTP server port to handle outgoing messages. This field is available if Generic SMTP is selected as the email provider. |
| The address entered here will be used as the From address for the messages sent. Adding a sender display name (like "Zabbix_info" in Zabbix_info <[email protected]> in the screenshot above) with the actual email address is supported. There are some restrictions on display names in Zabbix emails in comparison to what is allowed by RFC 5322, as illustrated by examples: Valid examples: [email protected] (only email address, no need to use angle brackets) Zabbix_info <[email protected]> (display name and email address in angle brackets) ∑Ω-monitoring <[email protected]> (UTF-8 characters in display name) Invalid examples: Zabbix HQ [email protected] (display name present but no angle brackets around email address) "Zabbix\@\<H(comment)Q\>" <[email protected]> (although valid by RFC 5322, quoted pairs and comments are not supported in Zabbix emails) |
|
| SMTP helo | Set a correct SMTP helo value, normally a domain name. If empty, the domain name of the email will be sent (i.e., what comes after @ in the Email field). If it is impossible to fetch the domain name, a debug-level warning will be logged and the server hostname will be sent as the domain for HELO command.This field is available if Generic SMTP is selected as the email provider. |
| Connection security | Select the level of connection security: None - do not use the CURLOPT_USE_SSL option STARTTLS - use the CURLOPT_USE_SSL option with CURLUSESSL_ALL value SSL/TLS - use of CURLOPT_USE_SSL is optional |
| SSL verify peer | Mark the checkbox to verify the SSL certificate of the SMTP server. The value of "SSLCALocation" server configuration directive should be put into CURLOPT_CAPATH for certificate validation. This sets cURL option CURLOPT_SSL_VERIFYPEER. |
| SSL verify host | Mark the checkbox to verify that the Common Name field or the Subject Alternate Name field of the SMTP server certificate matches. This sets cURL option CURLOPT_SSL_VERIFYHOST. |
| Authentication | Select the level of authentication: None - no cURL options are set Username and password - implies "AUTH=*" leaving the choice of authentication mechanism to cURL OAuth - OAuth authentication OAuth authentication is not supported for the Office365 relay email provider. |
| Username | User name to use in authentication. This sets the value of CURLOPT_USERNAME. User macros supported. |
| Password | Password to use in authentication. This sets the value of CURLOPT_PASSWORD. User macros supported. |
| OAuth tokens | Click on Configure to set up parameters for retrievieng OAuth tokens in a new window. This field is only available if "OAuth" is selected in the Authentication field. |
| Message format | Select message format: HTML - send as HTML Plain text - send as plain text |
To enable SMTP authentication options, Zabbix server must be both compiled with the --with-libcurl compilation option (with cURL 7.20.0 or higher) and use the libcurl-full packages during runtime.
See also common media type parameters for details on how to configure default messages and alert processing options.
OAuth tokens
The following parameters are required for retrieving OAuth tokens:
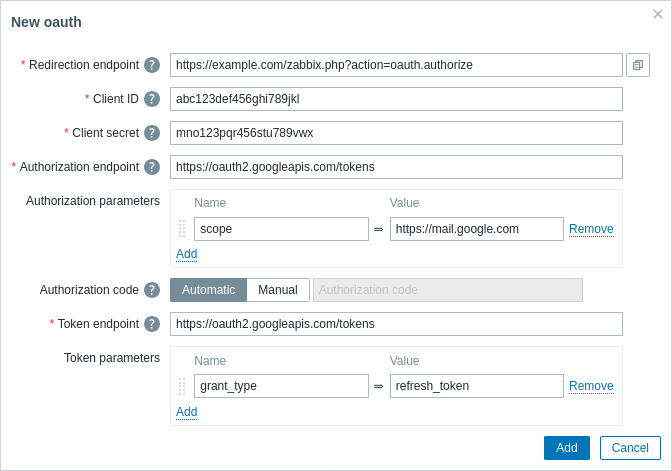
| Parameter | Description |
|---|---|
| Redirection endpoint | Enter Zabbix frontend URL where the OAuth service will redirect back the OAuth authorization (using format https://<zabbix-frontend-url>/zabbix.php?action=oauth.authorize).It is set automatically for a new email media type when the frontend URL is defined. |
| Client ID | Enter unique identifier of the client app registered within the OAuth authorization server. |
| Client secret | Enter private secret of the client app registered within the OAuth authorization server. |
| Authorization endpoint | Enter the OAuth authorization server URL for requesting user authorization. |
| Authorization parameters | Enter parameters for the authorization endpoint. |
| Authorization code | Enter the authorization code: Automatic - the code will be retrieved automatically through a redirection page Manual - enter the code manually if automatic retrieval fails |
| Token endpoint | Enter the OAuth authorization server URL to exchange the authorization code for access and refresh tokens. |
| Token parameters | Enter parameters for the access token. |
The retrieval of OAuth tokens has automated features for Gmail, Gmail relay and Office365 email providers. It is only required to supply Redirection endpoint, Client ID and Client secret parameter values. Zabbix will automatically fill the other required values (see OAuth URL defaults by provider).
OAuth access and refresh token retrieval
After submitting OAuth parameters:
A browser popup is opened navigating user to the Authorization endpoint.
User authorizes Zabbix in the OAuth service.
The OAuth service redirects user to the Zabbix frontend action
oauth.authorizewith the authorization code and scope value.In response, Zabbix will make a request to Token endpoint to exchange the authorization code for access and refresh tokens.
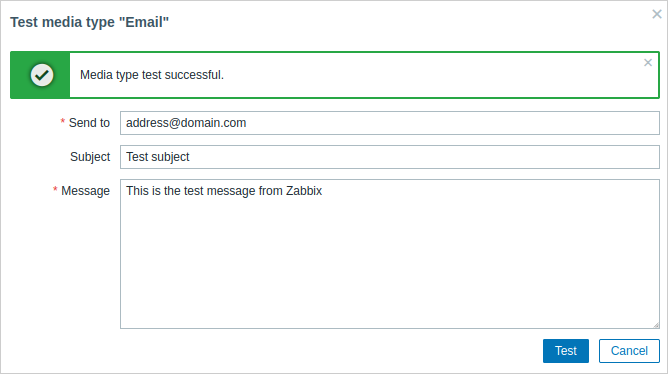
Media type testing
To test whether a configured email media type works correctly:
- Locate the relevant email in the list of media types.
- Click on Test in the last column of the list (a testing window will open).
- Enter a Send to recipient address, message body and, optionally, subject.
- Click on Test to send a test message.
Test success or failure message will be displayed in the same window:
User media
Once the email media type is configured, go to the Users → Users section and edit user profile to assign email media to the user. Steps for setting up user media, being common for all media types, are described on the Media types page.