
4 Webhook
Overview
The webhook media type is useful for making HTTP calls using custom JavaScript code for straightforward integration with external software such as helpdesk systems, chats, or messengers. You may choose to import an integration provided by Zabbix or create a custom integration from scratch.
Integrations
The following integrations are available allowing to use predefined webhook media types for pushing Zabbix notifications to:
- brevis.one
- Discord
- Event-Driven Ansible
- Express.ms messenger
- GitHub
- GLPI
- IBM Maximo Service Request
- iLert
- iTop
- Jira
- Jira Service Management
- ManageEngine ServiceDesk
- Mantis Bug Tracker
- Mattermost
- MS Teams
- MS Teams Workflows
- LINE
- Opsgenie
- OTRS CE
- Pagerduty
- Pushover
- Redmine
- Rocket.Chat
- ServiceNow
- SIGNL4
- Slack
- SolarWinds
- SysAid
- Telegram
- TOPdesk
- VictorOps
- Zammad
- Zendesk
In addition to the services listed here, Zabbix can be integrated with Spiceworks (no webhook is required). To convert Zabbix notifications into Spiceworks tickets, create an email media type and enter Spiceworks helpdesk email address (e.g. help\@zabbix.on.spiceworks.com) in the profile settings of a designated Zabbix user.
Configuration
To start using a webhook integration:
- Locate the required .yaml file in the
templates/mediadirectory of the downloaded Zabbix version or download it from Zabbix git repository. - Import the file into your Zabbix installation. The webhook will appear in the list of media types.
- Configure the webhook according to instructions in the Readme.md file (you may click a webhook's name above to quickly access Readme.md).
To create a custom webhook from scratch:
- Go to Alerts > Media types.
- Click Create media type.
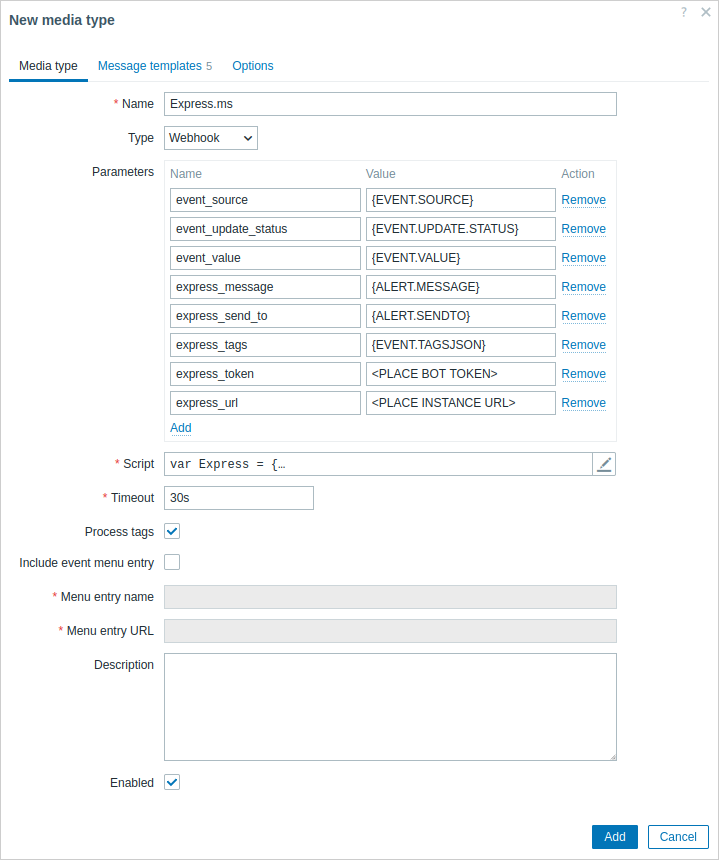
The Media type tab contains various attributes specific for this media type:
All mandatory input fields are marked with a red asterisk.
The following parameters are specific for the webhook media type:
| Parameter | Description |
|---|---|
| Parameters | Specify the webhook variables as the attribute and value pairs. For preconfigured webhooks, a list of parameters varies, depending on the service. Check the webhook's Readme.md file for parameter description. For new webhooks, several common variables are included by default (URL:<empty>, HTTPProxy:<empty>, To:{ALERT.SENDTO}, Subject:{ALERT.SUBJECT}, Message:{ALERT.MESSAGE}), feel free to keep or remove them. Webhook parameters support user macros, all macros that are supported in problem notifications and, additionally, {ALERT.SENDTO}, {ALERT.SUBJECT}, and {ALERT.MESSAGE} macros. If you specify an HTTP proxy, the field supports the same functionality as in the item configuration HTTP proxy field. The proxy string may be prefixed with [scheme]:// to specify which kind of proxy is used (e.g., https, socks4, socks5; see documentation). |
| Script | Enter JavaScript code in the modal editor that opens when clicking in the parameter field or on the pencil icon next to it. This code will perform the webhook operation. The script is a function code that accepts parameter - value pairs. The values should be converted into JSON objects using JSON.parse() method, for example: var params = JSON.parse(value);.The code has access to all parameters, it may perform HTTP GET, POST, PUT and DELETE requests, support additional methods such as CONNECT, PATCH, HEAD, OPTIONS and TRACE, and has control over HTTP headers and request body. The script must contain a return operator, otherwise it will not be valid. It may return OK status along with an optional list of tags and tag values (see Process tags option) or an error string. Note that the script is executed only after an alert is created. If the script is configured to return and process tags, these tags will not get resolved in {EVENT.TAGS} and {EVENT.RECOVERY.TAGS} macros in the initial problem message and recovery messages because the script has not had the time to run yet. Note: Using local variables (e.g. var local = 1) instead of a global one (e.g. global = 1) is recommended to ensure each script operates on its own data and to avoid collisions between simultaneous calls (see known issues).See also: Webhook development guidelines, Webhook script examples, Additional JavaScript objects. |
| Timeout | JavaScript execution timeout (1-60s, default 30s). Time suffixes are supported, e.g., 30s, 1m. |
| Process tags | Mark the checkbox to process returned JSON property values as tags. These tags are added to any existing problem tags. Note that when using webhook tags, the webhook must return a JSON object containing at least an empty tags object: var result = {tags: {}};Examples of tags that can be returned: jira-id:prod-1234, responsible:John Smith, processed:<no value> |
| Include event menu entry | Mark the checkbox to include an entry in the event menu linking to a created external ticket. An entry will be included for each webhook that is enabled and has this checkbox marked. Note that if the Menu entry name and Menu entry URL parameters contain any {EVENT.TAGS.<tag name>} macros, an entry will be included only if these macros can be resolved (that is, the event has these tags defined). If marked, the webhook should not be used for sending notifications to different users (consider creating a dedicated user instead) and should not be used in multiple alert actions for a single problem event. |
| Menu entry name | Specify the menu entry name. {EVENT.TAGS.<tag name>} macro is supported. This field is only mandatory if Include event menu entry is marked. |
| Menu entry URL | Specify the underlying URL of the menu entry. {EVENT.TAGS.<tag name>} macro is supported. This field is only mandatory if Include event menu entry is marked. |
See common media type parameters for details on how to configure default messages and alert processing options.
Even if a webhook doesn't use default messages, message templates for operation types used by this webhook must still be defined.
Testing
To test a configured webhook media type:
- Locate the relevant webhook in the list of media types.
- Click Test in the last column of the list (a testing window will open).
- Edit the webhook parameter values as needed. Replace macros with example values; otherwise, macros will not resolve, and the test will fail.
- Click Test.
Replacing or deleting values in the testing window affects the test procedure only, the actual webhook attribute values will remain unchanged.
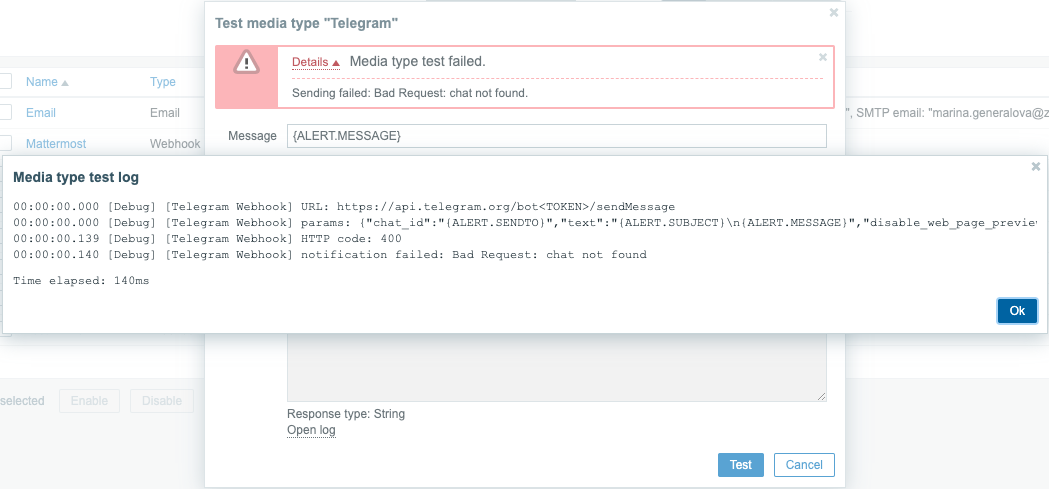
To view media type test log entries without leaving the test window, click Open log (a new pop-up window will open).
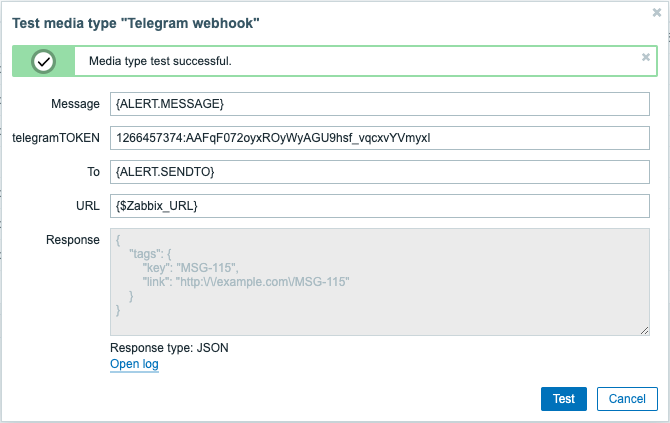
If the webhook test is successful:
- "Media type test successful." message is displayed.
- Server response appears in the gray Response field.
- Response type (JSON or String) is specified below the Response field.
If the webhook test fails:
- "Media type test failed." message is displayed, followed by additional failure details.
User media
Once the media type is configured, go to the Users > Users section and assign the webhook media to an existing user or create a new user to represent the webhook. Steps for setting up user media for an existing user, being common for all media types, are described on the Media types page.
If a webhook uses tags to store ticket\message ID, avoid assigning the same webhook as a media to different users as doing so may cause webhook errors (applies to the majority of webhooks that utilize Include event menu entry option). In this case, the best practice is to create a dedicated user to represent the webhook:
- After configuring the webhook media type, go to the Users > Users section and create a dedicated Zabbix user to represent the webhook - for example, with a username Slack for the Slack webhook. All settings, except media, can be left at their defaults as this user will not be logging into Zabbix.
- In the user profile, go to a tab Media and add a webhook with the required contact information. If the webhook does not use a Send to field, enter any combination of supported characters to bypass validation requirements.
- Grant this user at least read permissions to all hosts for which it should send the alerts.
When configuring alert action, add this user in the Send to users field in Operation details - this will tell Zabbix to use the webhook for notifications from this action.
Configuring alert actions
Actions determine which notifications should be sent via the webhook. Steps for configuring actions involving webhooks are the same as for all other media types with these exceptions:
- If a webhook uses webhook tags to store ticket\message ID and handle update\resolve operations, avoid using the same webhook in multiple alert actions for a single problem event. If {EVENT.TAGS.<tag name>} exists and gets updated in the webhook, its resulting value will be undefined. To avoid this, use a new tag name in the webhook for storing updated values. This applies to Jira, Jira Service Desk, Mattermost, Opsgenie, OTRS, Redmine, ServiceNow, Slack, Zammad, and Zendesk webhooks provided by Zabbix and to most webhooks utilizing the Include event menu entry option. Note, however, that a single webhook can be used in multiple operations or escalation steps of the same action, as well as in different actions that will not be triggered by the same problem event due to different conditions.
- When using a webhook in actions for internal events, ensure to mark the Custom message checkbox and define a custom message in the action operation configuration. Otherwise, a notification will not be sent.