
Secure connection to the frontend
Overview
This section provides Zabbix setup steps and configuration examples for secure TLS connections between Zabbix frontend and Zabbix server.
Configuration
By default, communication between Zabbix frontend and Zabbix server is unencrypted. For better security, enable TLS on both sides. Below is an example of the simplest way to do this.
1. Generate certificates and keys.
Create a working directory:
sudo mkdir -p /etc/zabbix/ssl && cd /etc/zabbix/sslCreate a CA certificate (adjust the MyZabbixCA value to match the actual common name):
sudo openssl genrsa -out ca.key 4096
sudo openssl req -new -x509 -days 3650 -key ca.key -out ca.crt -subj "/CN=MyZabbixCA/"
Generate a private key and certificate for Zabbix server (adjust the zabbix-server.example.com value to match the actual common name):
sudo openssl genrsa -out server.key 2048
sudo openssl req -new -key server.key -out server.csr -subj "/CN=zabbix-server.example.com/"
sudo openssl x509 -req -days 365 -in server.csr -CA ca.crt -CAkey ca.key -CAcreateserial -sha256 -out server.crt
Generate a private key and certificate for Zabbix frontend (adjust the zabbix-frontend-node value to match the actual common name):
sudo openssl genrsa -out frontend.key 2048
sudo openssl req -new -key frontend.key -out frontend.csr -subj "/CN=zabbix-frontend-node/"
sudo openssl x509 -req -days 365 -in frontend.csr -CA ca.crt -CAkey ca.key -CAcreateserial -sha256 -out frontend.crt
2. Set proper permissions.
For Zabbix server (adjust ownership/group according to your distribution's Zabbix server daemon user):
sudo chown root:zabbix /etc/zabbix/ssl/server.{crt,key} /etc/zabbix/ssl/ca.crt
sudo chmod 640 /etc/zabbix/ssl/server.key
sudo chmod 644 /etc/zabbix/ssl/server.crt /etc/zabbix/ssl/ca.crt
For frontend (adjust ownership/group according to your distribution's webserver user):
sudo chown root:www-data /etc/zabbix/ssl/frontend.{crt,key}
sudo chmod 640 /etc/zabbix/ssl/frontend.key
sudo chmod 644 /etc/zabbix/ssl/frontend.crt
3. Configure Zabbix server.
In zabbix_server.conf add:
TLSFrontendAccept=cert
TLSCertFile=/etc/zabbix/ssl/server.crt
TLSKeyFile=/etc/zabbix/ssl/server.key
TLSCAFile=/etc/zabbix/ssl/ca.crt
# Optionally:
# TLSFrontendCertIssuer=/CN=MyZabbixCA/
# TLSFrontendCertSubject=/CN=zabbix-frontend-node/
Then restart the server:
sudo systemctl restart zabbix-server4. Configure Zabbix frontend.
During web interface installation, enable the Encrypt connections from Web interface option (and Verify server certificate issuer and subject option, if necessary) and fill in the TLS CA file, TLS key file, TLS certificate file fields (and Server TLS certificate issuer and Server TLS certificate subject fields, if necessary):
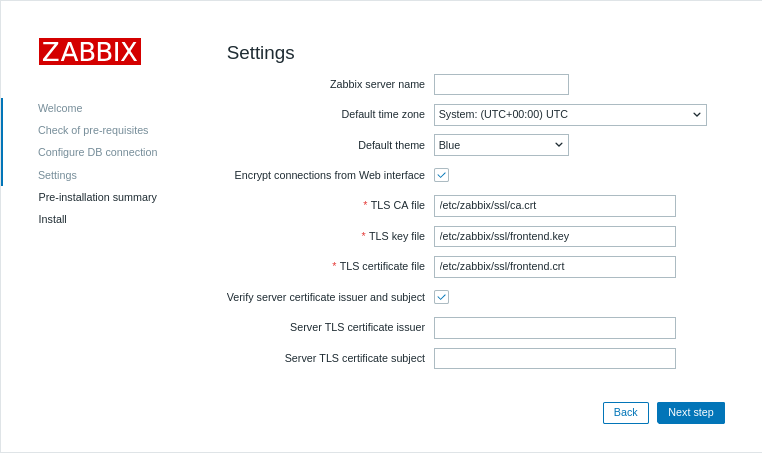
| Parameter | Description |
|---|---|
| TLS CA file | Specify the full path to the Certificate Authority (CA) certificate file used to verify the server's certificate. |
| TLS key file | Specify the full path to the client private key file corresponding to the client certificate. |
| TLS certificate file | Specify the full path to the client certificate file if mutual TLS authentication is required. |
| Server TLS certificate issuer | Specify a distinguished Name (DN) of the issuer to match against the server's certificate. |
| Server TLS certificate subject | Specify a distinguished Name (DN) of the subject to match against the server's certificate. |
On existing installations, edit the following fields in zabbix.conf.php:
$ZBX_SERVER_TLS['ACTIVE'] = '1';
$ZBX_SERVER_TLS['CA_FILE'] = '/etc/zabbix/ssl/ca.crt';
$ZBX_SERVER_TLS['KEY_FILE'] = '/etc/zabbix/ssl/frontend.key';
$ZBX_SERVER_TLS['CERT_FILE'] = '/etc/zabbix/ssl/frontend.crt';
// Optionally:
// $ZBX_SERVER_TLS['CERTIFICATE_ISSUER']  = '/CN=MyZabbixCA/';
// $ZBX_SERVER_TLS['CERTIFICATE_SUBJECT'] = '/CN=zabbix-server.example.com/';
5. Verify encryption by confirming there are no error messages in Zabbix frontend or Zabbix server log file:
tail -f /var/log/zabbix/zabbix_server.log