
4 Slide shows
Overview
In a slide show you can configure that a number of screens are displayed one after another at set intervals.
Sometimes you might want to switch between some configured screens. While that can be done manually, doing that more than once or twice may become very tedious. This is where the slide show function comes to rescue.
All users in Zabbix (including non-admin users) can create slide shows. Slide shows have an owner - the user who created them.
Slide shows can be made public or private. Public slide shows are visible to all users, however, they must have at least read permissions to all slide show elements (screens) to see it. To add a screen to the slide show the user must also have at least read permission to it.
Private slide shows are visible only to their owner. Private slide shows can be shared by the owner to other users and user groups. Regular (non-Super admin) users can only share with the groups and users they are member of. Private slide shows will be visible to their owner and the users the slide show is shared with as long as they have read permissions to all included screens. Admin level users, as long as they have read permissions to all included screens, can see and edit private slide shows regardless of being the owner or belonging to the shared user list.
Configuration
To create a slide show, do the following:
- Go to Monitoring → Screens
- Select Slide shows in the dropdown
- Go to the view with all slide shows
- Click on Create slide show
The Slide tab contains general slide show attributes:
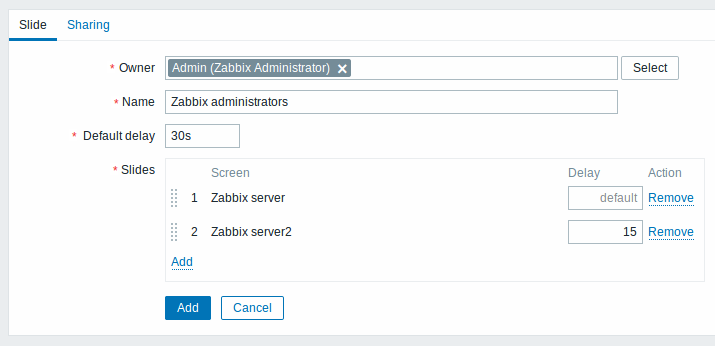
All mandatory input fields are marked with a red asterisk.
| Parameter | Description |
|---|---|
| Owner | Select the slide show owner. Specifying owner is mandatory. |
| Name | Unique name of the slide show. |
| Default delay | How long one screen is displayed by default, before rotating to the next. Time suffixes are supported, e.g. 30s, 5m, 2h, 1d. |
| Slides | List of screens to be rotated. Click on Add to select screens. The Up/Down arrow before the screen allows to drag a screen up and down in the sort order of display. If you want to display only, say, a single graph in the slide show, create a screen containing just that one graph. |
| Screen | Screen name. |
| Delay | A custom value for how long the screen will be displayed, in seconds. If set to 0, the Default delay value will be used. |
| Action | Click on Remove to remove a screen from the slide show. |
The slide show in this example consists of two screens which will be displayed in the following order:
Zabbix server ⇒ Displayed for 30 seconds ⇒ Zabbix server2 ⇒ Displayed for 15 seconds ⇒ Zabbix server ⇒ Displayed for 30 seconds ⇒ Zabbix server2 ⇒ …
The Sharing tab contains the slide show type as well as sharing options (user groups, users) for private slide shows:
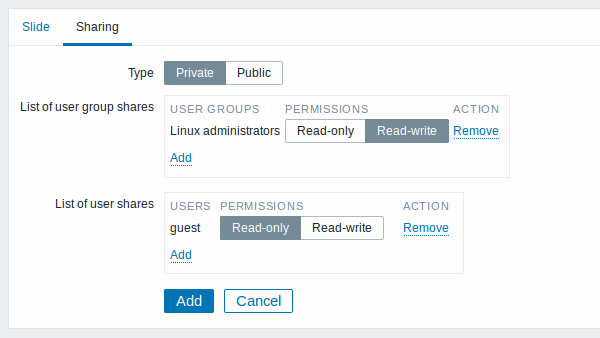
| Parameter | Description |
|---|---|
| Type | Select slide show type: Private - slide show is visible only to selected user groups and users Public - slide show is visible to all |
| List of user group shares | Select user groups that the slide show is accessible to. You may allow read-only or read-write access. |
| List of user shares | Select users that the slide show is accessible to. You may allow read-only or read-write access. |
Click on Add to save the slide show.
Display
Slide shows that are ready can be viewed in Monitoring → Screens, then choosing Slide shows from the dropdown and clicking on the slide show name.
With the Menu option next to the dropdown, you can accelerate or slow down the display by choosing a slide delay multiplier:
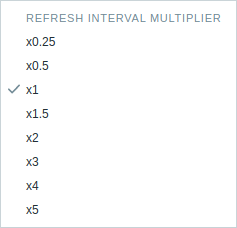
If a delay ends up as being less than 5 seconds (either by having entered a delay less than 5 seconds or by using the slide delay multiplier), a 5-second minimum delay will be used.