
6 Zabbix trapper
Overview
Trapper items accept incoming data instead of querying for it. This is useful for any data you want to send to Zabbix.
Configuration
To configure a trapper item:
- Go to Data collection → Hosts.
- Click Items in the row of the host.
- Click Create item.
- Enter item parameters in the configuration form.
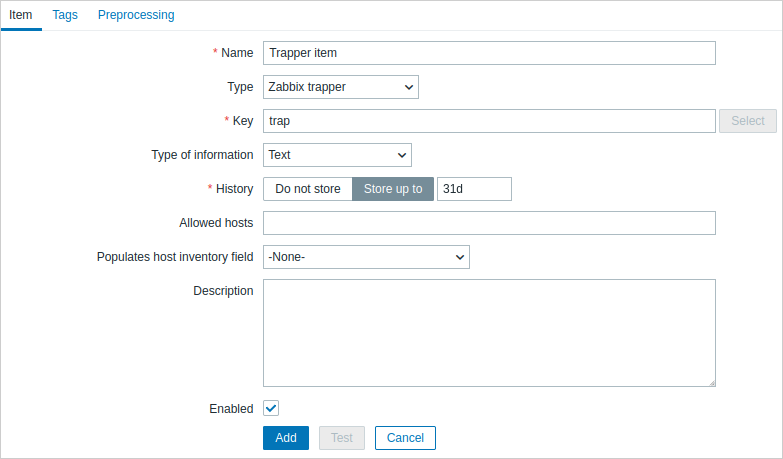
All mandatory input fields are marked with a red asterisk.
The fields that require specific information for trapper items are:
| Type | Select "Zabbix trapper". |
| Key | Enter a key that will be used to recognize the item when sending data to Zabbix server. |
| Type of information | Select the type of information that will correspond to the format of data that will be sent. |
| Allowed hosts | List of comma-delimited IP addresses (optionally in CIDR notation) or DNS names. If specified, incoming connections will be accepted only from the hosts listed here. If IPv6 support is enabled then '127.0.0.1', '::127.0.0.1', '::ffff:127.0.0.1' are treated equally and '::/0' will allow any IPv4 or IPv6 address. '0.0.0.0/0' can be used to allow any IPv4 address. Note that "IPv4-compatible IPv6 addresses" (0000::/96 prefix) are supported but deprecated by RFC4291. Example: 127.0.0.1, 192.168.1.0/24, 192.168.3.1-255, 192.168.1-10.1-255, ::1,2001:db8::/32, mysqlserver1, zabbix.example.com, {HOST.HOST} Spaces, user macros, and host macros {HOST.HOST}, {HOST.NAME}, {HOST.IP}, {HOST.DNS}, {HOST.CONN} are supported. |
Before sending values, you may have to wait up to 60 seconds after saving the item until Zabbix server picks up the changes from a configuration cache update.
Sending data
Sending data to Zabbix server or proxy is possible using the Zabbix sender utility or Zabbix sender protocol.
Sending data to Zabbix server is also possible using the history.push API method.
Zabbix sender
For sending data to Zabbix server or proxy using the Zabbix sender utility, you could run the following command to send the "test value":
zabbix_sender -z <server IP address> -p 10051 -s "New host" -k trap -o "test value"To send the "test value", the following command options are used:
-zto specify Zabbix server IP address-pto specify Zabbix server port number (10051 by default)-sto specify the host (make sure to use the technical instead of the visible host name)-kto specify the key of the item configured in the trapper item-oto specify the value to send
The Zabbix trapper process does not expand macros used in the item key to check the corresponding item key existence for the targeted host.
For more information on the communication between Zabbix sender and Zabbix server or proxy, see Zabbix sender protocol.
history.push
For sending data to Zabbix server using the history.push API method, you could make the following HTTP POST request containing some test values:
curl --request POST \
  --url 'https://example.com/zabbix/api_jsonrpc.php' \
  --header 'Authorization: Bearer 0424bd59b807674191e7d77572075f33' \
  --header 'Content-Type: application/json-rpc' \
  --data '{"jsonrpc":"2.0","method":"history.push","params":[{"itemid":10600,"value":"test value 1"},{"itemid":10601,"value":"test value 2"},{"itemid":99999,"value":"test value 3"}],"id":1}'
If the request is correct, the response returned by API could look as follows:
{
    "jsonrpc": "2.0",
    "result": {
        "response": "success",
        "data": [
            {
                "itemid": "10600"
            },
            {
                "itemid": "10601",
                "error": "Item is disabled."
            },
            {
                "error": "No permissions to referred object or it does not exist."
            }
        ]
    },
    "id": 1
}
Errors in response data indicate that sending data for specific items has failed validation by Zabbix server. This can happen for the following reasons:
- the user sending the data has no read permission to the item's host;
- the host is disabled or in maintenance without data collection;
- the item does not exist or is not yet included in the server configuration cache;
- the item is disabled or its type is other than Zabbix trapper or HTTP agent (with trapping enabled);
- the user's IP or DNS is not set in the item's Allowed hosts list;
- another item has a value with a duplicate timestamp on the nanosecond level.
The absence of errors indicates that the values sent have been accepted for processing, which includes preprocessing (if any), trigger processing, and saving to the database. Note that the processing of an accepted value may also fail (for example, during preprocessing), resulting in the value being discarded.
For more information on how to work with Zabbix API, see API.
Displaying data
Once data is sent, you can navigate to Monitoring → Latest data to see the result:

If a single numeric value is sent, the data graph will show a horizontal line to the left and right of the value's time point.