
13 Trapper items
Overview
Trapper items accept incoming data instead of querying for it.
It is useful for any data you might want to "push" into Zabbix.
To use a trapper item you must:
- have a trapper item set up in Zabbix
- send in the data into Zabbix
Configuration
Item configuration
To configure a trapper item:
- Go to: Configuration → Hosts
- Click on Items in the row of the host
- Click on Create item
- Enter parameters of the item in the form
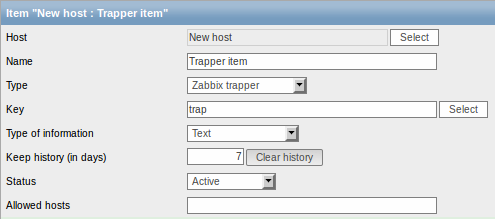
The fields that require specific information for trapper items are:
| Type | Select Zabbix trapper here. |
| Key | Enter a key that will be used to recognize the item when sending in data. |
| Type of information | Select the type of information that will correspond the format of data that will be sent in. |
| Allowed hosts | If specified, the trapper will accept incoming data only from this comma-delimited list of hosts. Hosts are identified by IP address/DNS name. For example: Single IP: 192.168.1.33 List of IP addresses: 192.168.56.5, 192.168.56.6, 192.168.56.7 Single DNS name: testzabbix.zabbix.com List of DNS names: testzabbix, testzabbix.zabbix.com, testzabbix1.zabbix.com Spaces and user macros are allowed in this field since Zabbix 2.2.0. |
You may have to wait up to 60 seconds after saving the item until the server picks up the changes from a configuration cache update, before you can send in values.
Sending in data
In the simplest of cases, we may use zabbix_sender utility to send the monitoring data for trapper item. If we have sent the value "test value" for our trapper item, here is how it will appear in Monitoring → Latest data:
