
11 使用Microsoft Entra ID配置SAML
概述
本节提供使用SAML 2.0认证从Microsoft Entra ID(原Microsoft Azure Active Directory)配置单点登录至Zabbix的指南.
请注意,要使单点登录生效,其用户名必须存在于Zabbix中,但其Zabbix密码不会被使用。如果认证成功,Zabbix会将本地用户名与SAML返回的用户名属性进行匹配。
Microsoft Entra ID配置
创建应用
1. 登录Microsoft Entra管理中心 Microsoft Entra ID. 出于测试目的, 您可以在Microsoft Entra ID中create一个免费试用账户.
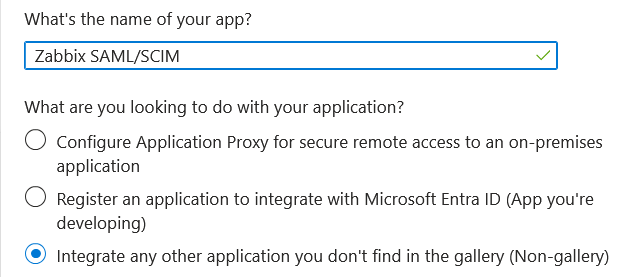
2. 在Microsoft Entra管理中心选择应用程序 -> 企业应用程序 -> 新建应用程序 -> 创建您自己的应用程序.
3. 添加您的应用程序名称并选择集成任何其他应用程序...选项. 完成后点击创建.
设置单点登录
1. 在您的应用程序页面中,转到设置单点登录并点击开始使用。然后选择SAML。
2. 编辑基本SAML配置:
- 在标识符(实体ID)中设置一个唯一名称以向Microsoft Entra ID标识您的应用,例如
zabbix; - 在回复URL(断言消费者服务URL)中设置Zabbix单点登录端点:
https://<path-to-zabbix-ui>/index_sso.php?acs:

请注意必须使用"https"。要使Zabbix正常工作,需要在conf/zabbix.conf.php中添加以下行:
3. Edit Attributes & Claims. You must add the username attribute that you want to pass to Zabbix (user_email, in this case).
The attribute names are arbitrary. Different attribute names may be used, however, it is required that they match the respective field value in Zabbix SAML settings.
- Click on Add new claim to add an attribute:

4. In SAML Certificates download the Base64 certificate provided by Entra ID and place it into conf/certs of the Zabbix frontend installation.
Set 644 permissions to it by running:
chmod 644 entra.cerMake sure that conf/zabbix.conf.php contains the line:
$SSO['IDP_CERT'] = 'conf/certs/entra.cer';5. 使用Entra ID中设置<您的应用名称>的值来配置Zabbix SAML认证(参见下一节):

Zabbix配置
1. 在Zabbix中,前往设置zabbix 并根据Entra ID配置填写以下参数:
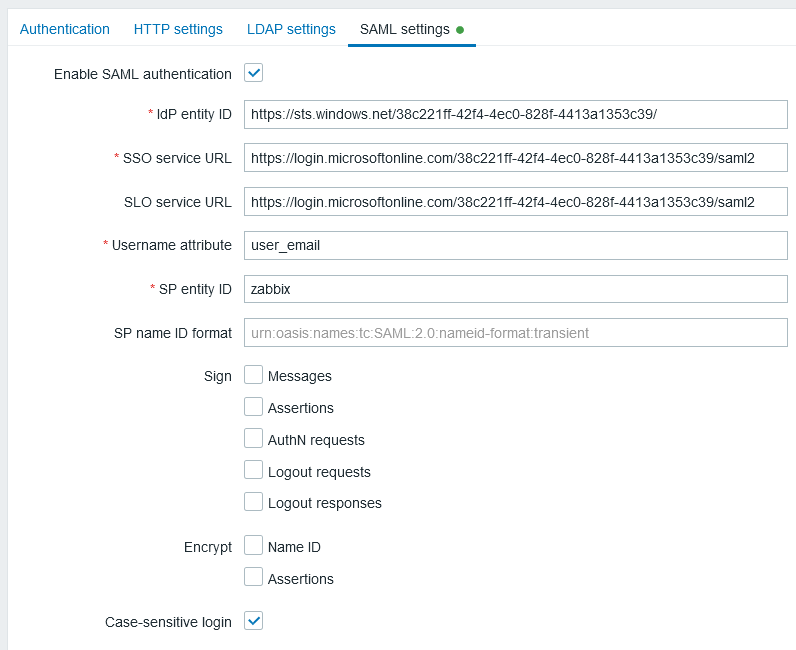
| Zabbix字段 | Entra ID配置项 | 示例值 |
|---|---|---|
| IdP entity ID | Microsoft Entra identifier | |
| SSO service URL | Login URL | |
| SLO service URL | Logout URL | |
| SP entity ID | Identifier (Entity ID) | |
| Username attribute | Custom attribute (claim) | user_email |
点击Update保存设置。
认证请求签名
可以配置Entra ID以validate the signature已签名的认证请求.
为实现此功能,create公钥/私钥对:
openssl req -x509 -newkey rsa:4096 -keyout /usr/share/zabbix/conf/certs/request-sign.key -out /usr/share/zabbix/conf/certs/request-sign.pem -sha256 -days 1825 -nodes分配权限:
chown apache /usr/share/zabbix/conf/certs/request-sign.key
chmod 400 /usr/share/zabbix/conf/certs/request-sign.key
通过添加以下内容更新Zabbix前端配置:
$SSO['SP_KEY'] = 'conf/certs/request-sign.key';
$SSO['SP_CERT'] = 'conf/certs/request-sign.crt';
故障排除
当用户尝试通过SAMLlogin到Zabbix时,若已使用MicroSoft Edge个人资料登录,可能会发生认证问题。作为此类问题的迹象,用户可能能够通过MicroSoft Edge隐私模式登录Zabbix。
为避免此类情况下的认证问题,可能需要在Zabbix前端配置file文件(zabbix.conf.php)中将requestedAuthnContext设置为"false"。
$SSO['SETTINGS'] = [
    'security' => [
        'requestedAuthnContext' => false
    ]
];