
3 Low-level discovery
Overview
Low-level discovery provides a way to automatically create items, triggers, and graphs for different entities on a computer. For instance, Zabbix can automatically start monitoring file systems or network interfaces on your machine, without the need to create items for each file system or network interface manually. Additionally it is possible to configure Zabbix to remove unneeded entities automatically based on actual results of periodically performed discovery.
In Zabbix, three types of item discovery are supported out of the box:
- discovery of file systems;
- discovery of network interfaces;
- discovery of SNMP OIDs.
A user can define their own types of discovery, provided they follow a particular JSON protocol.
The general architecture of the discovery process is as follows.
First, a user creates a discovery rule in "Configuration" → "Templates" → "Discovery" column. A discovery rule consists of (1) an item that discovers the necessary entities (for instance, file systems or network interfaces) and (2) prototypes of items, triggers, and graphs that should be created based on the value of that item.
An item that discovers the necessary entities is like a regular item seen elsewhere: the server asks a Zabbix agent (or whatever the type of the item is set to) for a value of that item, the agent responds with a textual value. The difference is that the value the agent responds with should contain a list of discovered entities in a specific JSON format. While the details of this format are only important for implementers of custom discovery checks, it is necessary to know that the returned value contains a list of macro → value pairs. For instance, item "net.if.discovery" might return two pairs: "{#IFNAME}" → "lo" and "{#IFNAME}" → "eth0".
Low-level discovery items "vfs.fs.discovery" and
"net.if.discovery" are supported since Zabbix agent version 2.0.
Discovery of SNMP OIDs is supported since Zabbix server and proxy
version 2.0.
Return values of a low-level discovery rule are limited to 2048 bytes on a Zabbix proxy run with IBM DB2 database. This limit does not apply to Zabbix server as return values are processed without being stored in a database.
These macros are used in names, keys and other prototype fields where they are then substituted with the received values for creating real items, triggers, graphs or even hosts for each discovered entity. See the full list of options for using LLD macros.
When the server receives a value for a discovery item, it looks at the macro → value pairs and for each pair generates real items, triggers, and graphs, based on their prototypes. In the example with "net.if.discovery" above, the server would generate one set of items, triggers, and graphs for the loopback interface "lo", and another set for interface "eth0".
See also: Discovered entities
The following sections illustrate the process described above in detail and serve as a how-to for performing discovery of file systems, network interfaces, and SNMP OIDs. See Creating custom LLD rules for a description of the JSON format for discovery items and an example of how to implement your own file system discoverer as a Perl script.
Discovery of file systems
To configure the discovery of file systems, do the following:
- Go to: Configuration → Templates
- Click on Discovery in the row of an appropriate template

- Click on Create discovery rule in the upper right corner of the screen
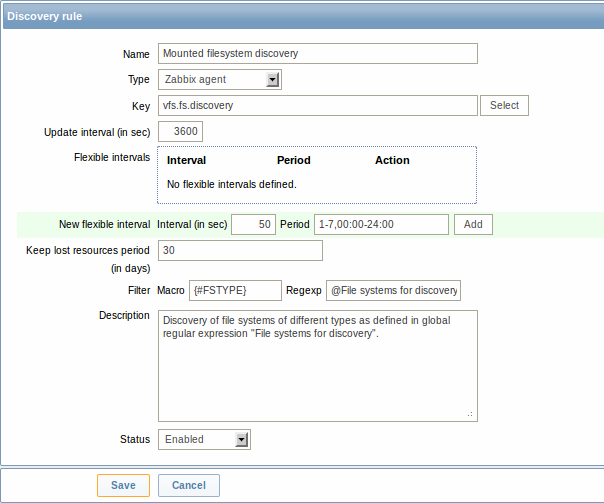
- Fill in the form with the following details
| Parameter | Description |
|---|---|
| Name | Name of discovery rule. |
| Type | The type of check to perform discovery; should be Zabbix agent or Zabbix agent (active) for file system discovery. |
| Key | An item with "vfs.fs.discovery" key is built into the Zabbix agent on many platforms (see supported item key list for details), and will return a JSON with the list of file systems present on the computer and their types. |
| Update interval (in sec) | This field specifies how often Zabbix performs discovery. In the beginning, when you are just setting up file system discovery, you might wish to set it to a small interval, but once you know it works you can set it to 30 minutes or more, because file systems usually do not change very often. Note: If set to "0", the item will not be polled. However, if a flexible interval also exists with a non-zero value, the item will be polled during the flexible interval duration. |
| Flexible intervals | You can create exceptions to Update interval. For example: Interval: 0, Period: 6-7,00:00-24:00 - will disable the polling at the weekend. Otherwise default update interval will be used. Up to seven flexible intervals can be defined. If multiple flexible intervals overlap, the smallest Interval value is used for the overlapping period. See Time period specification page for description of the Period format. Note: If set to "0", the item will not be polled during the flexible interval duration and will resume polling according to the Update interval once the flexible interval period is over. |
| Keep lost resources period (in days) | This field allows you to specify for how many days the discovered entity will be retained (won't be deleted) once its discovery status becomes "Not discovered anymore" (max 3650 days). Note: If set to "0", entities will be deleted immediately. Using "0" is not recommended, since just wrongly editing the filter may end up in the entity being deleted with all the historical data. |
| Filter | The filter can be used to only generate real items, triggers, and graphs for certain file systems. It expects POSIX Extended Regular Expression. For instance, if you are only interested in C:, D:, and E: file systems, you could put {#FSNAME} into "Macro" and "\C|\D|\E" regular expression into "Regexp" text fields. Filtering is also possible by file system types using {#FSTYPE} macro (e. g. "\ext|\reiserfs"). You can enter a regular expression or reference a global regular expression in "Regexp" field. In order to test the regular expression you can use "grep -E", for example: `for f in ext2 nfs reiserfs smbfs; do echo $f | grep -E 'ext|^reiserfs' || echo "SKIP: $f"; done`{.bash}Note that if some macro from the filter is missing in the response, the found entity will be ignored. |
| Description | Enter a description. |
| Status | Enabled - the rule will be processed. Disabled - the rule will not be processed. Not supported - the item is not supported. This item will not be processed, however Zabbix may try to periodically set the status of the item to Enabled according to the interval set for refreshing unsupported items. |
Zabbix database in MySQL must be created as case-sensitive if file system names that differ only by case are to be discovered correctly.
The mistake or typo in regex used in LLD rule may cause deleting thousands of configuration elements, historical values and events for many hosts. For example, incorrect “File systems for discovery” regular expression may cause deleting thousands of items, triggers, historical values and events.
Discovery rule history is not preserved.
Once a rule is created, go to the items for that rule and press "Create prototype" to create an item prototype. Note how macro {#FSNAME} is used where a file system name is required. When the discovery rule is processed, this macro will be substituted with the discovered file system.
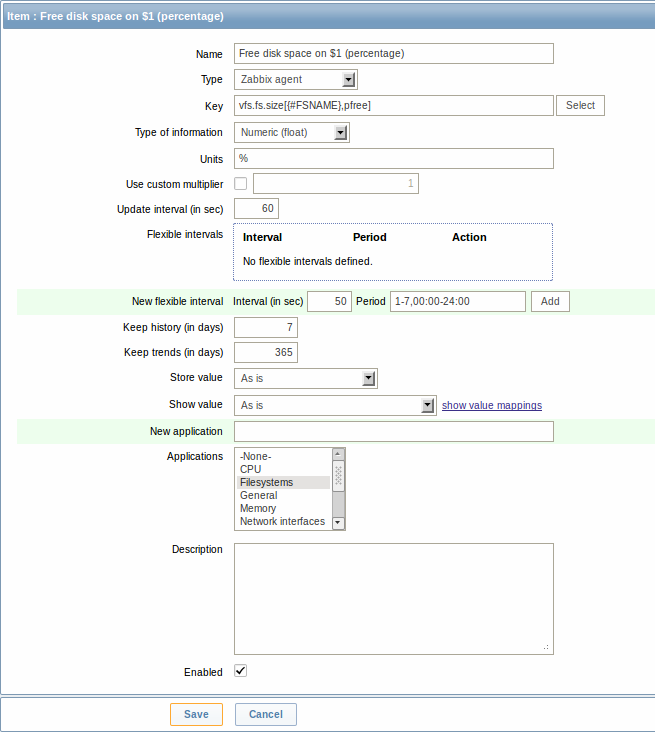
If an item prototype is created with a Disabled status, it will be added to a discovered entity, but in a disabled state.
We can create several item prototypes for each file system metric we are interested in:
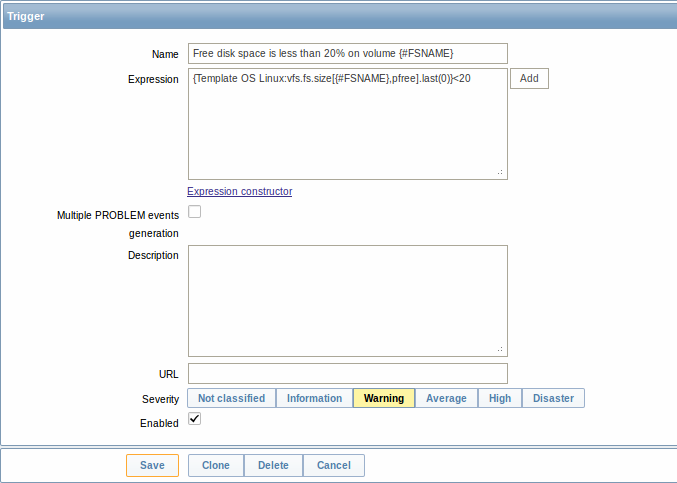
Then, we create trigger prototypes in a similar way:
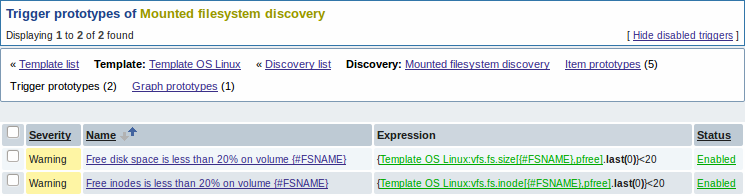
And graph prototypes too:
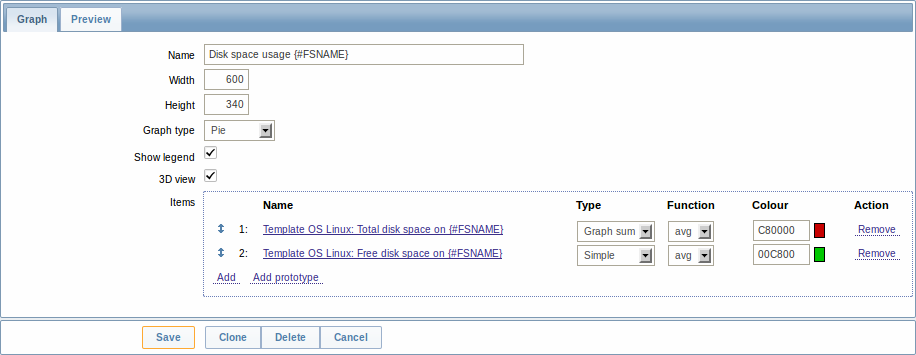
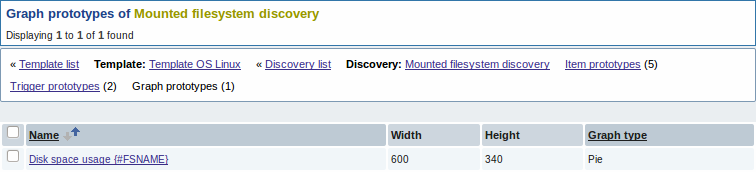
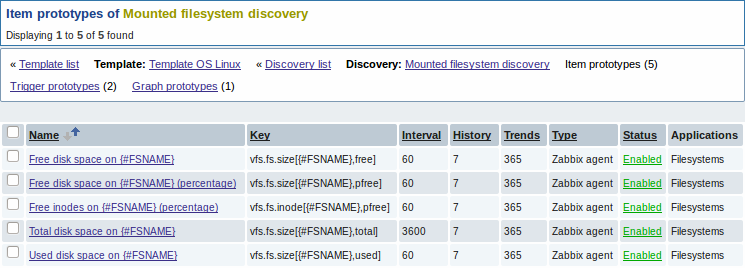
Finally, we have created a discovery rule that looks like shown below. It has five item prototypes, two trigger prototypes, and one graph prototype.

Note: For configuring host prototypes, see the section about host prototype configuration in virtual machine monitoring.
Discovered entities
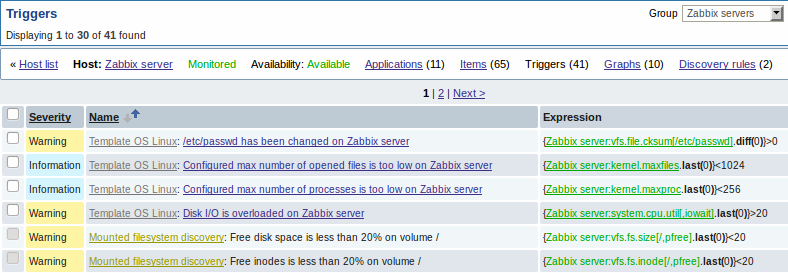
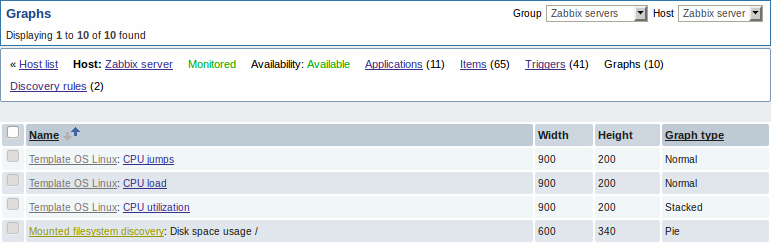
The screenshots below illustrate how discovered items, triggers, and graphs look like in the host's configuration. Discovered entities are prefixed with a golden link to a discovery rule they come from.
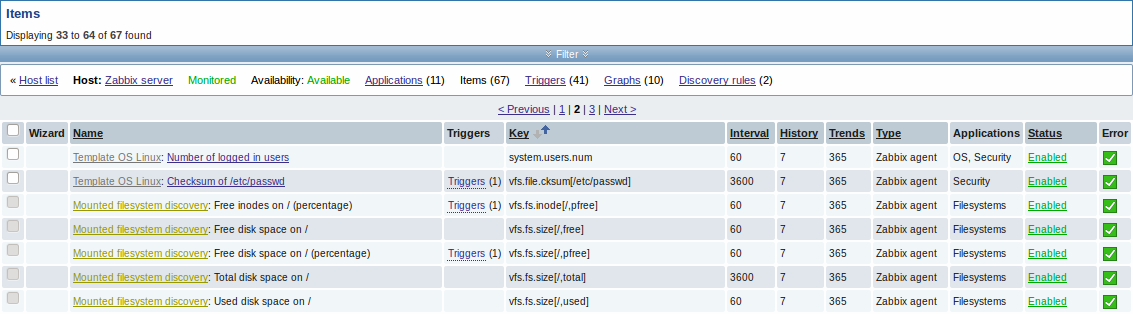
Note that discovered entities will not be created in case there are already existing entities with the same uniqueness criteria, for example, an item with the same key or graph with the same name. An error message is displayed in this case in the frontend that the low-level discovery rule could not create certain entities. The discovery rule itself, however, will not turn unsupported because some entity could not be created and had to be skipped. The discovery rule will go on creating/updating other entities.
Items (similarly, triggers and graphs) created by a low-level discovery rule cannot be manually deleted. However, they will be deleted automatically if a discovered entity (file system, interface, etc) stops being discovered (or does not pass the filter anymore). In this case the items, triggers and graphs will be deleted after the days defined in the Keep lost resources period field pass. Note that triggers (until Zabbix 2.2.2) and graphs (until Zabbix 2.2.3) are deleted immediately.
When discovered entities become 'Not discovered anymore', an orange lifetime indicator is displayed in the item list. Move your mouse pointer over it and a message will be displayed indicating how many days are left until the item is deleted.

If entities were marked for deletion, but were not deleted at the expected time (disabled discovery rule or item host), they will be deleted the next time the discovery rule is processed.
Discovery of network interfaces
Discovery of network interfaces is done in exactly the same way as discovery of file systems, except that you use the discovery rule key "net.if.discovery" instead of "vfs.fs.discovery" and use macro {#IFNAME} instead of {#FSNAME} in filter and item/trigger/graph prototypes.
Examples of item prototypes that you might wish to create based on "net.if.discovery": "net.if.in[{#IFNAME},bytes]", "net.if.out[{#IFNAME},bytes]".
See above for more information about the filter.
Discovery of SNMP OIDs
In this example, we will perform SNMP discovery on a switch. First, go to "Configuration" → "Templates".
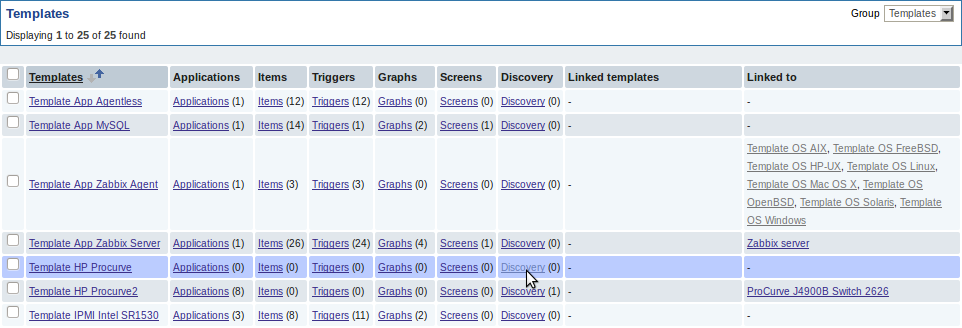
To edit discovery rules for a template, click on the link in the "Discovery" column.
Then, press "Create rule" and fill the form with the details in the screenshot below.
Unlike file system and network interface discovery, the item does not necessarily have to have "snmp.discovery" key - item type of SNMP agent is sufficient.
Also, unlike the previous examples, this discovery item will generate two macros for each discovered entity: {#SNMPINDEX} and {#SNMPVALUE}. In case you would like to filter out loopback interfaces from returned values you could put "{#SNMPVALUE}" into filter “Macro” and "\([\l]|l$)[\^o]?" regular expression into “Regexp” text fields. See above for more information about the filter.
In "SNMP OID" field, we have to put an OID that is capable of generating meaningful values for these macros.
To understand what we mean, let us perform snmpwalk on our switch:
$ snmpwalk -v 2c -c public 192.168.1.1 IF-MIB::ifDescr
IF-MIB::ifDescr.1 = STRING: WAN
IF-MIB::ifDescr.2 = STRING: LAN1
IF-MIB::ifDescr.3 = STRING: LAN2
Macro {#SNMPINDEX} takes its value from the part of the OID that is after ifDescr (in this example: 1, 2, 3). Macro {#SNMPVALUE} comes from the value of the corresponding OID (here: WAN, LAN1, LAN2). Thus, our "snmp.discovery" item would return three sets of macro → value pairs:
{#SNMPINDEX} → 1   {#SNMPVALUE} → WAN
{#SNMPINDEX} → 2   {#SNMPVALUE} → LAN1
{#SNMPINDEX} → 3   {#SNMPVALUE} → LAN2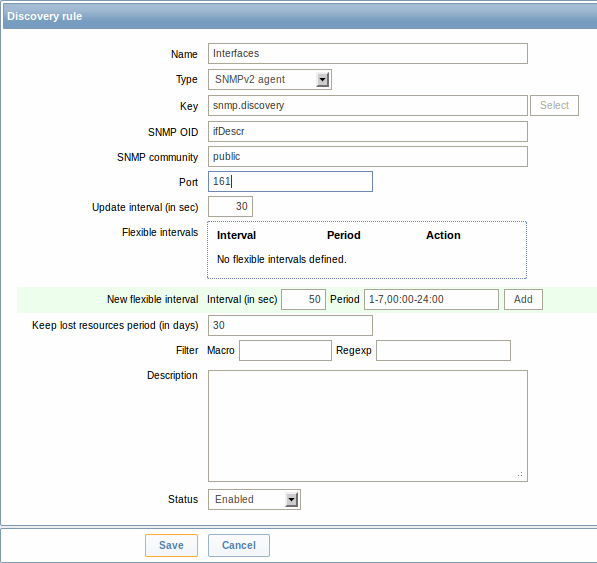
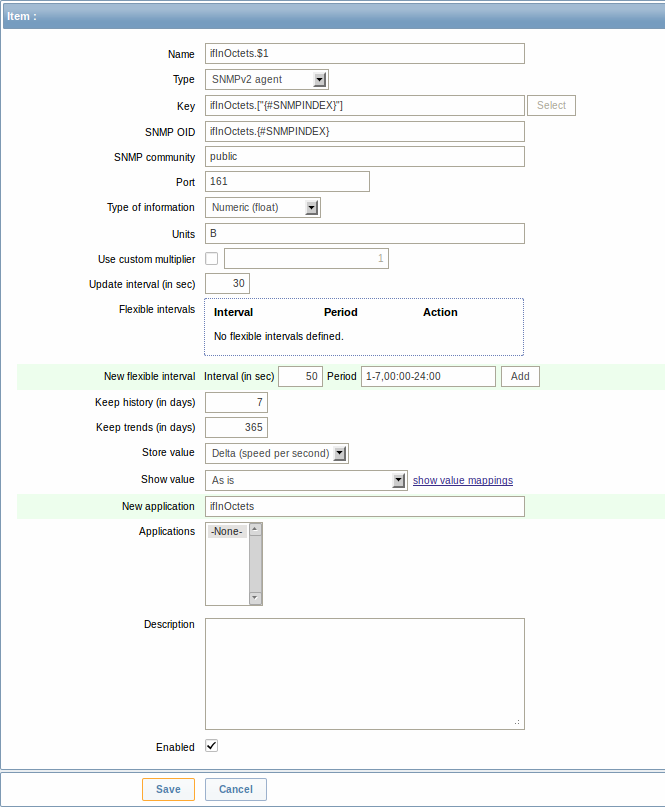
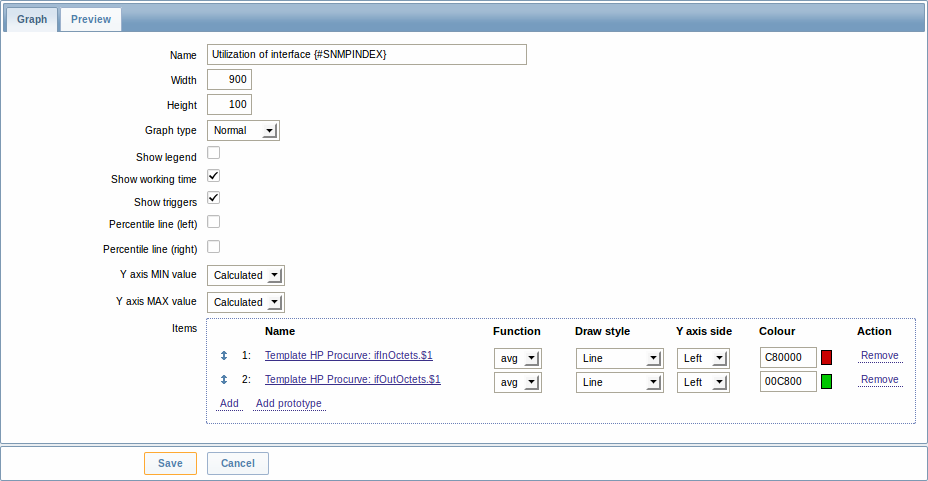
The following screenshot illustrates how we can use these macros in item prototypes:
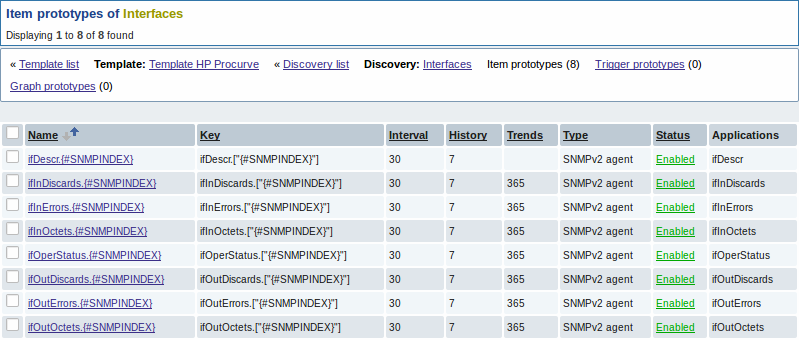
Again, creating as many item prototypes as needed:
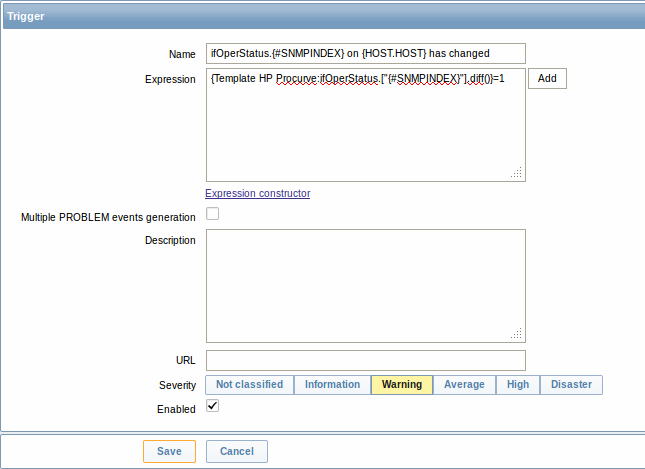
As well as trigger prototypes:
And graph prototypes:
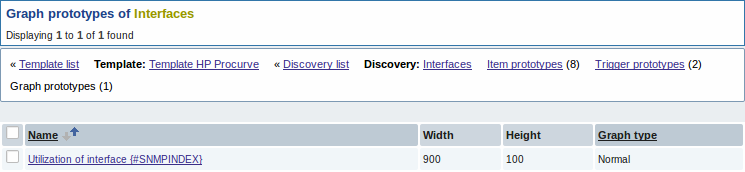
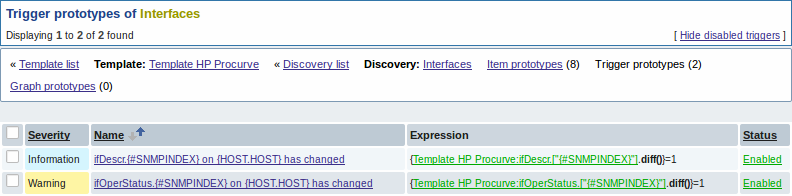
A summary of our discovery rule:
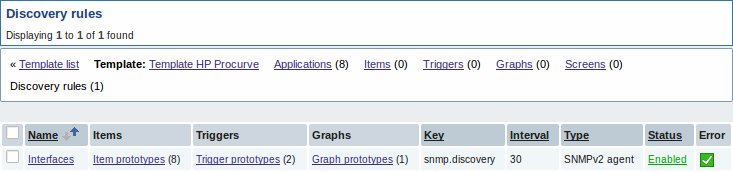
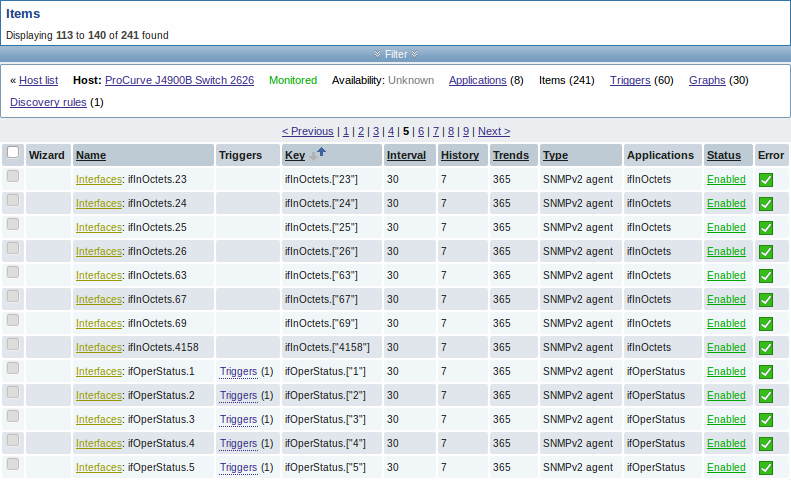
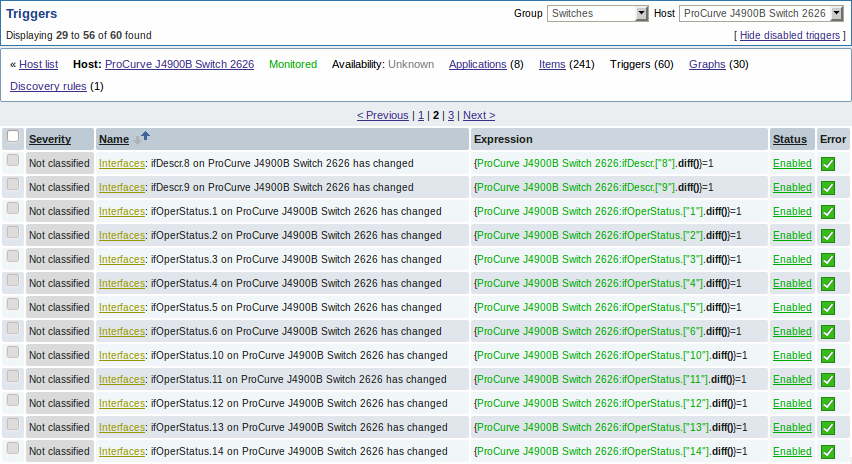
When server runs, it will create real items, triggers, and graphs, based on the values "snmp.discovery" returns. In host's configuration they will be prefixed with a golden link to a discovery rule they come from.

Creating custom LLD rules
It is also possible to create a completely custom LLD rule, discovering any type of entities - for example, databases on a database server.
To do so, a custom item should be created that returns JSON, specifying found objects and optionally - some properties of them. The amount of macros per entity is not limited - while the built-in discovery rules return either one or two macros (for example, two for filesystem discovery), it is possible to return more.
The required JSON format is best illustrated with an example. Suppose we are running an old Zabbix 1.8 agent (one that does not support "vfs.fs.discovery"), but we still need to discover file systems. Here is a simple Perl script for Linux that discovers mounted file systems and outputs JSON, which includes both file system name and type. One way to use it would be as a UserParameter with key "vfs.fs.discovery_perl":
#!/usr/bin/perl

$first = 1;

print "{\n";
print "\t\"data\":[\n\n";

for (`cat /proc/mounts`)
{
    ($fsname, $fstype) = m/\S+ (\S+) (\S+)/;
    $fsname =~ s!/!\\/!g;

    print "\t,\n" if not $first;
    $first = 0;

    print "\t{\n";
    print "\t\t\"{#FSNAME}\":\"$fsname\",\n";
    print "\t\t\"{#FSTYPE}\":\"$fstype\"\n";
    print "\t}\n";
}

print "\n\t]\n";
print "}\n";
Allowed symbols for LLD macro names are 0-9 ,
A-Z , _ , .
Lowercase letters are not supported in the names.
An example of its output (reformatted for clarity) is shown below. JSON for custom discovery checks has to follow the same format.
{
  "data":[

  { "{#FSNAME}":"\/",                           "{#FSTYPE}":"rootfs"   },
  { "{#FSNAME}":"\/sys",                        "{#FSTYPE}":"sysfs"    },
  { "{#FSNAME}":"\/proc",                       "{#FSTYPE}":"proc"     },
  { "{#FSNAME}":"\/dev",                        "{#FSTYPE}":"devtmpfs" },
  { "{#FSNAME}":"\/dev\/pts",                   "{#FSTYPE}":"devpts"   },
  { "{#FSNAME}":"\/",                           "{#FSTYPE}":"ext3"     },
  { "{#FSNAME}":"\/lib\/init\/rw",              "{#FSTYPE}":"tmpfs"    },
  { "{#FSNAME}":"\/dev\/shm",                   "{#FSTYPE}":"tmpfs"    },
  { "{#FSNAME}":"\/home",                       "{#FSTYPE}":"ext3"     },
  { "{#FSNAME}":"\/tmp",                        "{#FSTYPE}":"ext3"     },
  { "{#FSNAME}":"\/usr",                        "{#FSTYPE}":"ext3"     },
  { "{#FSNAME}":"\/var",                        "{#FSTYPE}":"ext3"     },
  { "{#FSNAME}":"\/sys\/fs\/fuse\/connections", "{#FSTYPE}":"fusectl"  }

  ]
}
Then, in the discovery rule's "Filter" field, we could specify "{#FSTYPE}" as a macro and "rootfs|ext3" as a regular expression.
You don't have to use macro names FSNAME/FSTYPE with custom LLD rules, you are free to use whatever names you like.