
1 Configuring a host
Overview
To configure a host in Zabbix frontend, do the following:
- Go to: Configuration → Hosts
- Click on Create to the right (or on the host name to edit an existing host)
- Enter parameters of the host in the form
You can also use the Clone and Full clone buttons in the form of an existing host to create a new host. Clicking on Clone will retain all host parameters and template linkage (keeping all entities from those templates). Full clone will additionally retain directly attached entities (applications, items, triggers, graphs, low-level discovery rules and web scenarios).
Cloning web scenarios with the host is supported since Zabbix 2.2.6.
Note: When a host is cloned, it will retain all template entities as they are originally on the template. Any changes to those entities made on the existing host level (such as changed item interval, modified regular expression or added prototypes to the low-level discovery rule) will not be cloned to the new host; instead they will be as on the template.
Configuration
The Host tab contains general host attributes:

| Parameter | Description |
|---|---|
| Host name | Enter a unique host name. Alphanumerics, spaces, dots, dashes and underscores are allowed. Note: With Zabbix agent running on the host you are configuring, the agent configuration file parameter Hostname must have the same value as the host name entered here. The name in the parameter is needed in the processing of active checks. |
| Visible name | If you set this name, it will be the one visible in lists, maps, etc. This attribute has UTF-8 support. |
| Groups | Select host groups the host belongs to. A host must belong to at least one host group. |
| New host group | A new group can be created and linked to the host. Ignored, if empty. |
| Interfaces | Several host interface types are supported for a host: Agent, SNMP, JMX and IPMI. To add a new interface, click on Add in the Interfaces block and enter IP/DNS, Connect to and Port info. Note: Interfaces that are used in any items cannot be removed and link Remove is greyed out for them. |
| IP address | Host IP address (optional). |
| DNS name | Host DNS name (optional). |
| Connect to | Clicking the respective button will tell Zabbix server what to use to retrieve data from agents: IP - Connect to the host IP address (recommended) DNS - Connect to the host DNS name |
| Port | TCP/UDP port number. Default values are: 10050 for Zabbix agent, 161 for SNMP agent, 12345 for JMX and 623 for IPMI. |
| Default | Check the radio button to set the default interface. |
| Monitored by proxy | The host can be monitored either by Zabbix server or one of Zabbix proxies: (no proxy) - host is monitored by Zabbix server Proxy name - host is monitored by Zabbix proxy "Proxy name" |
| Status | Host status: Monitored - Host is active, ready to be monitored Not monitored - Host is not active, thus not monitored |
The Templates tab allows you to link templates to the host. All entities (items, triggers, graphs and applications) will be inherited from the template.
To link a new template, start typing in the Link new templates field until a list of matching templates appear. Scroll down to select. When all templates to be linked are selected, click on Add.
To unlink a template, use one of the two options in the Linked templates block:
- Unlink - unlink the template, but preserve its items, triggers and graphs
- Unlink and clear - unlink the template and remove all its items, triggers and graphs
The IPMI tab contains IPMI management attributes.
| Parameter | Description |
|---|---|
| Authentication algorithm | Select the authentication algorithm. |
| Privilege level | Select the privilege level. |
| Username | User name for authentication. |
| Password | Password for authentication. |
The Macros tab allows you to define host-level user macros.
The Host inventory tab allows you to manually enter inventory information for the host. You can also select to enable Automatic inventory population, or disable inventory population for this host.
Configuring a host group
To configure a host group in Zabbix frontend, do the following:
- Go to: Configuration → Host groups
- Click on Create Group in the upper right corner of the screen
- Enter parameters of the group in the form
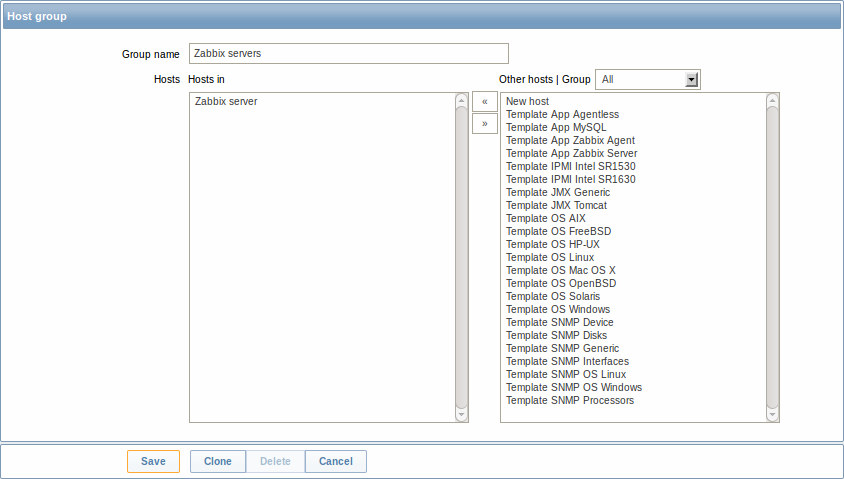
| Parameter | Description |
|---|---|
| Group name | Enter a unique host group name. The name must be unique within a Zabbix node. |
| Hosts | Select hosts, members of the group. A host group may have zero, one or more hosts. |