
- 3 Low-level discovery
3 Low-level discovery
Overview
Low-level discovery provides a way to automatically create items, triggers, and graphs for different entities on a computer. For instance, Zabbix can automatically start monitoring file systems or network interfaces on your machine, without the need to create items for each file system or network interface manually. Additionally it is possible to configure Zabbix to remove unneeded entities automatically based on actual results of periodically performed discovery.
A user can define their own types of discovery, provided they follow a particular JSON protocol.
The general architecture of the discovery process is as follows.
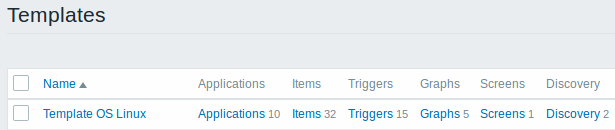
First, a user creates a discovery rule in "Configuration" → "Templates" → "Discovery" column. A discovery rule consists of (1) an item that discovers the necessary entities (for instance, file systems or network interfaces) and (2) prototypes of items, triggers, and graphs that should be created based on the value of that item.
An item that discovers the necessary entities is like a regular item seen elsewhere: the server asks a Zabbix agent (or whatever the type of the item is set to) for a value of that item, the agent responds with a textual value. The difference is that the value the agent responds with should contain a list of discovered entities in a JSON format. While the details of this format are only important for implementers of custom discovery checks, it is necessary to know that the returned value contains a list of macro → value pairs. For instance, item "net.if.discovery" might return two pairs: "{#IFNAME}" → "lo" and "{#IFNAME}" → "eth0".
These macros are used in names, keys and other prototype fields where they are then substituted with the received values for creating real items, triggers, graphs or even hosts for each discovered entity. See the full list of options for using LLD macros.
When the server receives a value for a discovery item, it looks at the macro → value pairs and for each pair generates real items, triggers, and graphs, based on their prototypes. In the example with "net.if.discovery" above, the server would generate one set of items, triggers, and graphs for the loopback interface "lo", and another set for interface "eth0".
Note that since Zabbix 4.2, the format of the JSON returned by low-level discovery rules has been changed. It is no longer expected that the JSON will contain the "data" object. Low-level discovery will now accept a normal JSON containing an array, in order to support new features such as the item value preprocessing and custom paths to low-level discovery macro values in a JSON document.
Built-in discovery keys have been updated to return an array of LLD rows
at the root of JSON document. Zabbix will automatically extract a macro
and value if an array field uses the {#MACRO} syntax as a key. Any new
native discovery checks will use the new syntax without the "data"
elements. When processing a low-level discovery value first the root is
located (array at $. or $.data).
While the "data" element has been removed from all native items related
to discovery, for backward compatibility Zabbix will still accept the
JSON notation with a "data" element, though its use is discouraged. If
the JSON contains an object with only one "data" array element, then it
will automatically extract the content of the element using JSONPath
$.data. Low-level discovery now accepts optional user-defined LLD
macros with a custom path specified in JSONPath syntax.
As a result of the changes above, newer agents no longer will be able to work with an older Zabbix server.
See also: Discovered entities
Configuring low-level discovery
We will illustrate low-level discovery based on an example of file system discovery.
To configure the discovery, do the following:
- Go to: Configuration → Templates or Hosts
- Click on Discovery in the row of an appropriate template/host
- Click on Create discovery rule in the upper right corner of the screen
- Fill in the discovery rule form with the required details
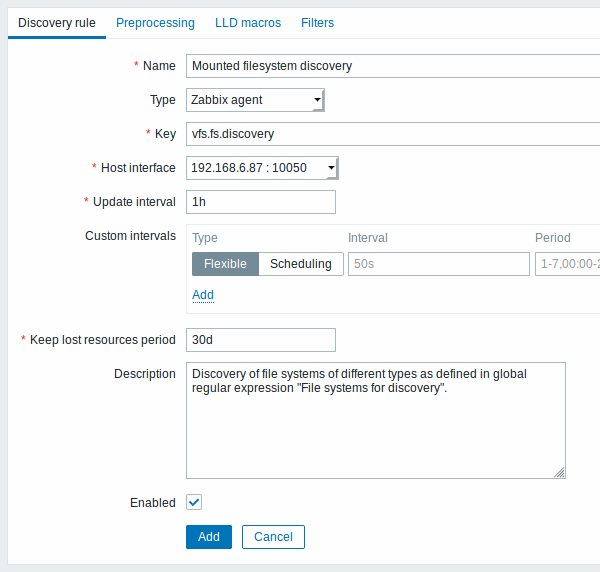
Discovery rule
The discovery rule form contains four tabs, representing, from left to right, the data flow during discovery:
- Discovery rule - specifies, most importantly, the built-in item or custom script to retrieve discovery data
- Preprocessing - applies some preprocessing to the discovered data
- LLD macros - allows to extract some macro values to use in discovered items, triggers, etc
- Filters - allows to filter the discovered values
The Discovery rule tab contains the item key to use for discovery (as well as some general discovery rule attributes):
All mandatory input fields are marked with a red asterisk.
| Parameter | Description |
|---|---|
| Name | Name of discovery rule. |
| Type | The type of check to perform discovery. In this example we are using a Zabbix agent item key. The discovery rule can also be a dependent item, depending on a regular item. It cannot depend on another discovery rule. For a dependent item, select the respective type (Dependent item) and specify the master item in the 'Master item' field. The master item must exist. |
| Key | Enter the discovery item key. For example, you may use the built-in "vfs.fs.discovery" item key to return a JSON with the list of file systems present on the computer and their types. Note that another option for filesystem discovery is using discovery results by the "vfs.fs.get" agent key, supported since Zabbix 4.4.5 (see example). |
| Update interval | This field specifies how often Zabbix performs discovery. In the beginning, when you are just setting up file system discovery, you might wish to set it to a small interval, but once you know it works you can set it to 30 minutes or more, because file systems usually do not change very often. Time suffixes are supported, e.g. 30s, 1m, 2h, 1d, since Zabbix 3.4.0. User macros are supported, since Zabbix 3.4.0. Note: The update interval can only be set to '0' if custom intervals exist with a non-zero value. If set to '0', and a custom interval (flexible or scheduled) exists with a non-zero value, the item will be polled during the custom interval duration. Note that for an existing discovery rule the discovery can be performed immediately by pushing the Check now button. |
| Custom intervals | You can create custom rules for checking the item: Flexible - create an exception to the Update interval (interval with different frequency) Scheduling - create a custom polling schedule. For detailed information see Custom intervals. Scheduling is supported since Zabbix 3.0.0. |
| Keep lost resources period | This field allows you to specify the duration for how long the discovered entity will be retained (won't be deleted) once its discovery status becomes "Not discovered anymore" (between 1 hour to 25 years; or "0"). Time suffixes are supported, e.g. 2h, 1d, since Zabbix 3.4.0. User macros are supported, since Zabbix 3.4.0. Note: If set to "0", entities will be deleted immediately. Using "0" is not recommended, since just wrongly editing the filter may end up in the entity being deleted with all the historical data. |
| Description | Enter a description. |
| Enabled | If checked, the rule will be processed. |
Discovery rule history is not preserved.
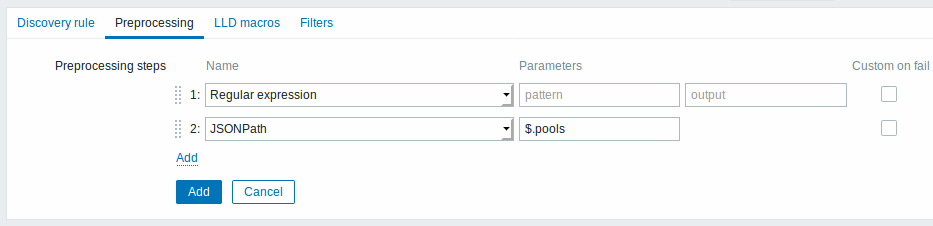
Preprocessing
The Preprocessing tab allows to define transformation rules to apply to the result of discovery. One or several transformations are possible in this step. Transformations are executed in the order in which they are defined. All preprocessing is done by Zabbix server.
See also: Preprocessing details.
| Type | Transformation | Description |
|---|---|---|
| Text | ||
| Regular expression | Match the received value to the <pattern> regular expression and replace value with the extracted <output>. The regular expression supports extraction of maximum 10 captured groups with the \N sequence. Parameters: pattern - regular expression output - output formatting template. An \N (where N=1…9) escape sequence is replaced with the Nth matched group. A \0 escape sequence is replaced with the matched text. If you mark the Custom on fail checkbox, it is possible to specify custom error handling options: either to discard the value, set a specified value or set a specified error message. |
|
| Structured data | ||
| JSONPath | Extract value or fragment from JSON data using JSONPath functionality. If you mark the Custom on fail checkbox, the item will not become unsupported in case of failed preprocessing step and it is possible to specify custom error handling options: either to discard the value, set a specified value or set a specified error message. |
|
| XML XPath | Extract value or fragment from XML data using XPath functionality. For this option to work, Zabbix server must be compiled with libxml support. Examples: number(/document/item/value) will extract 10 from <document><item><value>10</value></item></document>number(/document/item/@attribute) will extract 10 from <document><item attribute="10"></item></document>/document/item will extract <item><value>10</value></item> from <document><item><value>10</value></item></document>Note that namespaces are not supported. Supported since 4.4.0. If you mark the Custom on fail checkbox, it is possible to specify custom error handling options: either to discard the value, set a specified value or set a specified error message. |
|
| CSV to JSON | Convert CSV file data into JSON format. For more information, see: CSV to JSON preprocessing. Supported since 4.4.0. |
|
| Custom scripts | ||
| JavaScript | Enter JavaScript code in the block that appears when clicking in the parameter field or on Open. Note that available JavaScript length depends on the database used. For more information, see: Javascript preprocessing |
|
| Validation | ||
| Does not match regular expression | Specify a regular expression that a value must not match. E.g. Error:(.*?)\.If you mark the Custom on fail checkbox, it is possible to specify custom error handling options: either to discard the value, set a specified value or set a specified error message. |
|
| Check for error in JSON | Check for an application-level error message located at JSONpath. Stop processing if succeeded and message is not empty; otherwise continue processing with the value that was before this preprocessing step. Note that these external service errors are reported to user as is, without adding preprocessing step information. E.g. $.errors. If a JSON like {"errors":"e1"} is received, the next preprocessing step will not be executed.If you mark the Custom on fail checkbox, it is possible to specify custom error handling options: either to discard the value, set a specified value or set a specified error message. |
|
| Check for error in XML | Check for an application-level error message located at xpath. Stop processing if succeeded and message is not empty; otherwise continue processing with the value that was before this preprocessing step. Note that these external service errors are reported to user as is, without adding preprocessing step information. No error will be reported in case of failing to parse invalid XML. Supported since 4.4.0. If you mark the Custom on fail checkbox, it is possible to specify custom error handling options: either to discard the value, set a specified value or set a specified error message. |
|
| Throttling | ||
| Discard unchanged with heartbeat | Discard a value if it has not changed within the defined time period (in seconds). Positive integer values are supported to specify the seconds (minimum - 1 second). Time suffixes can be used in this field (e.g. 30s, 1m, 2h, 1d). User macros and low-level discovery macros can be used in this field. Only one throttling option can be specified for a discovery item. E.g. 1m. If identical text is passed into this rule twice within 60 seconds, it will be discarded.Note: Changing item prototypes does not reset throttling. Throttling is reset only when preprocessing steps are changed. |
|
| Prometheus | ||
| Prometheus to JSON | Convert required Prometheus metrics to JSON. See Prometheus checks for more details. |
|
Note that if the discovery rule has been applied to the host via template then the content of this tab is read-only.
Custom macros
The LLD macros tab allows to specify custom low-level discovery macros.
Custom macros are useful in cases when the returned JSON does not have the required macros already defined. So, for example:
- The native
vfs.fs.discoverykey for filesystem discovery returns a JSON with some pre-defined LLD macros such as {#FSNAME}, {#FSTYPE}. These macros can be used in item, trigger prototypes (see subsequent sections of the page) directly; defining custom macros is not needed; - The
vfs.fs.getagent item (supported since Zabbix 4.4.5, see more info) also returns a JSON with filesystem data, but without any pre-defined LLD macros. In this case you may define the macros yourself, and map them to the values in the JSON using JSONPath.
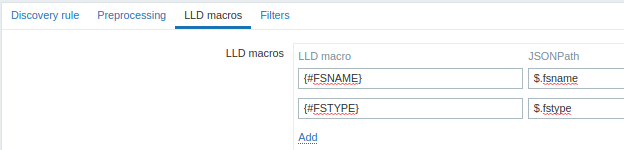
The extracted values can be used in discovered items, triggers, etc. Note that values will be extracted from the result of discovery and any preprocessing steps so far.
| Parameter | Description |
|---|---|
| LLD macro | Name of the low-level discovery macro, using the following syntax: {#MACRO}. |
| JSONPath | Path that is used to extract LLD macro value from a LLD row, using JSONPath syntax. For example, $.foo will extract "bar" and "baz" from this JSON: [{"foo":"bar"}, {"foo":"baz"}]The values extracted from the returned JSON are used to replace the LLD macros in item, trigger, etc. prototype fields. JSONPath can be specified using the dot notation or the bracket notation. Bracket notation should be used in case of any special characters and Unicode, like $['unicode + special chars #1']['unicode + special chars #2']. |
Filter
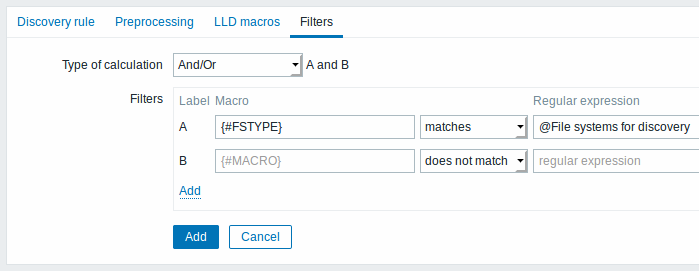
The Filters tab contains discovery rule filter definitions allowing to filter discovery values:
| Parameter | Description |
|---|---|
| Type of calculation | The following options for calculating filters are available: And - all filters must be passed; Or - enough if one filter is passed; And/Or - uses And with different macro names and Or with the same macro name; Custom expression - offers the possibility to define a custom calculation of filters. The formula must include all filters in the list. Limited to 255 symbols. |
| Filters | A filter can be used to generate real items, triggers, and graphs only for certain file systems. It expects a Perl Compatible Regular Expression (PCRE). For instance, if you are only interested in C:, D:, and E: file systems, you could put {#FSNAME} into "Macro" and "\C|\D|\E" regular expression into "Regular expression" text fields. Filtering is also possible by file system types using {#FSTYPE} macro (e.g. "\ext|\reiserfs") and by drive types (supported only by Windows agent) using {#FSDRIVETYPE} macro (e.g., "fixed"). You can enter a regular expression or reference a global regular expression in "Regular expression" field. In order to test a regular expression you can use "grep -E", for example: `for f in ext2 nfs reiserfs smbfs; do echo $f | grep -E 'ext|^reiserfs' || echo "SKIP: $f"; done`{.bash}{#FSDRIVETYPE} macro on Windows is supported since Zabbix 3.0.0. Defining several filters is supported since Zabbix 2.4.0. Note that if some macro from the filter is missing in the response, the found entity will be ignored. Filter drop-down offers two values to specify whether a macro matches a regular expression or does not match. |
A mistake or typo in the regular expression used in LLD rule may cause deleting thousands of configuration elements, historical values and events for many hosts. For example, an incorrect "File systems for discovery" regular expression may cause deleting thousands of items, triggers, historical values and events.
Zabbix database in MySQL must be created as case-sensitive if file system names that differ only by case are to be discovered correctly.
Form buttons
Buttons at the bottom of the form allow to perform several operations.
 |
Add a discovery rule. This button is only available for new discovery rules. |
 |
Update the properties of a discovery rule. This button is only available for existing discovery rules. |
 |
Create another discovery rule based on the properties of the current discovery rule. |
 |
Perform discovery based on the discovery rule immediately. The discovery rule must already exist. See more details. Note that when performing discovery immediately, configuration cache is not updated, thus the result will not reflect very recent changes to discovery rule configuration. |
 |
Delete the discovery rule. |
 |
Cancel the editing of discovery rule properties. |
Item prototypes
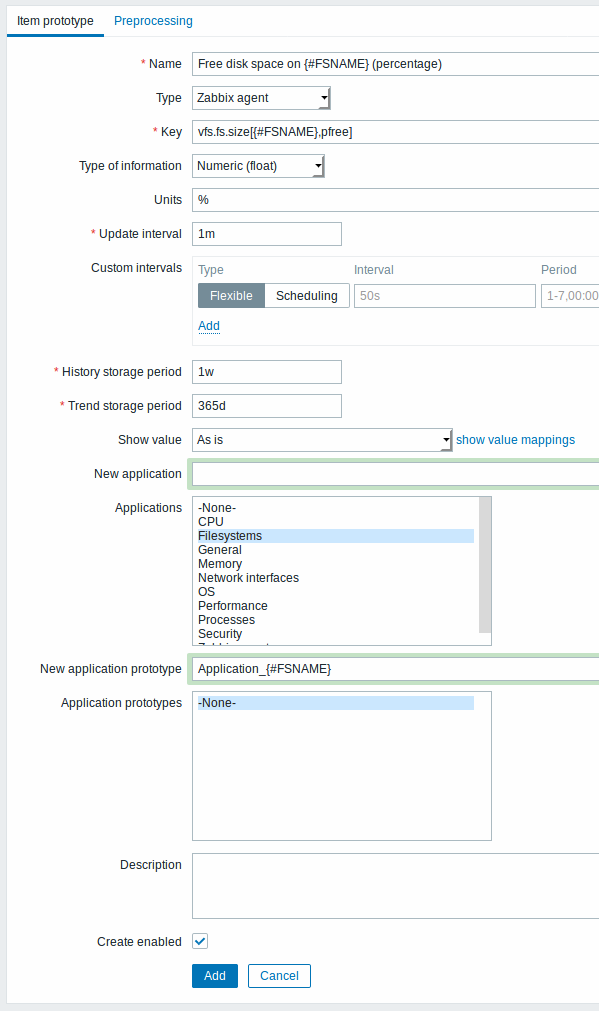
Once a rule is created, go to the items for that rule and press "Create prototype" to create an item prototype. Note how macro {#FSNAME} is used where a file system name is required. When the discovery rule is processed, this macro will be substituted with the discovered file system.
Low-level discovery macros and user macros may be used in item prototype configuration and item value preprocessing parameters. Note that when used in update intervals, a single macro has to fill the whole field. Multiple macros in one field or macros mixed with text are not supported.
Context-specific escaping of low-level discovery macros is performed for safe use in regular expression and XPath preprocessing parameters.
Attributes that are specific for item prototypes:
| Parameter | Description |
|---|---|
| New application prototype | You may define a new application prototype. In application prototypes you can use low-level discovery macros that, after discovery, will be substituted with real values to create applications that are specific for the discovered entity. See also application discovery notes for more specific information. |
| Application prototypes | Select from the existing application prototypes. |
| Create enabled | If checked the item will be added in an enabled state. If unchecked, the item will be added to a discovered entity, but in a disabled state. |
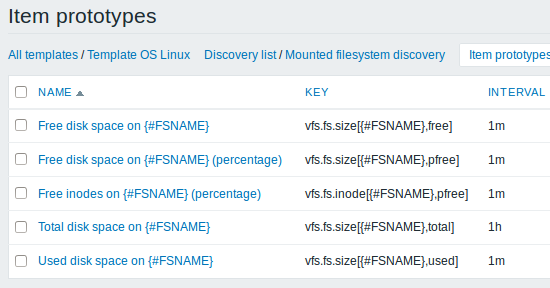
We can create several item prototypes for each file system metric we are interested in:
Mass update option is available if you want to update properties of several item prototypes at once.
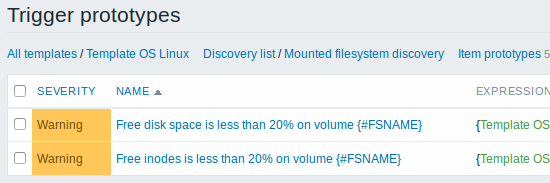
Trigger prototypes
We create trigger prototypes in a similar way as item prototypes:
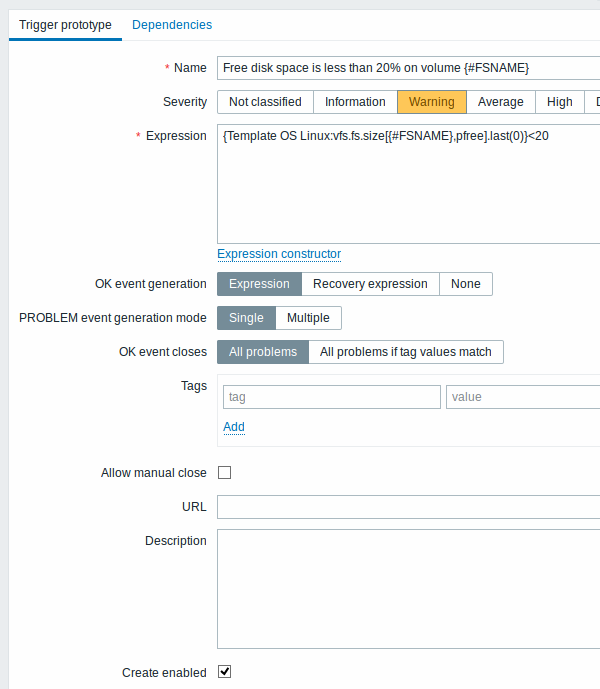
Attributes that are specific for trigger prototypes:
| Parameter | Description |
|---|---|
| Create enabled | If checked the trigger will be added in an enabled state. If unchecked, the trigger will be added to a discovered entity, but in a disabled state. |
When real triggers are created from the prototypes, there may be a need to be flexible as to what constant ('20' in our example) is used for comparison in the expression. See how user macros with context can be useful to accomplish such flexibility.
You can define dependencies between trigger prototypes as well (supported since Zabbix 3.0). To do that, go to the Dependencies tab. A trigger prototype may depend on another trigger prototype from the same low-level discovery (LLD) rule or on a regular trigger. A trigger prototype may not depend on a trigger prototype from a different LLD rule or on a trigger created from trigger prototype. Host trigger prototype cannot depend on a trigger from a template.
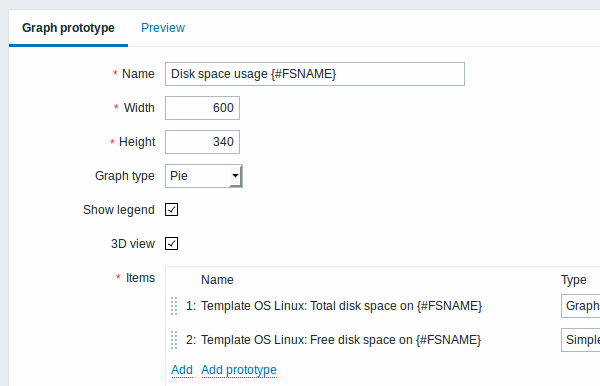
Graph prototypes
We can create graph prototypes, too:
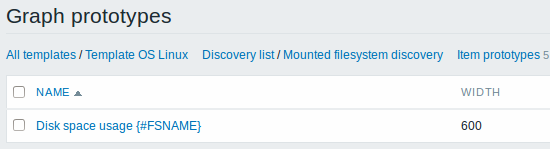
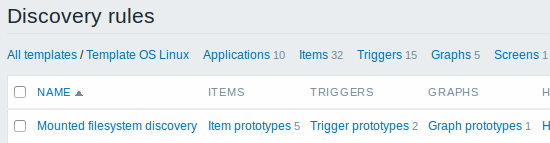
Finally, we have created a discovery rule that looks like shown below. It has five item prototypes, two trigger prototypes, and one graph prototype.
Note: For configuring host prototypes, see the section about host prototype configuration in virtual machine monitoring.
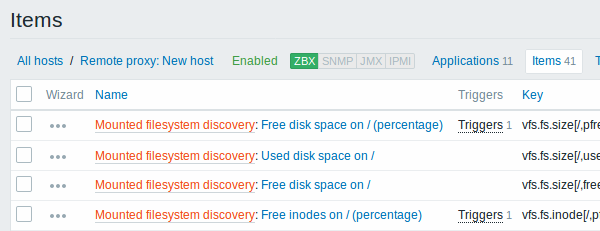
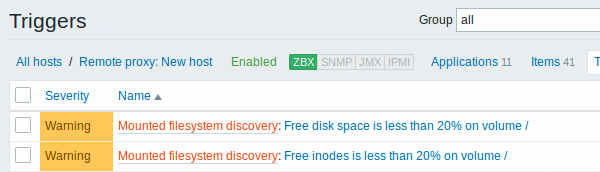
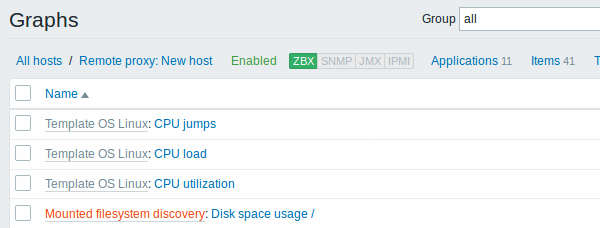
Discovered entities
The screenshots below illustrate how discovered items, triggers, and graphs look like in the host's configuration. Discovered entities are prefixed with an orange link to a discovery rule they come from.
Note that discovered entities will not be created in case there are already existing entities with the same uniqueness criteria, for example, an item with the same key or graph with the same name. An error message is displayed in this case in the frontend that the low-level discovery rule could not create certain entities. The discovery rule itself, however, will not turn unsupported because some entity could not be created and had to be skipped. The discovery rule will go on creating/updating other entities.
Items (similarly, triggers and graphs) created by a low-level discovery rule will be deleted automatically if a discovered entity (file system, interface, etc) stops being discovered (or does not pass the filter anymore). In this case the items, triggers and graphs will be deleted after the days defined in the Keep lost resources period field pass.
When discovered entities become 'Not discovered anymore', a lifetime indicator is displayed in the item list. Move your mouse pointer over it and a message will be displayed indicating how many days are left until the item is deleted.

If entities were marked for deletion, but were not deleted at the expected time (disabled discovery rule or item host), they will be deleted the next time the discovery rule is processed.
Entities containing other entities, which are marked for deletion, will not update if changed on the discovery rule level. For example, LLD-based triggers will not update if they contain items that are marked for deletion.
Other types of discovery
More detail and how-tos on other types of out-of-the-box discovery is available in the following sections:
- discovery of network interfaces;
- discovery of CPUs and CPU cores;
- discovery of SNMP OIDs;
- discovery of JMX objects;
- discovery using ODBC SQL queries;
- discovery of Windows services;
- discovery of host interfaces in Zabbix.
For more detail on the JSON format for discovery items and an example of how to implement your own file system discoverer as a Perl script, see creating custom LLD rules.
Data limits for return values
There is no limit for low-level discovery rule JSON data if it is received directly by Zabbix server, because return values are processed without being stored in a database. There's also no limit for custom low-level discovery rules, however, if it is intended to acquire custom LLD data using a user parameter, then user parameter return value limit applies (512 KB).
If data has to go through Zabbix proxy it has to store this data in database so database limits apply, for example, 2048 bytes on a Zabbix proxy run with IBM DB2 database.
Multiple LLD rules for same item
Since Zabbix agent version 3.2 it is possible to define several low-level discovery rules with the same discovery item.
To do that you need to define the Alias agent
parameter, allowing to use
altered discovery item keys in different discovery rules, for example
vfs.fs.discovery[foo], vfs.fs.discovery[bar], etc.
Creating custom LLD rules
It is also possible to create a completely custom LLD rule, discovering any type of entities - for example, databases on a database server.
To do so, a custom item should be created that returns JSON, specifying found objects and optionally - some properties of them. The amount of macros per entity is not limited - while the built-in discovery rules return either one or two macros (for example, two for filesystem discovery), it is possible to return more.
The required JSON format is best illustrated with an example. Suppose we are running an old Zabbix 1.8 agent (one that does not support "vfs.fs.discovery"), but we still need to discover file systems. Here is a simple Perl script for Linux that discovers mounted file systems and outputs JSON, which includes both file system name and type. One way to use it would be as a UserParameter with key "vfs.fs.discovery_perl":
#!/usr/bin/perl

$first = 1;

print "[\n";

for (`cat /proc/mounts`)
{
    ($fsname, $fstype) = m/\S+ (\S+) (\S+)/;

    print "\t,\n" if not $first;
    $first = 0;

    print "\t{\n";
    print "\t\t\"{#FSNAME}\":\"$fsname\",\n";
    print "\t\t\"{#FSTYPE}\":\"$fstype\"\n";
    print "\t}\n";
}

print "]\n";
Allowed symbols for LLD macro names are 0-9 ,
A-Z , _ , .
Lowercase letters are not supported in the names.
An example of its output (reformatted for clarity) is shown below. JSON for custom discovery checks has to follow the same format.
[
    { "{#FSNAME}":"/",                           "{#FSTYPE}":"rootfs"   },
    { "{#FSNAME}":"/sys",                        "{#FSTYPE}":"sysfs"    },
    { "{#FSNAME}":"/proc",                       "{#FSTYPE}":"proc"     },
    { "{#FSNAME}":"/dev",                        "{#FSTYPE}":"devtmpfs" },
    { "{#FSNAME}":"/dev/pts",                    "{#FSTYPE}":"devpts"   },
    { "{#FSNAME}":"/lib/init/rw",                "{#FSTYPE}":"tmpfs"    },
    { "{#FSNAME}":"/dev/shm",                    "{#FSTYPE}":"tmpfs"    },
    { "{#FSNAME}":"/home",                       "{#FSTYPE}":"ext3"     },
    { "{#FSNAME}":"/tmp",                        "{#FSTYPE}":"ext3"     },
    { "{#FSNAME}":"/usr",                        "{#FSTYPE}":"ext3"     },
    { "{#FSNAME}":"/var",                        "{#FSTYPE}":"ext3"     },
    { "{#FSNAME}":"/sys/fs/fuse/connections",    "{#FSTYPE}":"fusectl"  }
]
In previous example it is required that the keys match the LLD macro
names used in prototypes, the alternative is to extract LLD macro values
using JSONPath {#FSNAME} → $.fsname and {#FSTYPE} → $.fstype,
thus making such script possible:
#!/usr/bin/perl

$first = 1;

print "[\n";

for (`cat /proc/mounts`)
{
    ($fsname, $fstype) = m/\S+ (\S+) (\S+)/;

    print "\t,\n" if not $first;
    $first = 0;

    print "\t{\n";
    print "\t\t\"fsname\":\"$fsname\",\n";
    print "\t\t\"fstype\":\"$fstype\"\n";
    print "\t}\n";
}

print "]\n";
An example of its output (reformatted for clarity) is shown below. JSON for custom discovery checks has to follow the same format.
[
    { "fsname":"/",                           "fstype":"rootfs"   },
    { "fsname":"/sys",                        "fstype":"sysfs"    },
    { "fsname":"/proc",                       "fstype":"proc"     },
    { "fsname":"/dev",                        "fstype":"devtmpfs" },
    { "fsname":"/dev/pts",                    "fstype":"devpts"   },
    { "fsname":"/lib/init/rw",                "fstype":"tmpfs"    },
    { "fsname":"/dev/shm",                    "fstype":"tmpfs"    },
    { "fsname":"/home",                       "fstype":"ext3"     },
    { "fsname":"/tmp",                        "fstype":"ext3"     },
    { "fsname":"/usr",                        "fstype":"ext3"     },
    { "fsname":"/var",                        "fstype":"ext3"     },
    { "fsname":"/sys/fs/fuse/connections",    "fstype":"fusectl"  }
]
Then, in the discovery rule's "Filter" field, we could specify "{#FSTYPE}" as a macro and "rootfs|ext3" as a regular expression.
You don't have to use macro names FSNAME/FSTYPE with custom LLD rules, you are free to use whatever names you like. In case JSONPath is used then LLD row will be an array element that can be an object, but it can be also another array or a value.
Note that, if using a user parameter, the return value is limited to 512 KB. For more details, see data limits for LLD return values.
Using LLD macros in user macro contexts
User macros with context can be used to accomplish more flexible thresholds in trigger expressions. Different thresholds may be defined on user macro level and then used in trigger constants depending on the discovered context. Discovered context appears when the low-level discovery macros used in the macros are resolved to real values.
To illustrate we can use data from the example above and assume that the
following file systems will be discovered: /, /home, /tmp, /usr,
/var.
We may define a free-disk-space trigger prototype for a host, where the threshold is expressed by a user macro with context:
{host:vfs.fs.size[{#FSNAME},pfree].last()}<{$LOW_SPACE_LIMIT:"{#FSNAME}"}
Then add user macros:
{$LOW_SPACE_LIMIT}10{$LOW_SPACE_LIMIT:/home}20{$LOW_SPACE_LIMIT:/tmp}50
Now, once the file systems are discovered, events will be generated if
/, /usr and /var filesystems have less than 10% of free disk
space, the /home filesystem - less than 20% of free disk space or
the /tmp filesystem - less than 50% of free disk space.