
- 2 Best practices for secure Zabbix setup
- Overview
- Access control
- Cryptography
- Web server hardening
- Enabling Zabbix on root directory of URL
- Enabling HTTP Strict Transport Security (HSTS) on the web server
- Enabling Content Security Policy (CSP) on the web server
- Disabling web server information exposure
- Disabling default web server error pages
- Removing web server test page
- Set X-Frame-Options HTTP response header
- Hiding the file with list of common passwords
- UTF-8 encoding
- Windows installer paths
- Zabbix Security Advisories and CVE database
2 Best practices for secure Zabbix setup
Overview
This section contains best practices that should be observed in order to set up Zabbix in a secure way.
The practices contained here are not required for the functioning of Zabbix. They are recommended for better security of the system.
Access control
Principle of least privilege
The principle of least privilege should be used at all times for Zabbix. This principle means that user accounts (in Zabbix frontend) or process user (for Zabbix server/proxy or agent) have only those privileges that are essential to perform intended functions. In other words, user accounts at all times should run with as few privileges as possible.
Giving extra permissions to 'zabbix' user will allow it to access configuration files and execute operations that can compromise the overall security of the infrastructure.
When implementing the least privilege principle for user accounts, Zabbix frontend user types should be taken into account. It is important to understand that while a "Admin" user type has less privileges than "Super Admin" user type, it has administrative permissions that allow managing configuration and execute custom scripts.
Some information is available even for non-privileged users. For example, while Alerts → Scripts is not available for non-Super Admins, scripts themselves are available for retrieval by using Zabbix API. Limiting script permissions and not adding sensitive information (like access credentials, etc) should be used to avoid exposure of sensitive information available in global scripts.
Secure user for Zabbix agent
In the default configuration, Zabbix server and Zabbix agent processes share one 'zabbix' user. If you wish to make sure that the agent cannot access sensitive details in server configuration (e.g. database login information), the agent should be run as a different user:
- Create a secure user
- Specify this user in the agent configuration file ('User' parameter)
- Restart the agent with administrator privileges. Privileges will be dropped to the specified user.
Revoke write access to SSL configuration (Windows)
If you have compiled Zabbix agent on Windows, with OpenSSL located in an
unprotected directory (e.g., c:\openssl-64bit, C:\OpenSSL-Win64-111-static,
or C:\dev\openssl), make sure to revoke write access from non-administrator
users to this directory. Otherwise, the agent loads SSL settings from a path
that can be modified by unprivileged users, resulting in a potential security
vulnerability.
Cryptography
Setting up SSL for Zabbix frontend
On RHEL-based systems, install the mod_ssl package:
dnf install mod_sslCreate a directory for SSL keys:
mkdir -p /etc/httpd/ssl/private
chmod 700 /etc/httpd/ssl/private
Create the SSL certificate:
openssl req -x509 -nodes -days 365 -newkey rsa:2048 -keyout /etc/httpd/ssl/private/apache-selfsigned.key -out /etc/httpd/ssl/apache-selfsigned.crtFill out the prompts appropriately.
The most important line is the one that requests the Common Name.
You need to enter the domain name that you want to be associated with your server.
You can enter the public IP address instead if you do not have a domain name.
Country Name (2 letter code) [XX]:
State or Province Name (full name) []:
Locality Name (eg, city) [Default City]:
Organization Name (eg, company) [Default Company Ltd]:
Organizational Unit Name (eg, section) []:
Common Name (eg, your name or your server's hostname) []:example.com
Email Address []:
Edit the Apache SSL configuration file (/etc/httpd/conf.d/ssl.conf):
DocumentRoot "/usr/share/zabbix"
ServerName example.com:443
SSLCertificateFile /etc/httpd/ssl/apache-selfsigned.crt
SSLCertificateKeyFile /etc/httpd/ssl/private/apache-selfsigned.key
Restart the Apache service to apply the changes:
systemctl restart httpd.serviceWeb server hardening
Enabling Zabbix on root directory of URL
On RHEL-based systems, add a virtual host to Apache configuration (/etc/httpd/conf/httpd.conf) and set permanent redirect for document root to Zabbix SSL URL.
Note that example.com should be replaced with the actual name of the server.
# Add lines:

<VirtualHost *:*>
    ServerName example.com
    Redirect permanent / https://example.com
</VirtualHost>
Restart the Apache service to apply the changes:
systemctl restart httpd.serviceEnabling HTTP Strict Transport Security (HSTS) on the web server
To protect Zabbix frontend against protocol downgrade attacks, we recommend enabling HSTS policy on the web server.
To enable HSTS policy for your Zabbix frontend in Apache configuration, follow these steps:
1. Locate your virtual host's configuration file:
/etc/httpd/conf/httpd.confon RHEL-based systems/etc/apache2/sites-available/000-default.confon Debian/Ubuntu
2. Add the following directive to your virtual host's configuration file:
<VirtualHost *:*>
    Header set Strict-Transport-Security "max-age=31536000"
</VirtualHost>
3. Restart the Apache service to apply the changes:
# On RHEL-based systems:
systemctl restart httpd.service

# On Debian/Ubuntu
systemctl restart apache2.service
Enabling Content Security Policy (CSP) on the web server
To protect Zabbix frontend against Cross Site Scripting (XSS), data injection, and similar attacks, we recommend enabling Content Security Policy on the web server. To do so, configure the web server to return the HTTP header.
The following CSP header configuration is only for the default Zabbix frontend installation and for cases when all content originates from the site's domain (excluding subdomains). A different CSP header configuration may be required if you are, for example, configuring the URL widget to display content from the site's subdomains or external domains, switching from OpenStreetMap to another map engine, or adding external CSS or widgets.
To enable CSP for your Zabbix frontend in Apache configuration, follow these steps:
1. Locate your virtual host's configuration file:
/etc/httpd/conf/httpd.confon RHEL-based systems/etc/apache2/sites-available/000-default.confon Debian/Ubuntu
2. Add the following directive to your virtual host's configuration file:
<VirtualHost *:*>
    Header set Content-Security-Policy: "default-src 'self' *.openstreetmap.org; script-src 'self' 'unsafe-inline' 'unsafe-eval'; connect-src 'self'; img-src 'self' data: *.openstreetmap.org; style-src 'self' 'unsafe-inline'; base-uri 'self'; form-action 'self';"
</VirtualHost>
3. Restart the Apache service to apply the changes:
# On RHEL-based systems:
systemctl restart httpd.service

# On Debian/Ubuntu
systemctl restart apache2.service
Disabling web server information exposure
It is recommended to disable all web server signatures as part of the web server hardening process. The web server is exposing software signature by default:
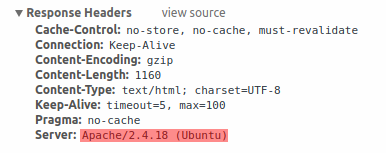
The signature can be disabled by adding two lines to the Apache (used as an example) configuration file:
ServerSignature Off
ServerTokens Prod
PHP signature (X-Powered-By HTTP header) can be disabled by changing the php.ini configuration file (signature is disabled by default):
expose_php = OffWeb server restart is required for configuration file changes to be applied.
Additional security level can be achieved by using the mod_security (package libapache2-mod-security2) with Apache. mod_security allows to remove server signature instead of only removing version from server signature. Signature can be altered to any value by changing "SecServerSignature" to any desired value after installing mod_security.
Please refer to documentation of your web server to find help on how to remove/change software signatures.
Disabling default web server error pages
It is recommended to disable default error pages to avoid information exposure. Web server is using built-in error pages by default:
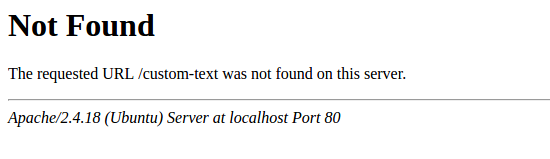
Default error pages should be replaced/removed as part of the web server hardening process. The "ErrorDocument" directive can be used to define a custom error page/text for Apache web server (used as an example).
Please refer to documentation of your web server to find help on how to replace/remove default error pages.
Removing web server test page
It is recommended to remove the web server test page to avoid information exposure. By default, web server webroot contains a test page called index.html (Apache2 on Ubuntu is used as an example):
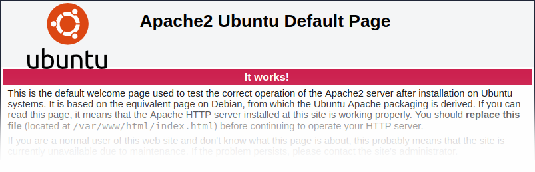
The test page should be removed or should be made unavailable as part of the web server hardening process.
Set X-Frame-Options HTTP response header
By default, Zabbix is configured with X-Frame-Options HTTP header* set to SAMEORIGIN.
This means that content can only be loaded in a frame that has the same origin as the page itself.
Zabbix frontend elements that pull content from external URLs (namely, the URL dashboard widget) display retrieved content in a sandbox with all sandboxing restrictions enabled.
These settings enhance the security of the Zabbix frontend and provide protection against XSS and clickjacking attacks. Super admin users can modify the Use iframe sandboxing and Use X-Frame-Options HTTP header parameters as needed. Please carefully weigh the risks and benefits before changing default settings. Turning iframe sandboxing or X-Frame-Options HTTP header off completely is not recommended.
Hiding the file with list of common passwords
To increase the complexity of password brute force attacks, it is
suggested to limit access to the file ui/data/top_passwords.txt by
modifying web server configuration. This file contains a list of the
most common and context-specific passwords, and is used to prevent users
from setting such passwords if Avoid easy-to-guess passwords parameter
is enabled in the password
policy.
For example, on NGINX file access can be limited by using the location
directive:
location = /data/top_passwords.txt {
    deny all;
    return 404;
}
On Apache - by using .htaccess file:
<Files "top_passwords.txt">
    Order Allow,Deny
    Deny from all
</Files>
UTF-8 encoding
UTF-8 is the only encoding supported by Zabbix. It is known to work without any security flaws. Users should be aware that there are known security issues if using some of the other encodings.
Windows installer paths
When using Windows installers, it is recommended to use default paths provided by the installer as using custom paths without proper permissions could compromise the security of the installation.