
5 Audit log
Overview
In the Reports → Audit log section, the records of user and system activity can be viewed.
For audit records to be collected and displayed, the Enable audit logging checkbox has to be marked in the Administration → Audit log section. Without this setting enabled, the history of activities will not be recorded in the database and will not be shown in the audit log.
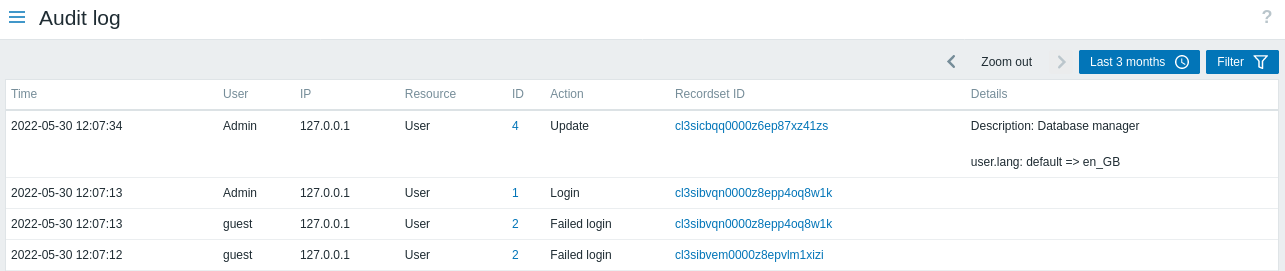
Audit log displays the following data:
| Column | Description |
|---|---|
| Time | Timestamp of the audit record. |
| User | User who performed the activity. |
| IP | IP from which the activity was initiated. |
| Resource | Type of the affected resource (All, API token, Action, Authentication, Autoregistration, etc.). |
| ID | ID of the affected resource. Clicking on the hyperlink will result in filtering audit log records by this resource ID. |
| Action | Type of the activity (Add, Configuration refresh, Delete, Execute, Failed login, History clear, Login, Logout, Update). |
| Recordset ID | Shared ID for all audit log records created as a result of the same operation. For example, when linking a template to a host, a separate audit log record is created for each inherited template entity (item, trigger, etc.) - all these records will have the same Recordset ID. Clicking on the hyperlink will result in filtering audit log records by this Recordset ID. |
| Details | Description of the resource and detailed information about the performed activity. If a record contains more than two rows, an additional link Details will be displayed. Click on this link to view the full list of changes. |
Using filter
The filter is located below the Audit log bar. It can be opened and collapsed by clicking on the Filter tab in the upper right corner.

You may use the filter to narrow down the records by user, affected resource, resource ID and performed operation (Recordset ID). Depending on the resource, one or more specific actions can be selected in the filter.
For better search performance, all data is searched with macros unresolved.
Time period selector
The time period selector allows to select often required periods with one mouse click. The time period selector can be opened by clicking on the time period tab next to the filter.