
11 Налаштування SAML за допомогою Okta
У цьому розділі описано, як налаштувати Okta, щоб увімкнути автентифікацію SAML 2.0 для Zabbix.
Okta configuration
1. Go to https://okta.com and register or sign in to your account.
2. In the Okta web interface navigate to Applications → Applications
and press "Add Application" button
( ).
).
3. Press "Create New App" button
( ).
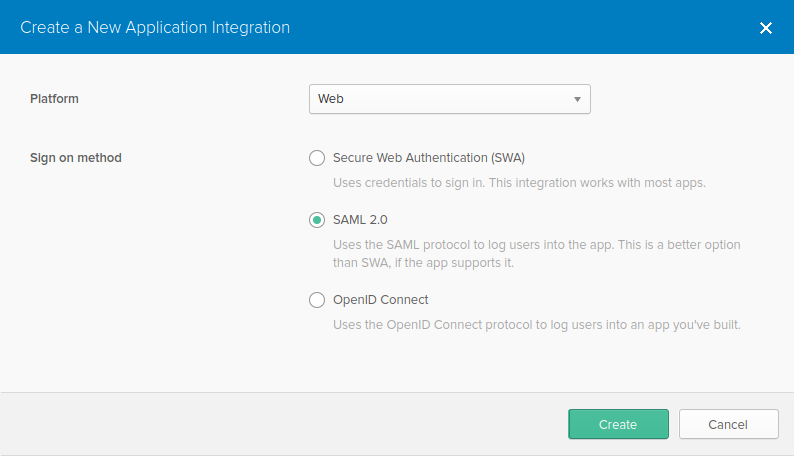
In a popup window select Platform: Web, Sign on method: SAML 2.0 and
press "Create" button.
).
In a popup window select Platform: Web, Sign on method: SAML 2.0 and
press "Create" button.
4. Fill in the fields in the General settings tab (the first tab that appears) according to your preferences and press "Next".
5. In the Configure SAML tab enter the values provided below, then press "Next".
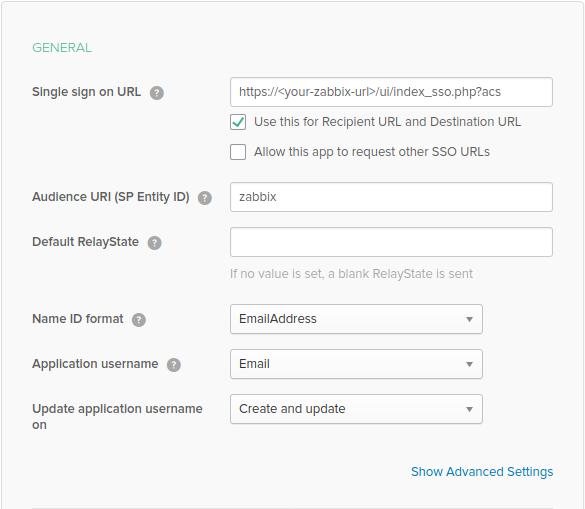
- In the GENERAL section:
- Single sign on URL:
https://<your-zabbix-url>/ui/index_sso.php?acs
The checkbox Use this for Recipient URL and Destination URL should be marked) - Audience URI (SP Entity ID): zabbix
Note, that this value will be used within the SAML assertion as a unique service provider identifier (if not matching, the operation will be rejected). It is possible to specify a URL or any string of data in this field. - Default RelayState:
Leave this field blank; if a custom redirect is required, it can be added in Zabbix in the Administration → Users settings. - Fill in other fields according to your preferences.
- Single sign on URL:
https://<your-zabbix-url>/ui/index_sso.php?acs
If planning to use encrypted connection, generate private and public encryption certificates, then upload public certificate to Okta. Certificate upload form appears when Assertion Encryption is set to Encrypted (click Show Advanced Settings to find this parameter).
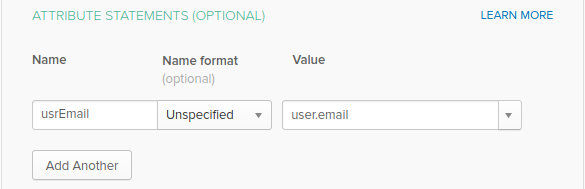
- In the ATTRIBUTE STATEMENTS (OPTIONAL) section add an attribute
statement with:
- Name: usrEmail
- Name format: Unspecified
- Value: user.email
6. At the next tab, select "I'm a software vendor. I'd like to integrate my app with Okta" and press "Finish".
7. Now, navigate to Assignments tab and press the "Assign" button, then select Assign to People from the drop-down.

8. In a popup that appears, assign created app to people that will use SAML 2.0 to authenticate with Zabbix, then press "Save and go back".
9. Navigate to the Sign On tab and press the "View Setup Instructions" button. Setup instructions will be displayed in a new tab; keep this tab open while configuring Zabbix.

Zabbix configuration
1. In Zabbix, go to SAML settings in the Administration → Authentication section and copy information from Okta setup instructions into corresponding fields:
- Identity Provider Single Sign-On URL → SSO service URL
- Identity Provider Issuer → IdP entity ID
- Username attribute → Attribute name (usrEmail)
- SP entity ID → Audience URI
2. Download the certificate provided in the Okta setup instructions page into ui/conf/certs folder as idp.crt, and set permission 644 by running:
chmod 644 idp.crtNote, that if you have upgraded to Zabbix 5.0 from an older version, you will also need to manually add these lines to zabbix.conf.php file (located in the //ui/conf/ // directory):
// Used for SAML authentication.
$SSO['SP_KEY'] = 'conf/certs/sp.key'; // Path to your private key.
$SSO['SP_CERT'] = 'conf/certs/sp.crt'; // Path to your public key.
$SSO['IDP_CERT'] = 'conf/certs/idp.crt'; // Path to IdP public key.
$SSO['SETTINGS'] = []; // Additional settings
See generic SAML Authentication instructions for more details.
3. If Assertion Encryption has been set to Encrypted in Okta, a checkbox "Assertions" of the Encrypt parameter should be marked in Zabbix as well.
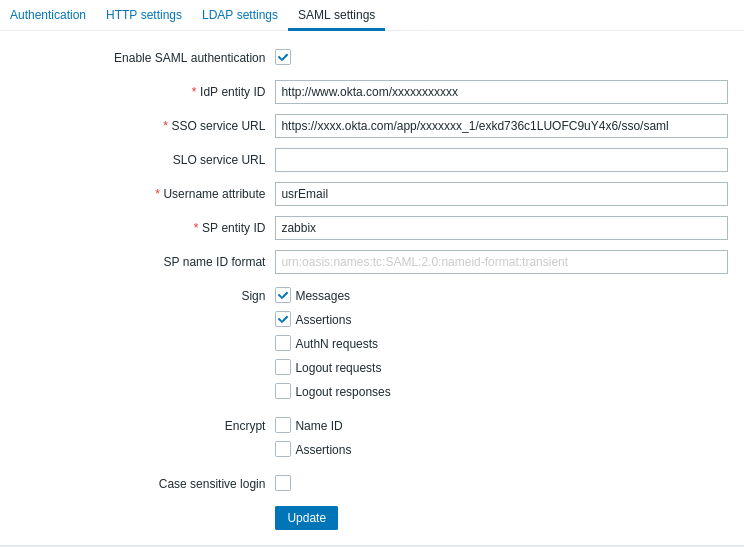
4. Press the "Update" button to save these settings.
To sign in with SAML, the username in Zabbix should match the Okta e-mail. These settings can be changed in the Administration → Users section of Zabbix web interface.
SCIM provisioning
1. To turn on SCIM provisioning, go to "General" -> "App Settings" of the application in Okta.
Mark the Enable SCIM provisioning checkbox. As a result, a new Provisioning tab appears.
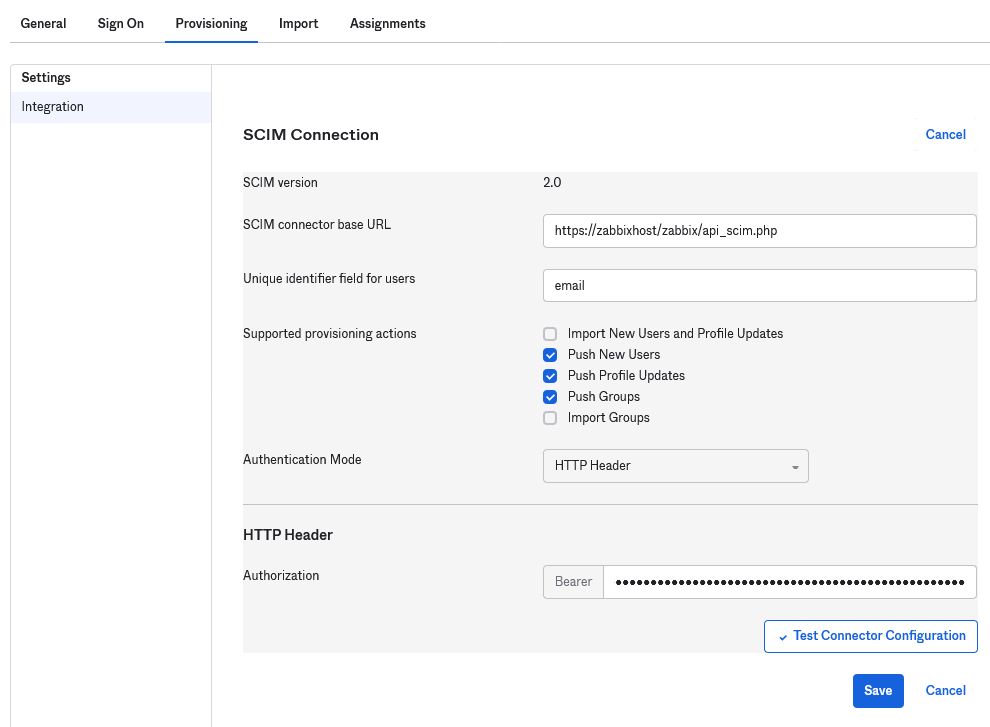
2. Go to the "Provisioning" tab to set up a SCIM connection:
- In SCIM connector base URL specify the path to the Zabbix frontend and append
api_scim.phpto it, i.e.:
https://<your-zabbix-url>/zabbix/api_scim.php - Unique identifier field for users:
email - Authentication mode:
HTTP header - In Authorization enter a valid API token with Super admin rights
If you are using Apache, you may need to change the default Apache configuration in /etc/apache2/apache2.conf by adding the following line:
SetEnvIf Authorization "(.*)" HTTP_AUTHORIZATION=$1Otherwise Apache does not send the Authorization header in request.
3. Click on Test Connector Configuration to test the connection. If all is correct a success message will be displayed.
4. In "Provisioning" -> "To App", make sure to mark the following checkboxes:
- Create Users
- Update User Attributes
- Deactivate Users
This will make sure that these request types will be sent to Zabbix.
5. Make sure that all attributes defined in SAML are defined in SCIM. You can access the profile editor for your app in "Provisioning" -> "To App", by clicking on Go to Profile Editor.
Click on Add Attribute. Fill the values for Display name, Variable name, External name with the SAML attribute name, for example, user_name.
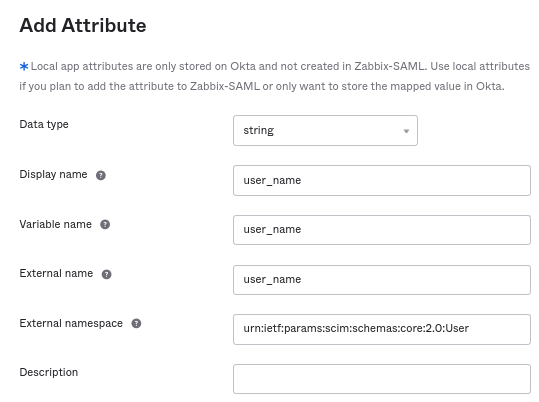
Extenal namespace should be the same as user schema: urn:ietf:params:scim:schemas:core:2.0:User
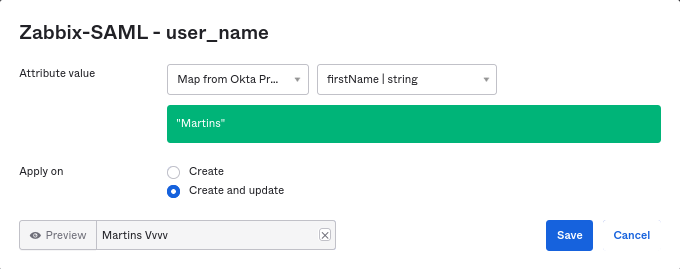
6. Go to "Provisioning" -> "To App" -> "Attribute Mappings" of your application. Click on Show Unmapped Attributes at the bottom. Newly added attributes appear.
7. Map each added attribute.
8. Add users in the "Assignments" tab. The users previously need to be added in Directory -> People. All these assignments will be sent as requests to Zabbix.
9. Add groups in the "Push Groups" tab. The user group mapping pattern in Zabbix SAML settings must match a group specified here. If there is no match, the user cannot be created in Zabbix.
Information about group members is sent every time when some change is made.