
Getting started with Zabbix API
What is Zabbix API
Normally, you have only one way, to manipulate, configure and create objects in Zabbix - through it's PHP frontend. This is great, but only until you decide to build something custom: create a batch add/update script, or a custom monitoring tool, or anything else, that is not provided by default Zabbix GUI interface.
That's when Zabbix API comes to the rescue. It allows you to create, update and fetch Zabbix objects (like hosts, items, graphs and others) through JSON RPC protocol and do whatever you like (if you have an account authorized for that, of course).
Zabbix API was introduced in version 1.8 and still is under heavy development. In some parts, functionality is still limited, but it promises to become much wider with the release of Zabbix 2.0.
Example session
For a quick overview, take a look at an example Zabbix API session or read below for detailed explanation.
Using JSON RPC
If you are unfamiliar with JSON RPC, fear not, there is noting complicated there. All the workflow falls to several steps:
- Prepare JSON object, that describes what you want to do (create host, fetch graph, update item etc.);
- Send this object using POST method to http://example.com/zabbix/api_jsonrpc.php, where http://example.com/zabbix/ is the address of your Zabbix frontend;
- Get a response with desired data in JSON format.
In most cases, you will do this from scripts, using your scripting language tools, but, of course, you can send requests "by hand", using any of the JSON RPC tools you desire.
Actually, that's it! All you need to know now, is how to authenticate for this and what format of JSON is Zabbix expecting to get from you.
Basic request format
Simplified JSON request to Zabbix API looks like this:
{
   "jsonrpc": "2.0",
   "method": "method.name",
   "params": {
      "param_1_name": "param_1_value",
      "param_2_name": "param_2_value"
   },
   "id": 1,
   "auth": "159121b60d19a9b4b55d49e30cf12b81"
}
Lets look at it line by line:
- "jsonrpc": "2.0" - this is a standard JSON PRC parameter identifying protocol version. It will remain unchanged for all your requests;
- "method": "method.name" - this parameter defines actual operation to perform. Common examples: "host.create", "item.update" and so on;
- "params" - here you pass the JSON object with parameters required for specific method. If you would like to create an item, for example, "name" and "key_" parameters will be required. Possible parameters for each methods (and methods themselves) are described Zabbix API documentation;
- "id": 1 - this field can be used to tie every JSON request to it's response. The response will have the same "id" as provided by the request. It is useful when you are sending multiple requests at once. These are not required to be unique or sequential;
- "auth": "159121b60d19a9b4b55d49e30cf12b81" - this is an authentication token to identify the user, accessing the API. See Authenticating section below for more information.
Authenticating
So, now we know how to use the API. Let's take a peek at host.create method and create a new host. Let's send the request:
{
   "jsonrpc": "2.0",
   "method": "host.create",
   "params": {
      "host": "My first host name",
      "ip": "192.168.3.1",
      "port": 10050,
      "useip": 1,
      "groups": [
         {
            "groupid": 50
         }
      ]
   },
   "id": 1
}
Zabbix responds:
{
    "jsonrpc": "2.0",
    "error": {
        "code": -32602,
        "message": "Invalid params.",
        "data": "Not authorized"
    },
    "id": 1
}
What happened? Of course, no random person can send request to Zabbix to fetch the info or to modify something. That's why you need to be authenticated in order to do anything.
Good time to notice few things:
In case of any error, you get "error" parameter in the result:
- "code" parameter will always be -32602 (it's the JSON error code for invalid parameters);
- "message" reflects the same information that "code" gave us and won't differ too much;
- "data" will describe what actually went wrong.
In case of a success, you will get "result" parameter instead of "error" (as you will see later).
So, how to get authenticated? All you need is to send a request, calling "user.login" method and providing "user" and "password" as parameters.
{
   "jsonrpc": "2.0",
   "method": "user.login",
   "params": {
      "user": "Admin",
      "password": "zabbix"
   },
   "id": 1
}
"Admin/zabbix" are default Zabbix credentials, but you have probably changed Admin's password by how. Haven't you?
So, we get the response:
{
"jsonrpc": "2.0",
"error": {
"code": -32602,
"message": "Invalid params.",
"data": "No API access"
},
"id": 1
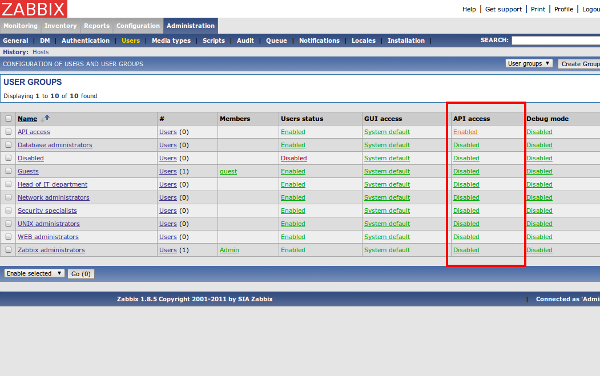
}Failure, again. What happened this time? Thing is, in Zabbix 1.8, users that are not in "API access" group do not have an access to Zabbix API by default. In order to use API with the given user, you need to set "API access" to "Enabled" for the user group of that user or place that user into a predefined "API access" group.
Now, when your user is a member of user group with "API access" enabled, let's try the same request again:
{
   "jsonrpc": "2.0",
   "method": "user.login",
   "params": {
      "user": "Admin",
      "password": "zabbix"
   },
   "id": 1
}
Response:
{
    "jsonrpc": "2.0",
    "result": "7cd4e1f5ebb27236e820db4faebc1769",
    "id": 1
}
Hooray! Authentication successful! What now? Now you can use hash, returned in "result" parameter, as a proof of your rights, by including it with every API call you make, as an "auth" parameter.
Usage examples and common parameters
Now, that you are authenticated, you can go on and actually do something. First of all, let's try and fetch some info.
Getting host groups
Here is a simple request to get all available host groups ordered by name:
{
   "jsonrpc": "2.0",
   "method": "hostgroup.get",
   "params": {
      "output": "extend",
      "sortfield": "name"
   },
   "id": 1,
   "auth": "7cd4e1f5ebb27236e820db4faebc1769"
}
Notice, that "method" contains "hostgroup.get", actual procedure that you are executing, and "params" contain additional options.
"sortfield", as you can guess, allows to sort result you get by chosen field.
"output":"extend" means that you want to get all available info about each group. This, in a way, is similar to "SELECT *" in SQL. Possible options of "output" are:
- "extend" - get all info;
- "shorten" - get only ids of an object;
- "refer" - get id of an object and also ids of related objects;
- list of fields, like ["groupid", "name"] - get only listed fields.
List of fields is only supported in Alert, DCheck, Host, DService, Screenitem, Template and Trigger get methods.
And don't forget about the "auth" hash that you got using "user.login".
The response of given request might look like this:
{
    "jsonrpc": "2.0",
    "result": [
        {
            "groupid": "5",
            "name": "Discovered hosts",
            "internal": "1"
        },
        {
            "groupid": "2",
            "name": "Linux servers",
            "internal": "0"
        },
        {
            "groupid": "1",
            "name": "Templates",
            "internal": "0"
        },
        {
            "groupid": "3",
            "name": "Windows servers",
            "internal": "0"
        },
        {
            "groupid": "4",
            "name": "Zabbix servers",
            "internal": "0"
        }
    ],
    "id": 1
}
These are standard groups, created by initial Zabbix configuration. Notice "groupid" field, the "XXXXid" fields are unique system identifiers, that will be used to address the object from another requests. See the next section for explanation.
Creating host
We fetched the host groups, now let's try creating something. Let's create a host, that will be inside of the user groups "Linux servers" and "Zabbix servers". The request will look like this:
{
   "jsonrpc": "2.0",
   "method": "host.create",
   "params": {
      "host": "My new fancy host that I have created using API",
      "ip": "192.168.3.1",
      "port": 10050,
      "useip": 1,
      "groups": [
         {
            "groupid": 2
         },
         {
            "groupid": 4
         }
      ]
   },
   "id": 1,
   "auth": "7cd4e1f5ebb27236e820db4faebc1769"
}
Notice, that we are using "groupid" fields that we got earlier, to reference the groups we want our host to be in. We, say, that we want host to be in groups with ids 2 (Linux servers) and 4 (Zabbix servers). This is the way you will be working with all related objects.
If everything goes right, you will get a response:
{
    "jsonrpc": "2.0",
    "result": {
        "hostids": [
            "10051"
        ]
    },
    "id": 1
}
"hostids" list contains ids of the elements we have just created. In our case, we were creating just one host and got it's id - 10051. You can use it in future requests.
Updating item
Of course, if you can create something, you should be able to update or delete something as well. And you are. Lest try and update an item. I have created item with description "agent.ping" at "My new fancy host that I have created using API" we created earlier, so we can play around with it. First, let's take a look at it:
Request:
{
   "jsonrpc": "2.0",
   "method": "item.get",
   "params": {
      "output": "extend",
      "filter": {
         "description": "agent.ping"
      },
      "hostids": [
         "10051"
      ]
   },
   "id": 1,
   "auth": "7cd4e1f5ebb27236e820db4faebc1769"
}
Note, that here we have used "filter" parameter, to specify item description and "hostids", to say that we are interested in item that is on the host we just created (it had and ID of 10051, remember?)
Response:
{
    "jsonrpc": "2.0",
    "result": [
        {
            "hosts": [
                {
                    "hostid": "10051"
                }
            ],
            "itemid": "22162",
            "type": "0",
            "snmp_community": "",
            "snmp_oid": "",
            "snmp_port": "161",
            "hostid": "10051",
            "description": "agent.ping",
            "key_": "agent.ping",
            "delay": "30",
            "history": "90",
            "trends": "365",
            "lastvalue": null,
            "lastclock": null,
            "prevvalue": null,
            "status": "0",
            "value_type": "3",
            "trapper_hosts": "",
            "units": "",
            "multiplier": "0",
            "delta": "0",
            "prevorgvalue": null,
            "snmpv3_securityname": "",
            "snmpv3_securitylevel": "0",
            "snmpv3_authpassphrase": "",
            "snmpv3_privpassphrase": "",
            "formula": "0",
            "error": "",
            "lastlogsize": "0",
            "logtimefmt": "",
            "templateid": "0",
            "valuemapid": "0",
            "delay_flex": "",
            "params": "",
            "ipmi_sensor": "",
            "data_type": "0",
            "authtype": "0",
            "username": "",
            "password": "",
            "publickey": "",
            "privatekey": "",
            "mtime": "0"
        }
    ],
    "id": 1
}
Wow, much info there. Let's try and update item, by changing "snmp_port" to 162 and "item type" to SNMPV1. item.update method is the right tool for this.
Request:
{
   "jsonrpc": "2.0",
   "method": "item.update",
   "params": {
      "itemid": "22162",
      "snmp_port": "162",
      "type": 1
   },
   "id": 1,
   "auth": "7cd4e1f5ebb27236e820db4faebc1769"
}
Note, that we have specified three parameters: "itemid", so that Zabbix would know which item to update (don't forget this one!) and the two parameters we want to change. By the way, how did I know, that "type": 1 means SNMPV1? Well, it's all in general item section.
Response:
{
    "jsonrpc": "2.0",
    "result": {
        "itemids": [
            "22162"
        ]
    },
    "id": 1
}
As usual, Zabbix returned an ID of affected item.