4 Installation from Source
Software requirements
Building of Zabbix server or agents from sources requires additional software.
The following software is required to compile Zabbix (required versions):
One of the following database engines:
- IBM DB2 Headers and Libraries - CLI headers and libraries are required.
<!-- -->- MySQL Headers and Libraries.
<!-- -->- Oracle Headers and Libraries - OCI headers and libraries are required.
<!-- -->- PostgreSQL Headers and Libraries.
<!-- -->- SQLite Headers and Libraries.
Usually provided as part of mysql-dev, postgresql-dev, sqlite3-dev packages.
NET-SNMP (or UCD-SNMP) library and header files. Required for SNMP support. Optional.
Iksemel library and header files. Required to enable Jabber messaging. Optional.
Libcurl library and header files. Required for WEB monitoring module. Optional.
C Compiler. GNU C compiler is the best choice for open platforms. Other (HP, IBM) C compilers may be used as well.
GNU Make. GNU Make is required to process Zabbix Makefiles.
Structure of Zabbix distribution
- src
The directory contains sources for all Zabbix processes except frontends.
- src/zabbix_server
The directory contains Makefile and sources for zabbix_server.
- src/zabbix_agent
The directory contains Makefile and sources for zabbix_agent and zabbix_agentd.
- src/zabbix_get
The directory contains Makefile and sources for zabbix_get.
- src/zabbix_sender
The directory contains Makefile and sources for zabbix_sender.
- include
The directory contains Zabbix include files.
- misc
- misc/init.d
The directory contains start-up scripts for different platforms.
- frontends
- frontends/php
The directory contains files of PHP frontend.
- create
The directory contains SQL script for initial database creation.
- create/schema
Database creation schemas.
- create/data
Data for initial database creation.
- upgrades
The directory contains upgrade procedures for different versions of Zabbix.
Zabbix Server
Server side
Step 1
Create the Zabbix superuser account
This is the user the server will run as. For production use you should create a dedicated unprivileged account ('zabbix' is commonly used). Running Zabbix as 'root','bin', or any other account with special rights is a security risk. Do not do it!
Zabbix server process (zabbix_server) is protected from being run under root account.
If Zabbix server and agent are run on the same machine it is recommended to use a different user for running the server than for running the agent. Otherwise, if both are run as the same user, the agent can access the server configuration file and any Admin level user in Zabbix can quite easily retrieve, for example, the database password.
Step 2
Extract Zabbix sources
shell> tar -zxf zabbix-1.8.tar.gzStep 3
Create the Zabbix database
Zabbix comes with SQL scripts used to create the required database schema and also to insert a default configuration. There are separate scripts for IBM DB2, MySQL, Oracle, PostgreSQL and SQLite.
For IBM DB2:
shell> db2 "create database zabbix using codeset utf-8 territory us pagesize 32768"
shell> cd create/schema
shell> db2batch -d zabbix -f ibm_db2.sql
shell> cd ../data
shell> db2batch -d zabbix -f data.sql
shell> db2batch -d zabbix -f images_ibm_db2.sql
Zabbix frontend uses OFFSET and LIMIT clauses in SQL queries. For
this to work, IBM DB2 server must have DB2_COMPATIBILITY_VECTOR
variable be set to 3. Run the following command before starting the
database server:
shell> db2set DB2_COMPATIBILITY_VECTOR=3For MySQL:
shell> mysql -u<username> -p<password>
mysql> create database zabbix character set utf8;
mysql> quit;
shell> cd create/schema
shell> cat mysql.sql | mysql -u<username> -p<password> zabbix
shell> cd ../data
shell> cat data.sql | mysql -u<username> -p<password> zabbix
shell> cat images_mysql.sql | mysql -u<username> -p<password> zabbix
For Oracle (we assume that user zabbix with password password exists and has permissions to create database objects in service ORCL):
shell> cd createCopy directory data/images somewhere on oracle server, e. g. /home/oracle:
shell> scp -r data/images user@host:/home/oracleEdit file data/images_oracle.sql and set images_dir variable to "/home/oracle/images":
CREATE OR REPLACE DIRECTORY image_dir AS '/home/oracle/images'Proceed with importing data:
shell> sqlplus zabbix/password@host/ORCL
sqlplus> set def off
sqlplus> @schema/oracle.sql
sqlplus> @data/data.sql
sqlplus> @data/images_oracle.sql
sqlplus> exit
Zabbix requires UTF8 database character set. If database is
not UTF8 it can be converted by running:
ALTER DATABASE NATIONAL CHARACTER SET UTF8;
For PostgreSQL:
shell> psql -U <username>
psql> create database zabbix;
psql> \q
shell> cd create/schema
shell> cat postgresql.sql | psql -U <username> zabbix
shell> cd ../data
shell> cat data.sql | psql -U <username> zabbix
shell> cat images_pgsql.sql | psql -U <username> zabbix
For SQLite:
shell> cd create/schema
shell> cat sqlite.sql | sqlite3 /var/lib/sqlite/zabbix.db
shell> cd ../data
shell> cat data.sql | sqlite3 /var/lib/sqlite/zabbix.db
shell> cat images_sqlite3.sql | sqlite3 /var/lib/sqlite/zabbix.db
Step 4
Configure and compile the source code for your system
The sources must be compiled for both the server (monitoring machine) as well as the clients (monitored machines). To configure the source for the server, you must specify which database will be used.
shell> ./configure --enable-server --with-ibm-db2 --with-net-snmp --with-jabber --with-libcurl # for IBM DB2 + Jabber + WEB monitoringor
shell> ./configure --enable-server --with-mysql --with-net-snmp --with-jabber --with-libcurl # for MySQL + Jabber + WEB monitoringor
shell> ./configure --enable-server --with-oracle --with-net-snmp --with-jabber --with-libcurl # for Oracle + Jabber + WEB monitoringor
shell> ./configure --enable-server --with-pgsql --with-net-snmp --with-jabber --with-libcurl # for PostgreSQL + Jabber + WEB monitoringor
shell> ./configure --enable-server --with-sqlite3 --with-net-snmp --with-jabber --with-libcurl # for SQLite3 + Jabber + WEB monitoringUse flag --with-ibm-db2 to specify location of the CLI API.
Use flag --with-oracle to specify location of the OCI API.
Flag --with-ucd-snmp can be used instead of --with-net-snmp. If no SNMP support is required, both --with-net-snmp and --with-ucd-snmp may be skipped.
However, if you want to compile client binaries along with server binaries, run:
shell> ./configure --enable-server --enable-agent --with-mysql --with-net-snmp --with-jabber --with-libcurlUse flag --enable-static to statically link libraries. If you plan to distribute compiled binaries among different servers, you must use this flag to make these binaries work without required libraries. Note that --enable-static does not work under Solaris.
Step 5
Make and install everything
shell> make installBy default, make install will install all the files in /usr/local/sbin, /usr/local/lib etc. Make sure that you have enough permissions.
You can specify an installation prefix other than /usr/local using --prefix, for example --prefix=/home/zabbix. In this case daemon binaries will be installed under <prefix>/sbin, while utilities under <prefix>/bin. Man pages will be installed under <prefix>/share.
Step 6
Configure /etc/services
The step is optional. However, it is recommended. On the client (monitored) machines, add the following lines to /etc/services:
zabbix-agent    10050/tcp  Zabbix Agent
zabbix-agent    10050/udp  Zabbix Agent
zabbix-trapper  10051/tcp  Zabbix Trapper
zabbix-trapper  10051/udp  Zabbix Trapper
Note that the port numbers are official Zabbix ports registered in IANA.
Step 7
Configure /etc/inetd.conf
If you plan to use zabbix_agent instead of the recommended zabbix_agentd, the following line must be added:
zabbix_agent stream tcp nowait.3600 zabbix /opt/zabbix/bin/zabbix_agentRestart inetd
shell> killall -HUP inetdModify default settings in configuration files
Step 8
Create a location to hold configuration files:
mkdir /etc/zabbixStep 9
Configure /etc/zabbix/zabbix_agentd.conf
You need to configure this file for every host with zabbix_agentd installed. The file should contain the IP address of the Zabbix server. Connections from other hosts will be denied. You may take misc/conf/zabbix_agentd.conf as example.
Step 10
Configure /etc/zabbix/zabbix_server.conf
For small installations (up to ten monitored hosts), default parameters are sufficient. However, you should change default parameters to maximize performance of Zabbix. See section [Performance tuning] for more details. You may take misc/conf/zabbix_server.conf as example.
Step 11
Run server processes
Run zabbix_server on server side.
shell> cd sbin
shell> ./zabbix_server
Step 12
Run agents
Run zabbix_agentd where necessary.
shell> cd sbin
shell> ./zabbix_agentd
Zabbix Proxy
Zabbix Proxy is a special process. It is not required to run Zabbix.
Step 1
Create the Zabbix superuser account
This is the user the Proxy will run as. For production use you should create a dedicated unprivileged account ('zabbix' is commonly used). Running Zabbix Proxy as 'root', 'bin', or any other account with special rights is a security risk. Do not do it!
Zabbix Proxy process (zabbix_proxy) is protected from being run under root account.
Step 2
Extract Zabbix sources
shell> tar -zxf zabbix-1.8.tar.gzStep 3
Create the Zabbix database. Optional.
Zabbix Proxy process will create database automatically on the first run if it does not exist. It will use existing database otherwise. Database auto-creation is supported for SQLite only.
used to create the required database schema. There are separate scripts for IBM DB2, MySQL, Oracle, PostgreSQL and SQLite.
For IBM DB2:
shell> db2 "create database zabbix using codeset utf-8 territory us pagesize 32768"
shell> cd create/schema
shell> db2batch -d zabbix -f ibm_db2.sql
For MySQL:
shell> mysql -u<username> -p<password>
mysql> create database zabbix character set utf8;
mysql> quit;
shell> cd create/schema
shell> cat mysql.sql | mysql -u<username> -p<password> zabbix
For Oracle (we assume that user 'zabbix' with password 'password' exists and has permissions to create database objects):
shell> cd create/schema
shell> cat oracle.sql | sqlplus zabbix/password >out.log
Check file out.log for any error messages. Zabbix requires
UTF8 database character set. If database is not UTF8 it can be converted
by running: ALTER DATABASE NATIONAL CHARACTER SET UTF8;
For PostgreSQL:
shell> psql -U <username>
psql> create database zabbix;
psql> \q
shell> cd create/schema
shell> cat postgresql.sql | psql -U <username> zabbix
For SQLite:
shell> cd create/schema
shell> cat sqlite.sql | sqlite3 /var/lib/sqlite/zabbix.db
The database will be automatically created if it does not exist.
Step 4
Configure and compile the source code for your system
The sources must be compiled to enable compilation of Zabbix Proxy process. To configure the source for the Proxy, you must specify which database will be used.
shell> ./configure --enable-proxy --with-ibm-db2 --with-net-snmp # for IBM DB2 + SNMP monitoringor
shell> ./configure --enable-proxy --with-mysql --with-net-snmp # for MySQL + SNMP monitoringor
shell> ./configure --enable-proxy --with-oracle --with-net-snmp # for Oracle + SNMP monitoringor
shell> ./configure --enable-proxy --with-pgsql --with-net-snmp # for PostgreSQL + SNMP monitoringor
shell> ./configure --enable-proxy --with-sqlite3 --with-net-snmp # for SQLite3 + SNMP monitoringUse flag --with-ibm-db2 to specify location of the CLI API.
Use flag --with-oracle to specify location of the OCI API.
Use flag --enable-static to statically link libraries. If you plan to distribute compiled binaries among different hosts, you must use this flag to make these binaries work without required libraries. --enable-static does not work under Solaris. Flag --with-ucd-snmp can be used instead of --with-net-snmp. If no SNMP support required, both --with-net-snmp and --with-ucd-snmp may be skipped.
However, if you want to compile client binaries along with proxy binaries, run:
shell> ./configure --enable-proxy --enable-agent --with-mysql --with-net-snmpParameter --enable-static may be used to force static linkage.
Step 5
Make and install everything
shell> make installBy default, make install will install all the files in /usr/local/sbin, /usr/local/lib etc. You can specify an installation prefix other than /usr/local using --prefix
Step 6
Configure /etc/services
The step is optional. However, it is recommended. On the client (monitored) machines, add the following lines to /etc/services:
zabbix_agent 10050/tcp
zabbix_trap 10051/tcp
Step 7
Configure /etc/inetd.conf
If you plan to use zabbix_agent instead of the recommended zabbix_agentd, the following line must be added:
zabbix_agent stream tcp nowait.3600 zabbix /opt/zabbix/bin/zabbix_agentRestart inetd
shell> killall -HUP inetdStep 8
Create a location to hold configuration files:
mkdir /etc/zabbixConfigure /etc/zabbix/zabbix_proxy.conf
For small installations (up to ten monitored hosts), default parameters are sufficient. However, you should change default parameters to maximize performance of Zabbix Proxy. Make sure you have correct Hostname and Server parameters set. You may take misc/conf/zabbix_proxy.conf as example.
Step 9
Run Proxy processes
Run zabbix_proxy:
shell> cd sbin
shell> ./zabbix_proxy
Zabbix Agent
Client side
Step 1
Create the Zabbix account
This is the user the agent will run as. For production use you should create a dedicated unprivileged account (“zabbix” is commonly used). Zabbix agents have protection against running under root account.
Step 2
Extract Zabbix sources
shell> tar -zxf zabbix-1.8.tar.gzStep 3
Configure and compile the source code for your system
The sources must be compiled for the client only.
To configure the source for the client:
shell> ./configure --enable-agentUse flag --enable-static to statically link libraries. If you plan to distribute compiled binaries among different hosts, you must use this flag to make these binaries work without required libraries.
Step 4
Build agent
shell> makeCopy created binaries from bin/ to /opt/zabbix/bin or any other directory. Other common directories are /usr/local/bin or /usr/local/zabbix/bin.
Step 5
Configure /etc/services
The step is not real requirement. However, it is recommended.
On the client (monitored) machines, add the following lines to /etc/services:
zabbix_agent 10050/tcp
zabbix_trap 10051/tcp
Step 6
Configure /etc/inetd.conf
If you plan to use zabbix_agent instead of the recommended zabbix_agentd, the following line must be added:
zabbix_agent stream tcp nowait.3600 zabbix /opt/zabbix/bin/zabbix_agentRestart inetd
shell> killall -HUP inetdStep 7
Create a location to hold configuration files:
mkdir /etc/zabbixStep 8
Configure /etc/zabbix/zabbix_agentd.conf
You need to configure this file for every host with zabbix_agentd installed. The file should contain IP address of Zabbix server. Connections from other hosts will be denied. You may take misc/conf/zabbix_agentd.conf as example.
Step 9
Run zabbix_agentd on all monitored machines
shell> /opt/zabbix/bin/zabbix_agentdYou should not run zabbix_agentd if you have chosen to use zabbix_agent!
Make sure that your system allows allocation of 2MB of shared memory, otherwise the agent may not start and you will see "Can't allocate shared memory for collector." in agent's log file. This may happen on Solaris 8.
Zabbix WEB Interface
Step 0
Zabbix frontend is written in PHP, so to run it a PHP supported webserver is needed. Installation is done by simply copying the PHP files into the webserver HTML documents directory. It is suggested to use a subdirectory instead of HTML root.
Common locations of the HTML documents directory for Apache web server include:
- /usr/local/apache2/htdocs (default directory when installing Apache from source)
- /srv/www/htdocs (OpenSUSE, SLES)
- /var/www/html (Fedora, RHEL, CentOS)
- /var/www (Debian, Ubuntu)
To create a subdirectory and copy Zabbix frontend files into it, execute the following commands, replacing <htdocs> with the correct path in your case:
mkdir <htdocs>/zabbix
cd frontends/php
cp -a . <htdocs>/zabbix
When upgrading you simply replace the content of <htdocs>/zabbix with the new files copied over from frontends/php, in this step.
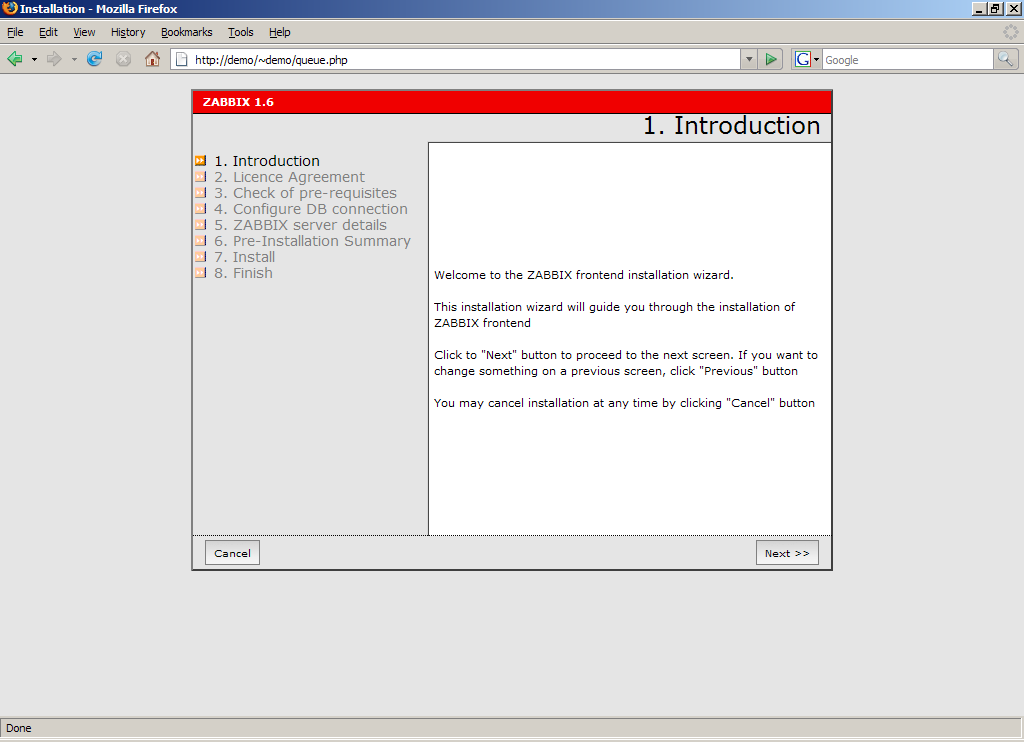
Step 1
Point your browser to Zabbix URL.
Step 2
Read and accept GPL v2.

Step 3
Make sure that all software pre-requisites are met.
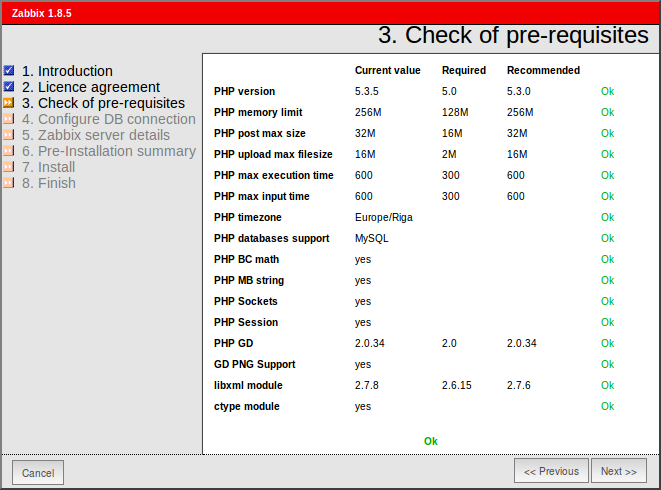
| Pre-requisite | Minimum value | Description |
|---|---|---|
| PHP version | 5.0 | |
| PHP Memory limit | 8MB | In php.ini: memory_limit = 128M |
| PHP post max size | 8MB | In php.ini: post_max_size = 16M |
| PHP max execution time | 300 seconds | In php.ini: max_execution_time = 300 |
| PHP max input time | 300 seconds | In php.ini: max_input_time = 300 |
| PHP database support | One of: IBM DB2, MySQL, Oracle, PostgreSQL, SQLite | One of the following modules must be installed: ibm_db2, php-mysql, oci8, php-pgsql, php-sqlite3 |
| **PHP BC math ** | Any | Compiled in or separate module php-bcmath. |
| PHP multibyte support | Any | Compiled in or separate module php-mbstring. |
| GD Version | 2.0 or higher | Module php-gd. |
| Image formats | At least PNG | Module php-gd. |
Step 4
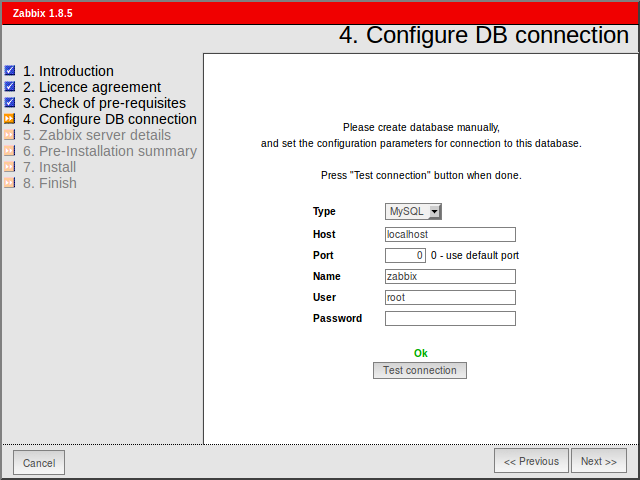
Configure database settings. Zabbix database must already be created.
Step 5
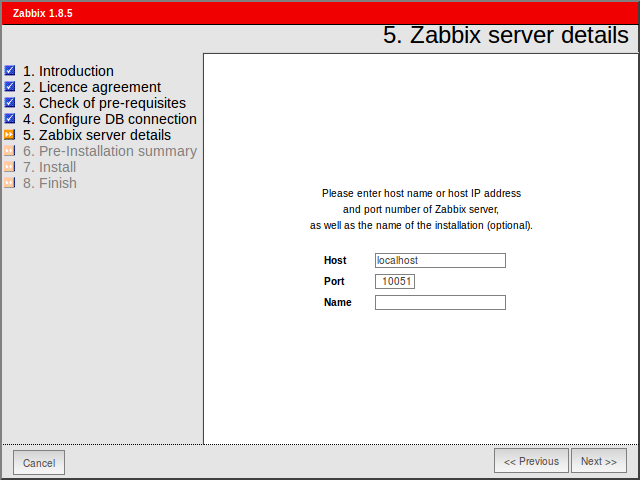
Enter Zabbix Server details.
Step 6
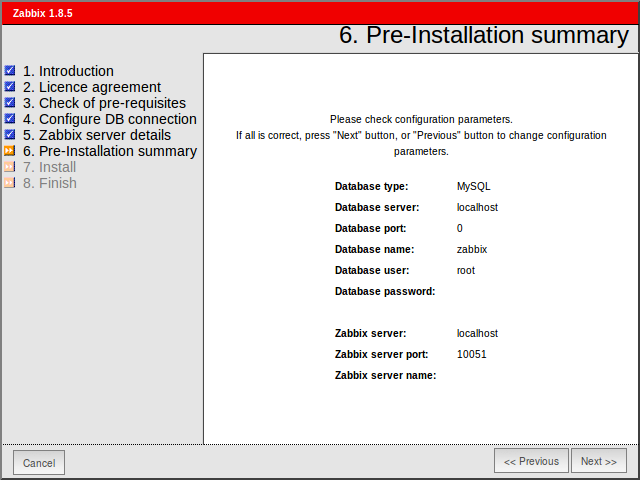
See summary of settings.
Step 7
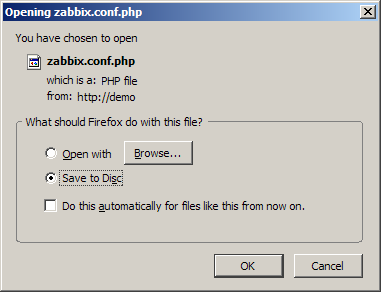
Download configuration file and place it under conf/.

Step 8
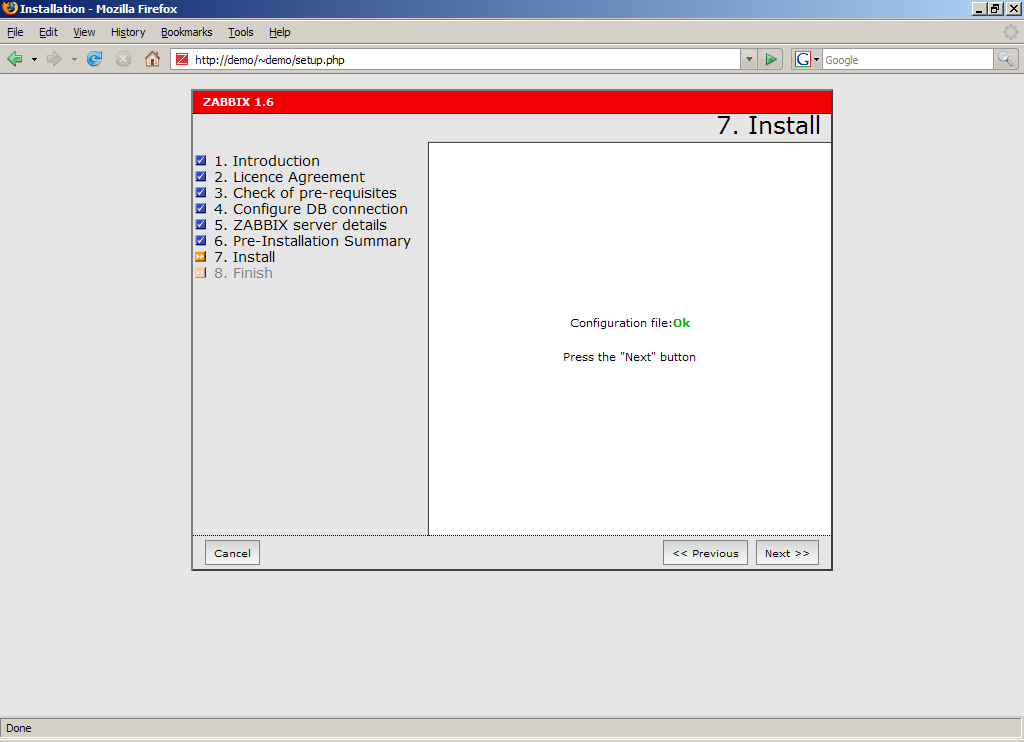
Finishing installation.
Step 9
For distributed monitoring only!
If used in a distributed environment you have to run only once:
shell> ./zabbix_server -n <nodeid>where Node ID is an unique Node identificator. For example:
shell> ./zabbix_server -n 1This will convert database data for use with Node ID '1' and also adds a local node.
Step 10
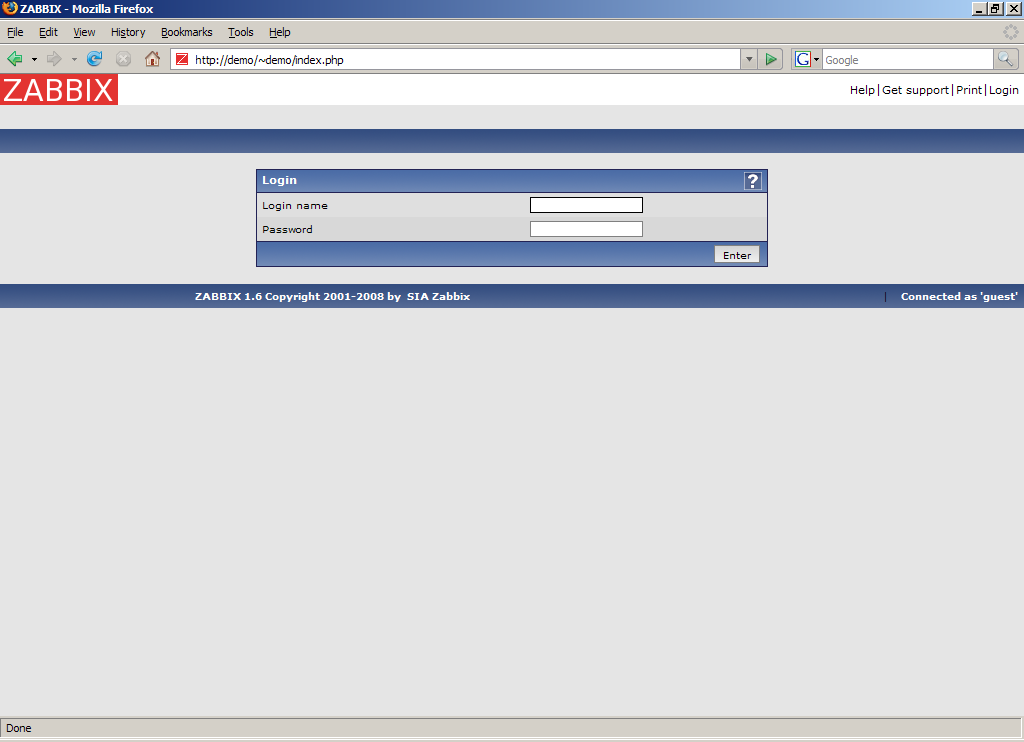
Zabbix frontend is ready! Default user name is Admin, password zabbix.