
Настройка облачного прокси Zabbix
Обзор
На этой странице описывается настройка прокси Zabbix, развернутого в Zabbix Cloud, для сбора данных мониторинга с узлов сети в удаленной среде.
Процедура предназначена главным образом для сервера Zabbix и прокси, созданных в Zabbix Cloud.
В процедуре также описывается конфигурация, необходимая, если сервер Zabbix размещен не в Zabbix Cloud.
Предварительные требования
Установлен, настроен и запущен сервер Zabbix либо на Zabbix Cloud работает узел сервера Zabbix.
Создание узла прокси
Создайте узел прокси Zabbix Cloud.
При создании узла:
1. Выберите Proxy.
2. Выберите Proxy active или Proxy passive в зависимости от того, как прокси должен взаимодействовать с сервером Zabbix.
3. Настройте IP-адрес узла или фильтры доступа CIDR (это можно сделать после создания узла).
4. Укажите сервер Zabbix, к которому будет подключаться прокси.
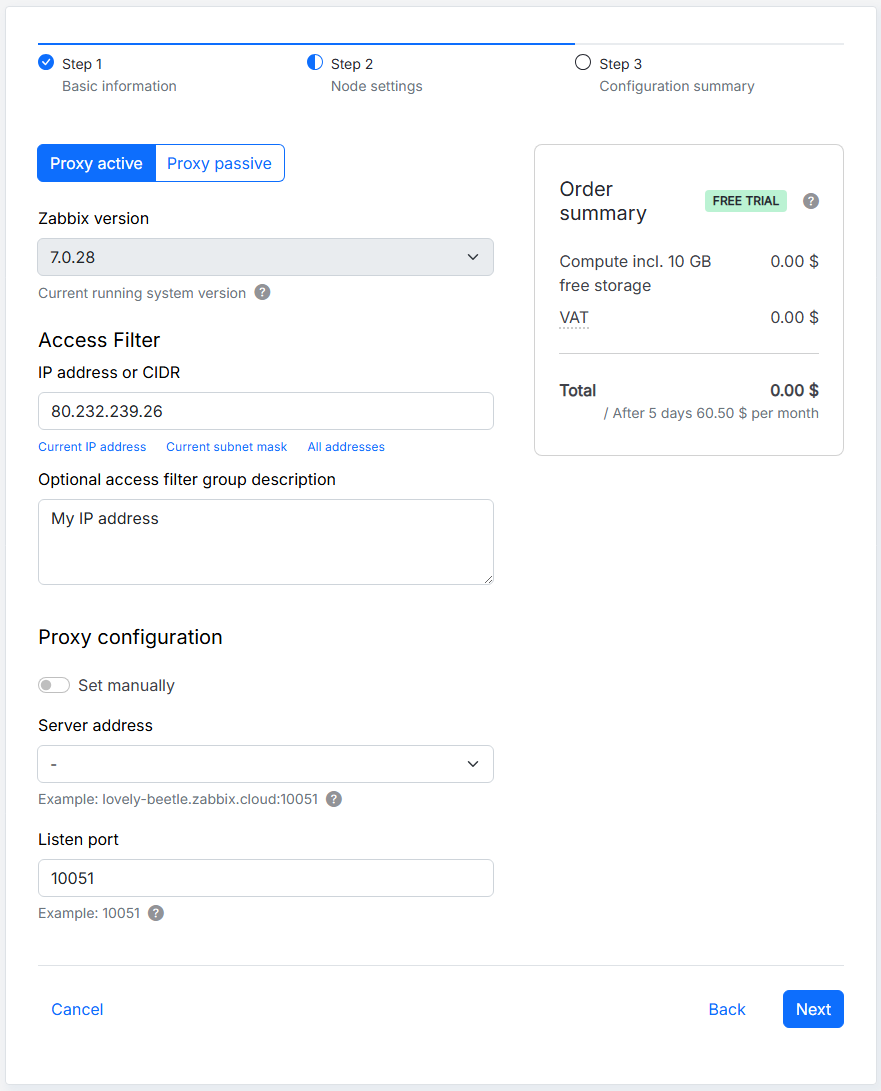
5. Завершите процесс создания узла.
Дополнительную информацию о создании узла прокси см. в разделе Развертывание Zabbix в облаке.
Настройка фильтров доступа
Zabbix Cloud использует фильтры доступа, чтобы контролировать, какие IP-адреса или подсети могут подключаться к облачному узлу.
Во время инициализации узла автоматически создается фильтр доступа для IP-адреса, используемого для доступа к узлу. Он не обязательно включает адреса отслеживаемых узлов сети или других компонентов Zabbix. Добавьте необходимые адреса вручную.
Дополнительную информацию см. в разделе Конфигурация узла — Фильтры доступа.
Узел прокси
Добавьте IP-адреса или подсети, с которых ожидаются подключения к прокси.
Если отслеживаемые узлы сети используют активные проверки агента, агенты инициируют подключения к прокси, поэтому IP-адрес или подсеть отслеживаемых узлов сети должны быть разрешены фильтрами доступа узла прокси.
Если в качестве режима прокси был установлен Proxy Passive, сервер Zabbix подключается к прокси, поэтому IP-адрес или подсеть сервера Zabbix должны быть разрешены фильтрами доступа узла прокси.
Если выбран режим Proxy passive и используется узел сервера:
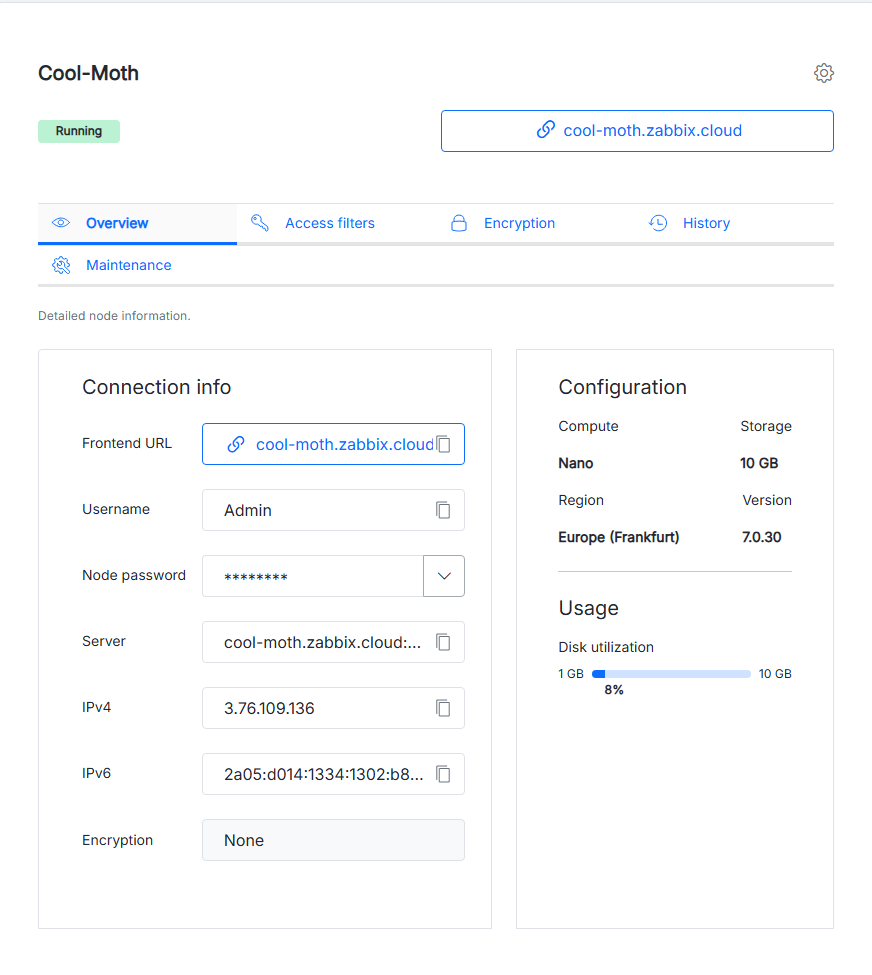
1. Перейдите на вкладку Overview узла сервера и скопируйте IPv4- или IPv6-адрес узла.
2. Перейдите на вкладку Access filters узла прокси и нажмите Add new filter > Add.
3. Вставьте скопированный адрес в поле IP addresses or CIDRs и добавьте описание в поле Optional access filter group description.
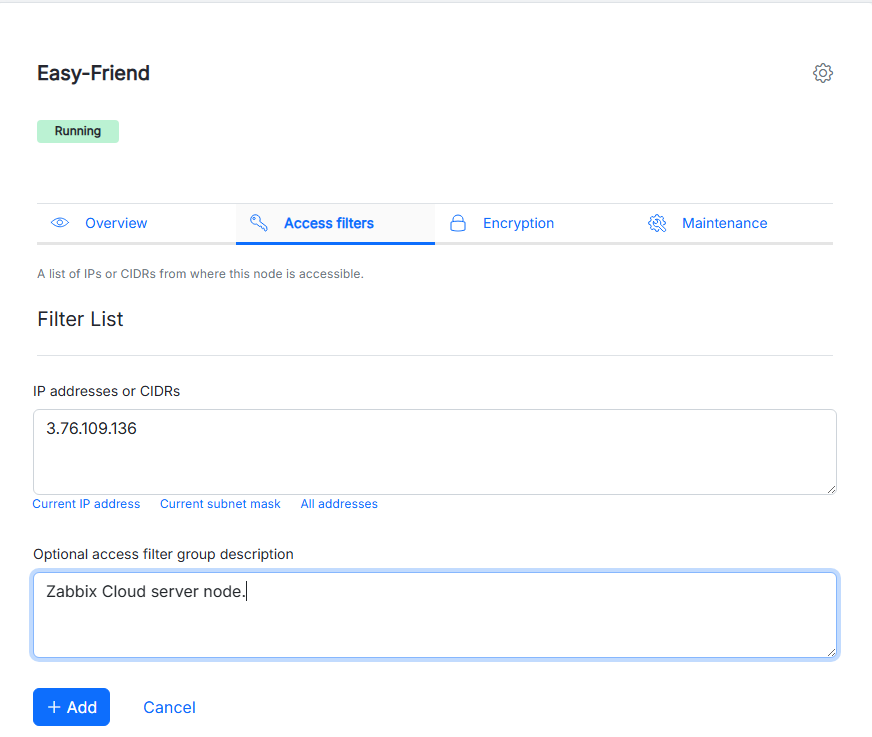
4. Нажмите Add.
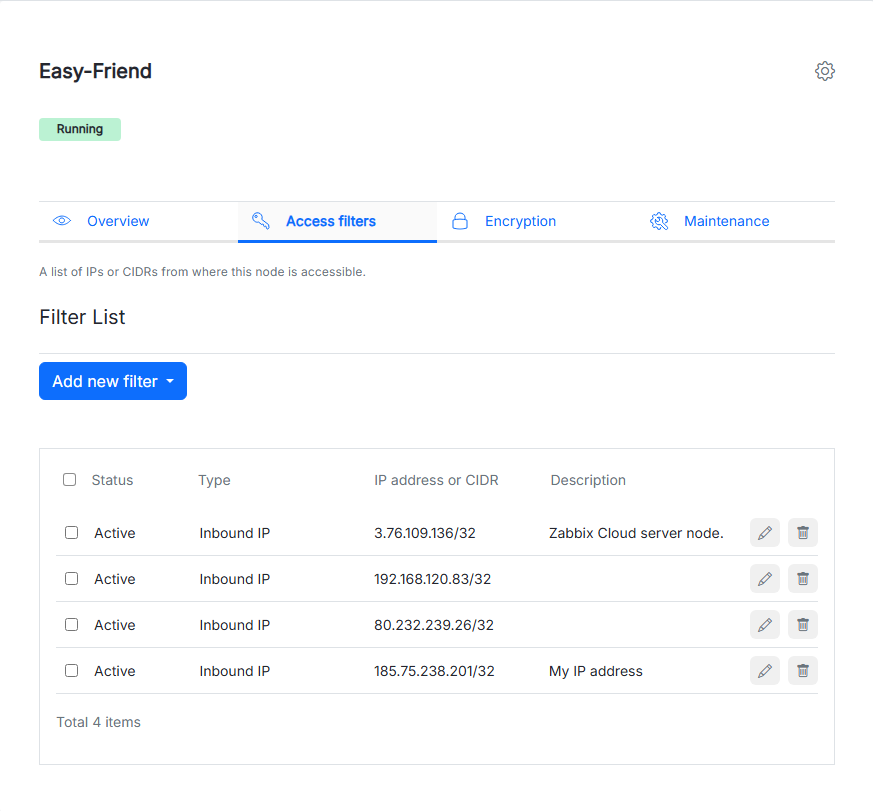
Выполните шаги 2-4 для IP-адреса агента Zabbix, использующего активные проверки.
Узел сервера
Если сервер Zabbix размещен в Zabbix Cloud, также настройте фильтры доступа на узле сервера.
Для прокси в активном режиме добавьте IP-адрес или CIDR прокси-узла в фильтры доступа узла сервера, поскольку прокси инициирует подключение к серверу.
1. Перейдите на вкладку Обзор прокси-узла и скопируйте IPv4- или IPv6-адрес узла.
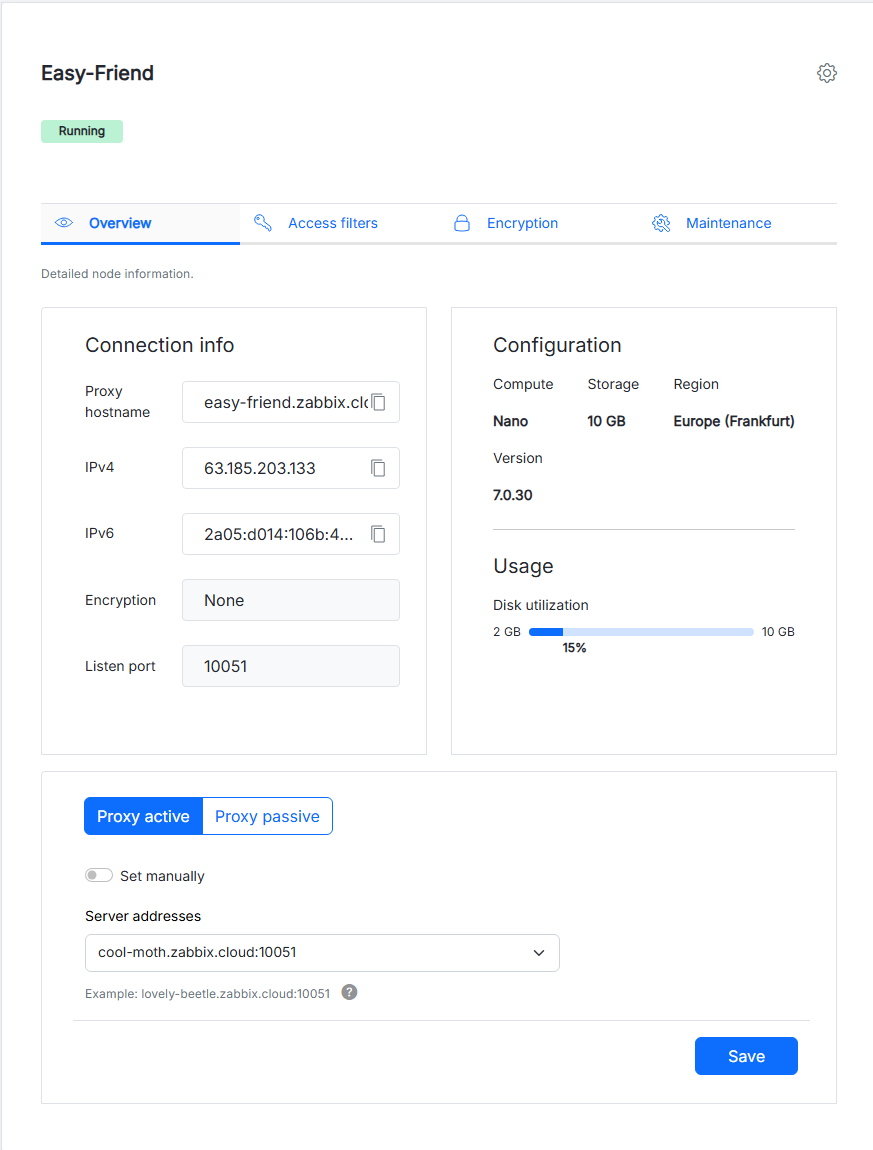
2. Перейдите на вкладку Фильтры доступа узла сервера и нажмите Добавить новый фильтр > Добавить.
3. Вставьте скопированный адрес в поле IP-адреса или CIDR, а в поле Необязательное описание группы фильтров доступа добавьте описание.
4. Выберите подходящий тип фильтра.
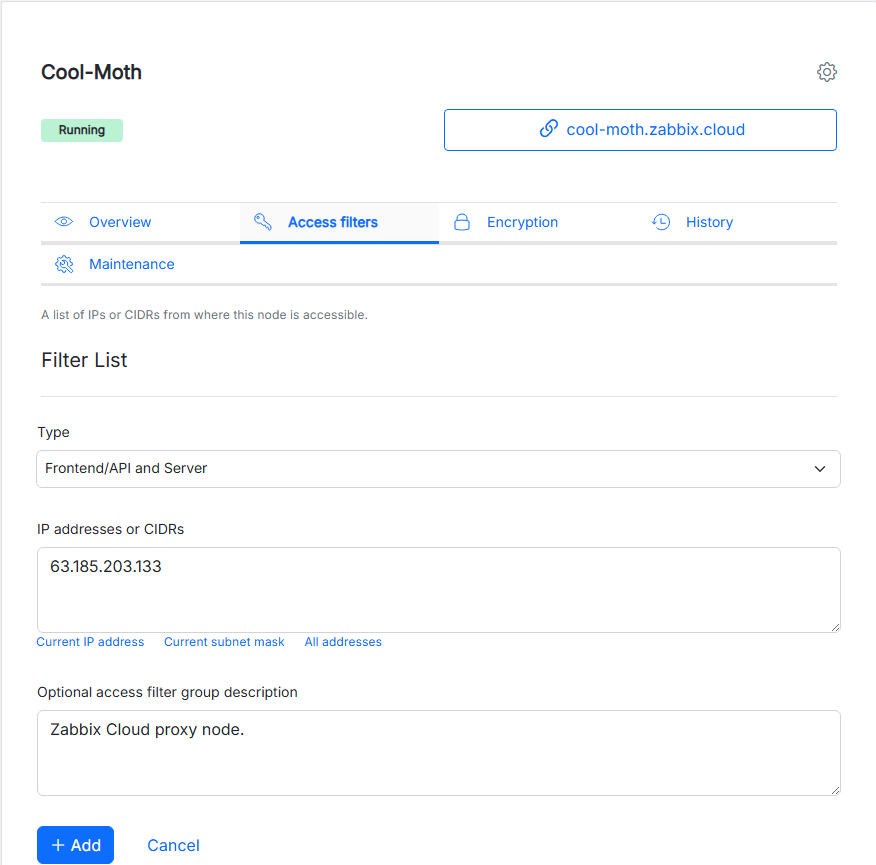
5. Нажмите Добавить.
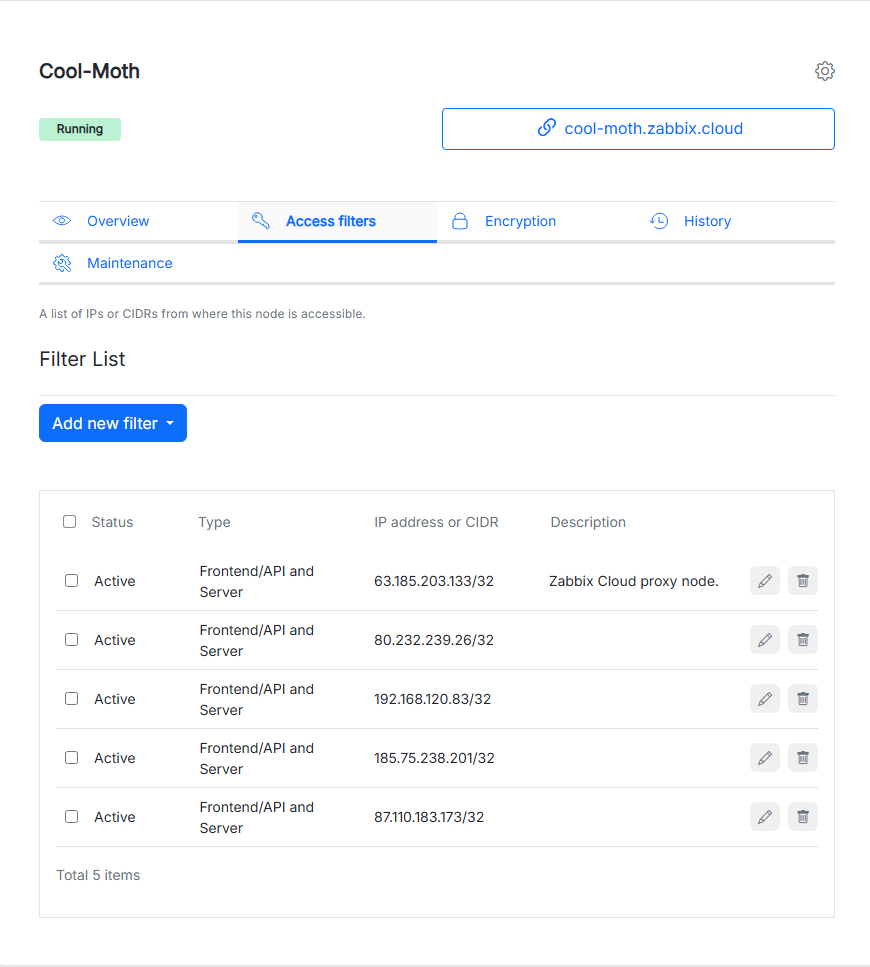
Настройка прокси
Прокси необходимо настроить в веб-интерфейсе Zabbix для взаимодействия с сервером Zabbix.
Откройте раздел Администрирование > Прокси в веб-интерфейсе Zabbix, нажмите Создать прокси и настройте прокси необходимым образом:
1. Укажите имя прокси в поле Имя прокси. Оно должно совпадать с именем узла сети прокси, настроенным для прокси. Введите его вручную или скопируйте на вкладке Обзор прокси.
2. Выберите режим прокси, соответствующий режиму, выбранному при создании прокси.
3. Для активного прокси укажите IP-адрес или DNS-имя прокси.
4. Нажмите Добавить.
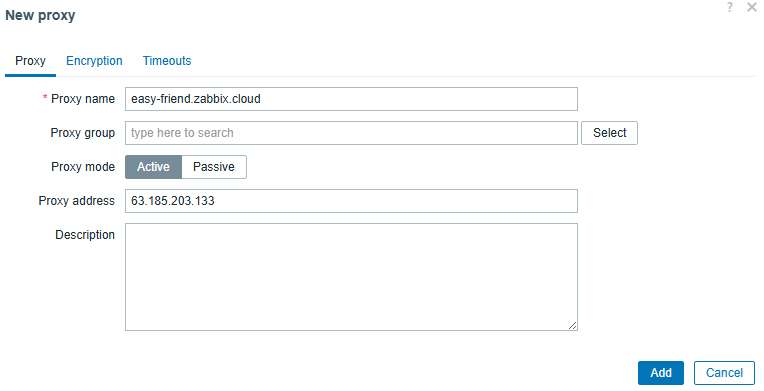
Дополнительную информацию см. в разделе Распределенный мониторинг с использованием прокси.
Настройка отслеживаемых узлов сети
Добавьте узлы сети, которые должны отслеживаться через прокси.
1. Перейдите в раздел Сбор данных > Узлы сети.
2. Создайте узел сети или откройте существующий.
3. В поле Отслеживается через выберите Прокси: введите имя прокси для поиска и выберите его либо нажмите кнопку Выбрать, чтобы открыть список доступных прокси.
4. Настройте интерфейс узла сети и другие параметры.
5. Нажмите Добавить или Обновить.
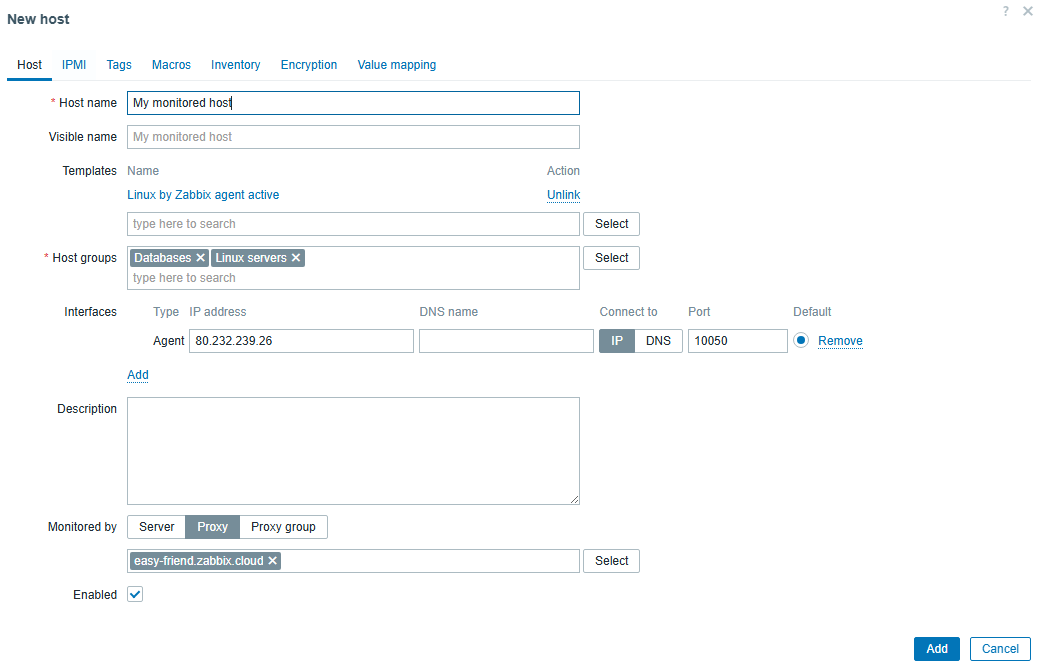
Узел сети, настроенный для отслеживания через прокси, отправляет или получает данные мониторинга через этот прокси в зависимости от типа элемента данных и режима агента.
Настройка агента Zabbix
Если на узле сети, за которым ведется наблюдение, используется агент Zabbix или агент Zabbix 2, настройте агент для взаимодействия с соответствующим компонентом Zabbix.
Конфигурация зависит от того, использует ли агент пассивные или активные проверки.
Пассивные проверки агента
При пассивных проверках прокси Zabbix инициирует подключения к агенту и запрашивает данные мониторинга.
Откройте файл конфигурации агента Zabbix и измените параметр Server, чтобы разрешить подключения с IP-адреса прокси Zabbix Cloud.
Например:
Server=<proxy_IP>Убедитесь, что узел сети с мониторингом разрешает входящие TCP-подключения от прокси через порт агента, который по умолчанию имеет значение 10050.
Прокси должен иметь возможность подключаться к узлу сети с мониторингом по сети.
Проверки активным агентом
При активных проверках агент инициирует подключения к прокси Zabbix и отправляет собранные данные мониторинга.
Откройте файл конфигурации агента Zabbix и обновите параметр ServerActive, указав адрес прокси Zabbix Cloud.
Например:
ServerActive=<proxy_IP>:<proxy_listen_port>Замените <proxy_IP> на IP-адрес прокси Zabbix Cloud, а <proxy_listen_port> — на порт прослушивания, настроенный при создании узла сети прокси.
Порт прослушивания по умолчанию — 10051.
Если в параметре ServerActive указан прокси, агент получает конфигурацию активных проверок от прокси, а не напрямую от сервера Zabbix.
Убедитесь, что отслеживаемый узел сети может установить исходящее TCP-соединение с прокси через настроенный порт прослушивания.
Дополнительную информацию о пассивных и активных проверках агентом см. в разделе Пассивные и активные проверки агентом.
Внешний сервер Zabbix
Прокси Zabbix Cloud также может взаимодействовать с сервером Zabbix, развернутым за пределами Zabbix Cloud.
В этом случае внешний сервер Zabbix должен иметь возможность взаимодействовать с облачным прокси в соответствии с выбранным режимом прокси.
Для прокси в активном режиме прокси инициирует подключение к внешнему серверу Zabbix. Настройте внешний сервер Zabbix на прием подключений от прокси и убедитесь, что прокси может подключиться к серверу по сети.
Для пассивного прокси подключение к прокси инициирует сервер Zabbix. Добавьте IP-адрес или подсеть внешнего сервера Zabbix в фильтры доступа узла сети прокси и убедитесь, что сервер может подключиться к прокси по сети.
Внешний сервер Zabbix не использует фильтры доступа Zabbix Cloud. Вместо этого настройте необходимые правила брандмауэра и сети во внешней среде.
Контролируемые узлы сети могут находиться в той же среде, что и внешний сервер Zabbix, в другой сети или в сети, доступной прокси.
Если агенты используют активные проверки, настройте их параметр ServerActive, указав облачный прокси Zabbix.
Если агенты используют пассивные проверки, настройте их параметр Server, разрешив подключения от прокси.
Проверьте конфигурацию
После настройки прокси, агентов, фильтров доступа и сетевого подключения убедитесь, что прокси взаимодействует с сервером Zabbix.
1. Перейдите в раздел Администрирование > Прокси.
2. Проверьте Состояние прокси.
3. Перейдите в раздел Мониторинг > Последние данные и убедитесь, что доступны последние значения элементов данных.
Если прокси не взаимодействует с сервером, проверьте:
- режим прокси;
- адрес и порт сервера;
- фильтры доступа прокси;
- фильтры доступа сервера, если сервер размещен в Zabbix Cloud;
- конфигурацию агента;
- правила брандмауэра и маршрутизации;
- адрес, настроенный в
ServerилиServerActive.