
14 OneLoginでのSAML設定
概要
このセクションでは、SAML 2.0認証を使用してOneLoginからZabbixへのシングルサインオンおよびユーザーのプロビジョニングを設定するためのガイドラインを提供します。
OneLoginの設定
アプリケーションの作成
1. OneLogin のアカウントにログインします。テスト目的で、OneLogin で無料の開発者アカウントを作成できます。
2. OneLogin の Webインターフェースで Applications → Applications に移動します。
3. "Add App" をクリックし、適切なアプリを検索します。このページのガイドラインは、SCIM Provisioner with SAML (SCIM v2 Enterprise, full SAML) アプリの例に基づいています。
4. まず、アプリの表示名をカスタマイズするとよいでしょう。アイコンやアプリの詳細を追加することもできます。その後、Save をクリックします。
SSO/SCIM プロビジョニングの設定
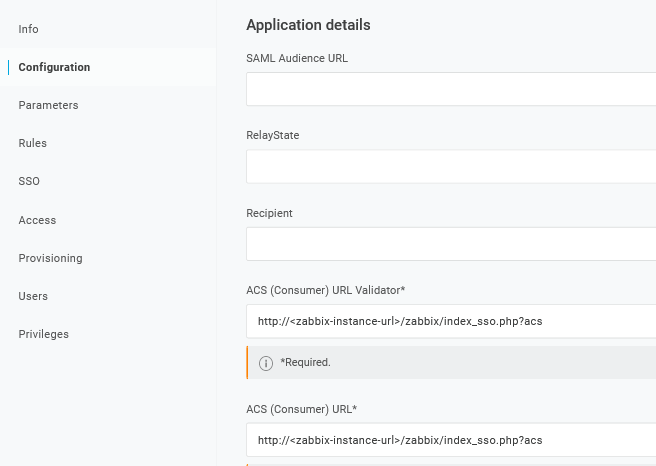
1. Configuration -> Application details で、Zabbix のシングルサインオンエンドポイント http://<zabbix-instance-url>/zabbix/index_sso.php?acs を次のフィールドの値として設定します。
- ACS (Consumer) URL Validator
- ACS (Consumer) URL
acs パラメータがリクエストから切り取られないように、https ではなく http を使用する点に注意してください。
https を使用することも可能です。その場合、Zabbix で動作させるには conf/zabbix.conf.php に次の行を追加する必要があります。
$SSO['SETTINGS'] = ['use_proxy_headers' => true];その他のオプションはデフォルト値のままにしてください。
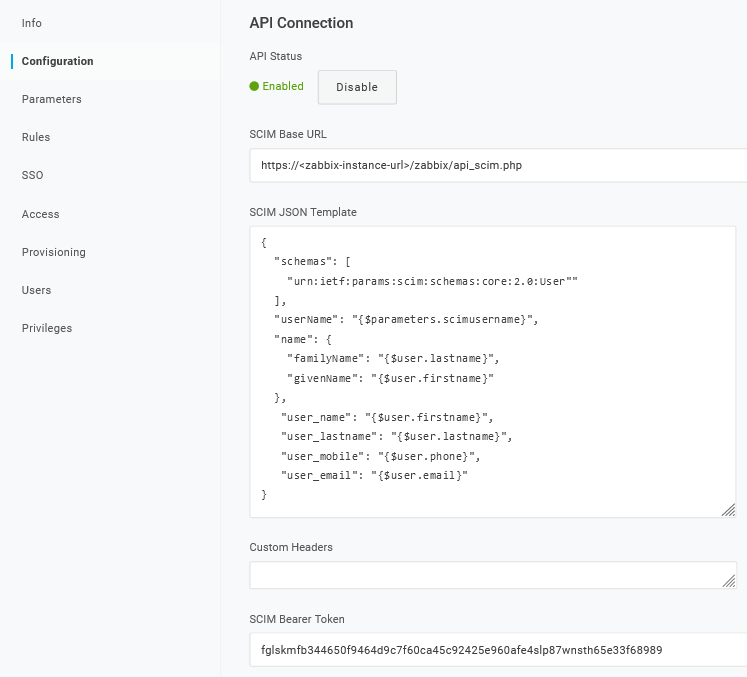
2. Configuration -> API connection で、次の値を設定します。
- SCIM Base URL:
https://<zabbix-instance-url>/zabbix/api_scim.php - SCIM JSON Template:
user_name、user_lastname、user_email、user_mobileなど、SCIM 経由で Zabbix に渡したいすべてのカスタム属性を含める必要があります。
{
  "schemas": [
    "urn:ietf:params:scim:schemas:core:2.0:User"
  ],
  "userName": "{$parameters.scimusername}",
  "name": {
    "familyName": "{$user.lastname}",
    "givenName": "{$user.firstname}"
  },
   "user_name": "{$user.firstname}",
   "user_lastname": "{$user.lastname}",
   "user_mobile": "{$user.phone}",
   "user_email": "{$user.email}"
}
属性名は任意です。別の属性名を使用することもできますが、Zabbix の SAML 設定における各フィールド値と一致している必要があります。
ユーザープロビジョニングを動作させるには、サービスプロバイダー側で必須でなくても、OneLogin が応答として givenName と familyName を含む name 属性を受け取る必要がある点に注意してください。そのため、アプリケーション設定のスキーマ部分でこれを指定する必要があります。
- SCIM Bearer Token: Super admin 権限を持つ Zabbix API トークンを入力します。
Enable をクリックして接続を有効にします。
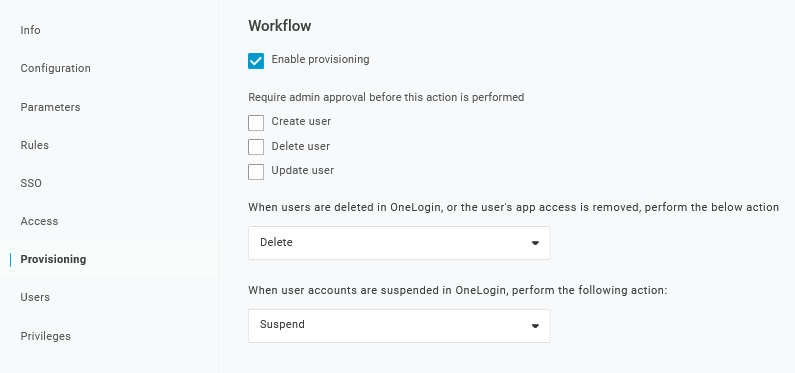
3. Provisioning ページで、Provisioning オプションを有効にします。
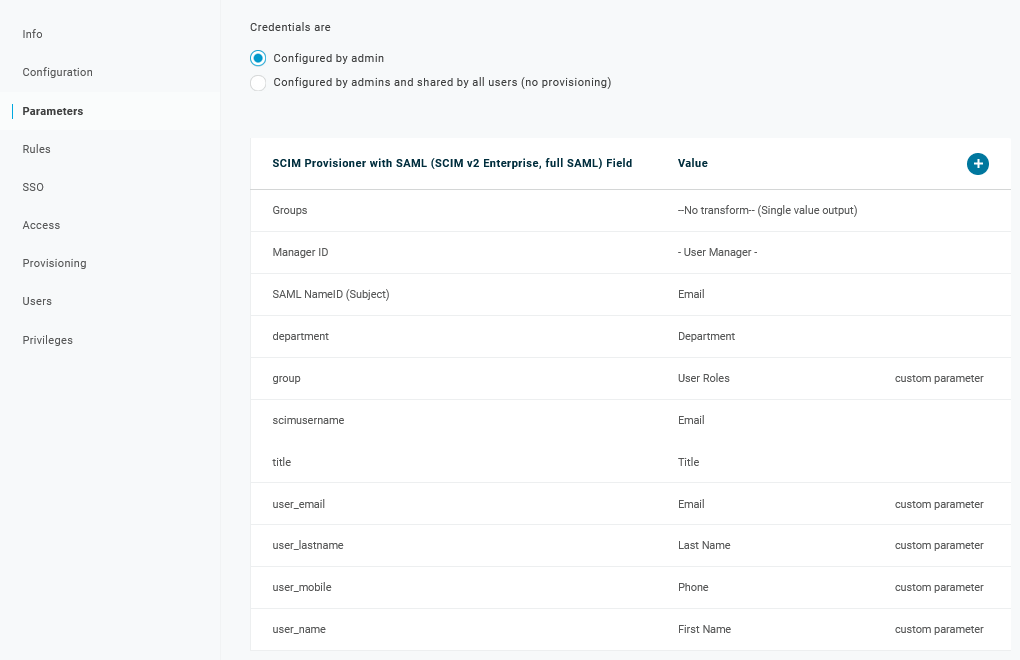
4. Parameters ページには、デフォルトパラメータの一覧が表示されます。
- 'scimusername' が OneLogin のユーザーログイン値(例: メールアドレス)と一致していることを確認します。
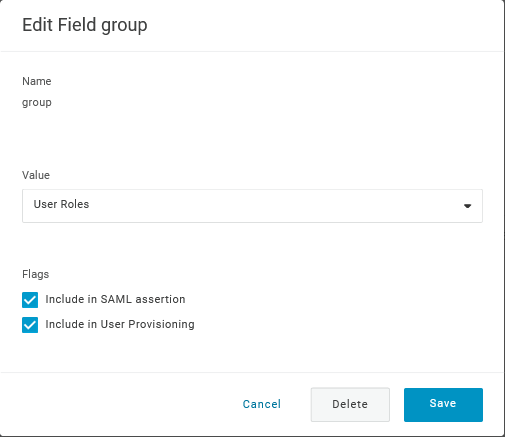
- 'Groups' パラメータについて、Include in User Provisioning オプションを有効にします。
user_name、user_lastname、user_email、user_mobileなど、SAML アサーションとユーザープロビジョニングに必要なカスタムパラメータを作成するには、"+" をクリックします。

パラメータを追加する際は、Include in SAML assertion と Include in User Provisioning の両方を有効にしてください。
- OneLogin のユーザーロールに一致する 'group' パラメータを追加します。ユーザーロールはセミコロン
;で区切られた文字列として渡されます。OneLogin のユーザーロールは、Zabbix でユーザーグループを作成するために使用されます。
パラメータ一覧を確認します。
5. Rules ページで、デフォルトの Groups パラメータに対するユーザーロールのマッピングを作成します。
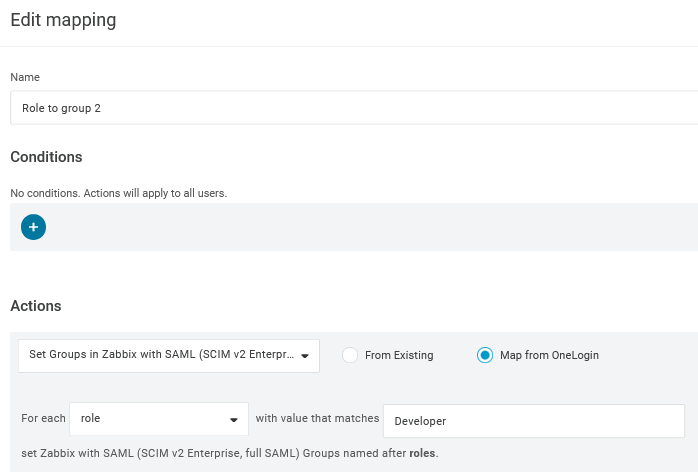
正規表現を使用して、特定のロールをグループとして渡すことができます。OneLogin は複数のロールを持つ属性を送信する際に区切り文字として ; を使用するため、ロール名に ; を含めないでください。
Zabbixの設定
1. Zabbixで、SAML設定 に移動し、OneLoginの設定に基づいて設定オプションを入力します。
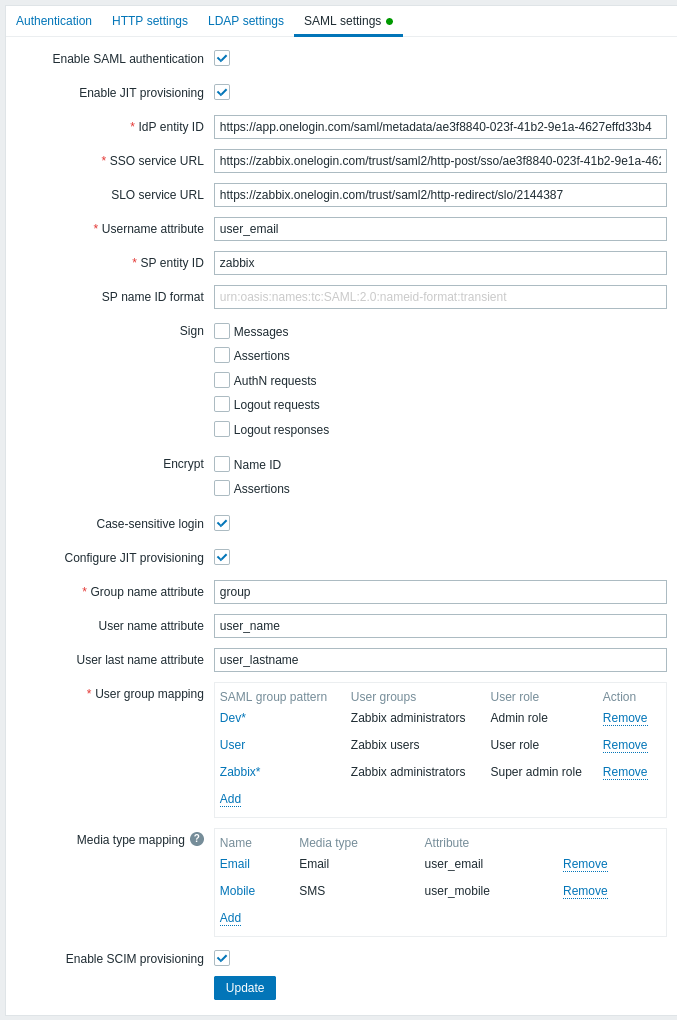
| Zabbix field | Setup field in OneLogin | Sample value |
|---|---|---|
| IdP entity ID | Issuer URL (see SSO tab of your application in OneLogin) |
|
| SSO service URL | SAML 2.0 Endpoint (HTTP) (see SSO tab of your application in OneLogin) |
|
| SLO service URL | SLO Endpoint (HTTP) (see SSO tab of your application in OneLogin) |
|
| Username attribute | Custom parameter | user_email |
| Group name attribute | Custom parameter | group |
| User name attribute | Custom parameter | user_name |
| User last name attribute | Custom parameter | user_lastname |
ユーザーグループのマッピングも設定する必要があります。メディアのマッピングは任意です。これらの設定を保存するには、Update をクリックします。
2. OneLoginが提供する証明書をダウンロードし、Zabbix Webインターフェースのインストール先の conf/certs に idp.crt として配置します。
次のコマンドを実行して、権限を644に設定します。
chmod 644 idp.crtOneLoginでの証明書のダウンロードは、Applications -> SSO -> 現在の証明書の下にある View details をクリックしてアクセスできます。
別の証明書名や配置先を使用することも可能です。その場合は、conf/zabbix.conf.php に次の行を追加してください。
$SSO['IDP_CERT'] = 'path/to/certname.crt';SCIMユーザープロビジョニング
ユーザープロビジョニングを有効にすると、OneLoginでユーザーとそのロールを追加・更新し、それらを即座にZabbixへプロビジョニングできるようになります。
たとえば、新しいユーザーを作成できます。
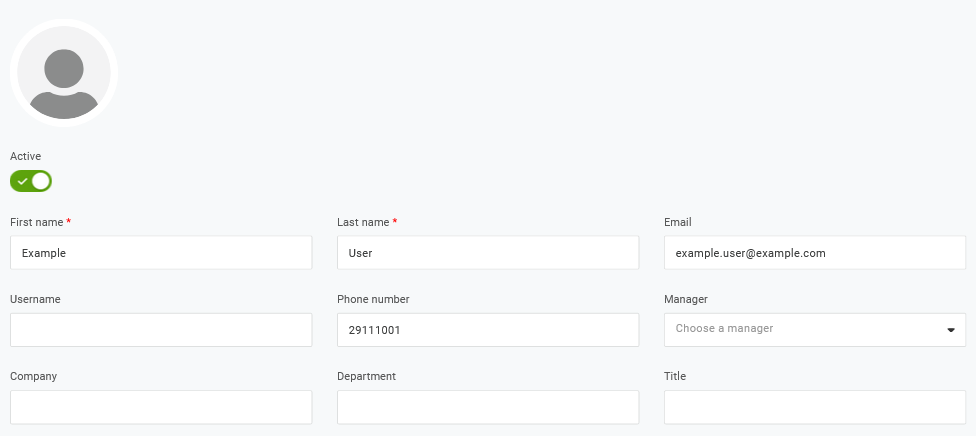
そのユーザーをユーザーロールと、ユーザーをプロビジョニングするアプリケーションに追加します。

ユーザーを保存すると、Zabbixへプロビジョニングされます。Application -> Users で、現在のアプリケーションユーザーのプロビジョニング状態を確認できます。

正常にプロビジョニングされると、そのユーザーはZabbixのユーザー一覧に表示されます。
