2 実際のシナリオ
概要
このセクションでは、Web監視をどのように使用できるかについて、実際のステップバイステップの例を示します。
ZabbixのWeb監視を使用して、Zabbixフロントエンドを監視します。目的は、Zabbixフロントエンドが利用可能であるか、正しいコンテンツを提供しているか、どれだけ迅速に動作するかを判断することです。これを達成するために、最初のページの可用性の確認、ユーザー名とパスワードでのログイン、ログイン成功の検証、ログアウト、ログアウトの確認など、いくつかのステップが必要です。
シナリオ
新しいWebシナリオを追加する
データ収集 → ホスト に移動し、ホストを選択して、そのホストの行にある Web をクリックします。
次に、Webシナリオの作成 をクリックします。
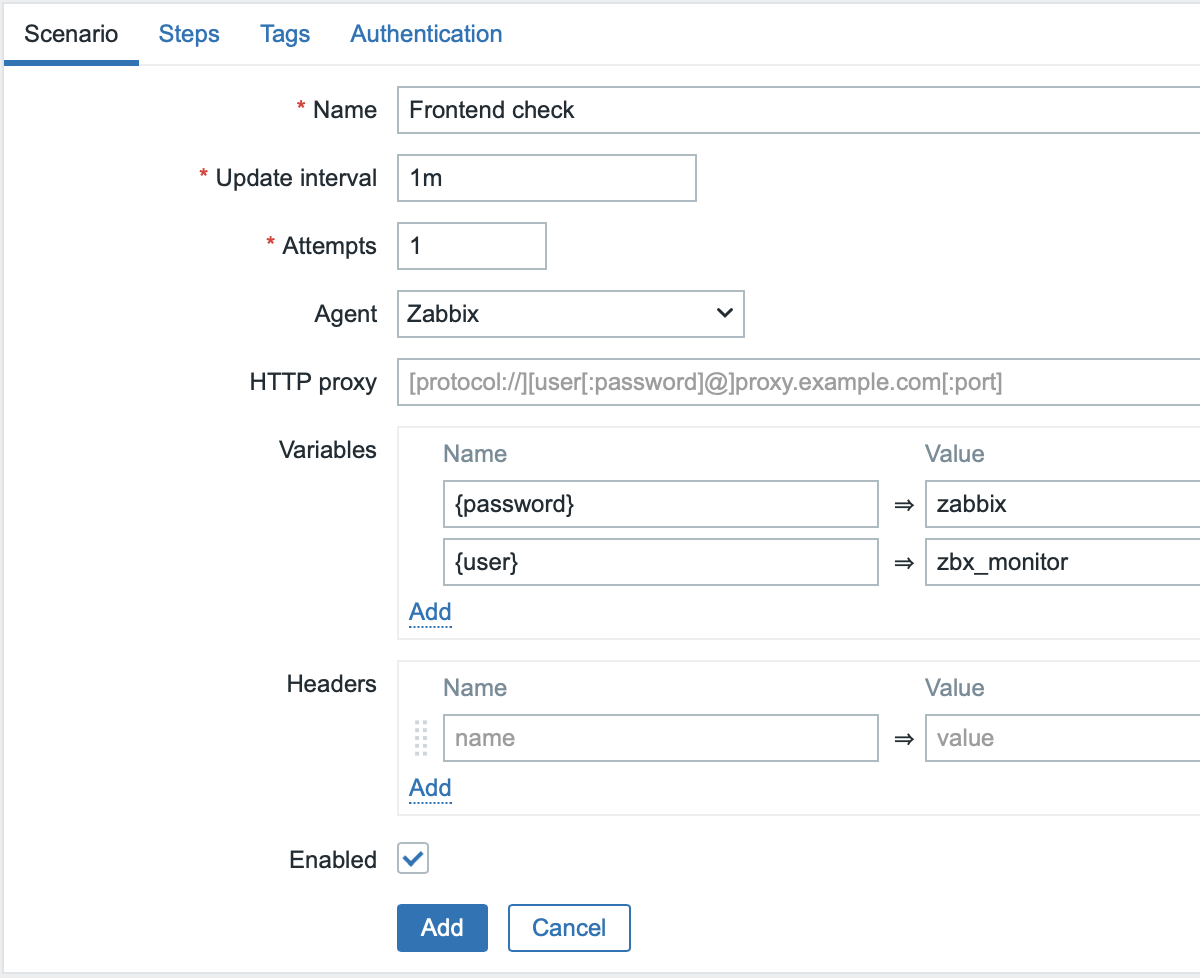
新しいシナリオのフォームで、次のフィールドを入力します。
- 名前 - Frontend check
- 更新間隔 - 1m
- 試行回数 - 1
- エージェント - Zabbix
変数 セクションで、{password} と {user} の2つの変数を追加します。
値には、既存の Zabbix ユーザーの認証情報を入力します。
安全上の理由から、監視用途には最小限の権限を持つ別のユーザーを作成することを推奨します。
必要に応じて、タグ タブに切り替えて Webシナリオのタグを追加します。
完全に設定されると、この Webシナリオは自動的にホストに Zabbix trapper アイテムを追加します。
Webシナリオのタグを使用すると、関連するアイテムやトリガーをすばやく識別したり、収集したデータを検索したりできます。
たとえば、このチュートリアルに適したタグは component: web-scenario および/または target: frontend です。
Webシナリオのステップを設定する
Steps タブに切り替え、シナリオのステップを定義します。個別のステップを追加するには、Add ボタンをクリックします。
共通フィールド
以下に説明する各ステップについて、ステップ固有のフィールドに加えて、以下のフィールドも入力してください。
- URL - ZabbixフロントエンドのURL
- Timeout - 15秒
- Required status codes - 200
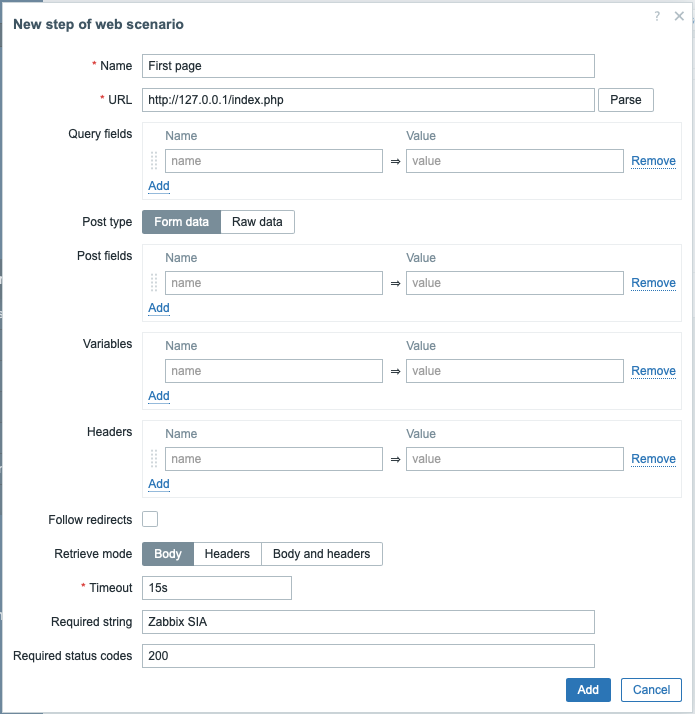
Webシナリオステップ1
最初のページが正しく応答し、HTTPレスポンスコード200を返し、"Zabbix SIA"というテキストを含んでいることを確認します。
- Name フィールドに、First page を入力します。
- Required string フィールドに、Zabbix SIA を入力します。
- 共通フィールド を入力します。
ステップの設定が完了したら、Add ボタンをクリックします。
Webシナリオステップ2
シナリオレベルで定義されたマクロ(変数){user} と {password} を使用してZabbixフロントエンドにログインします。
- 名前フィールドにLoginと入力します。
- Postフィールドセクションで、3つのPostフィールドを追加します:
- name に値 {user}
- password に値 {password}
- enter に値 Sign in
- 変数セクションで、新しい変数 {csrf_token} を値 regex:([0-9a-z]{64}) で追加します。 この変数は割り当てられたCSRFトークンの値をキャッチし、ステップ4で再利用します。
- 共通フィールドを入力します。

Zabbixフロントエンドはログイン時にJavaScriptリダイレクトを使用するため、最初にログインを行い、ログイン後の機能は以降のステップでのみ確認できることに注意してください。また、ログインステップではindex.phpファイルへのフルURLを使用する必要があります。
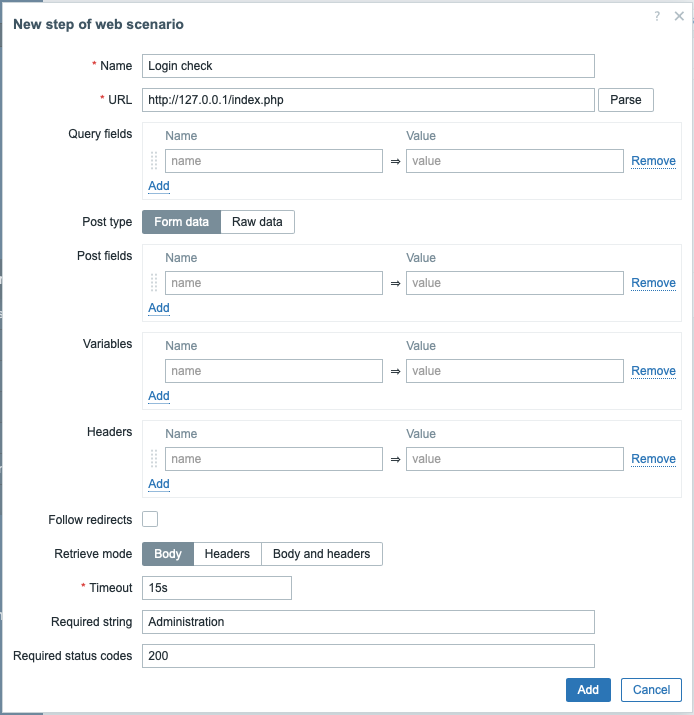
Webシナリオステップ3
ログイン後、ログイン時にのみ表示される文字列(例:管理)をチェックして成功を確認します。
- 名前フィールドにログインチェックと入力します。
- 必須文字列フィールドに管理と入力します。
- 共通フィールドを入力します。
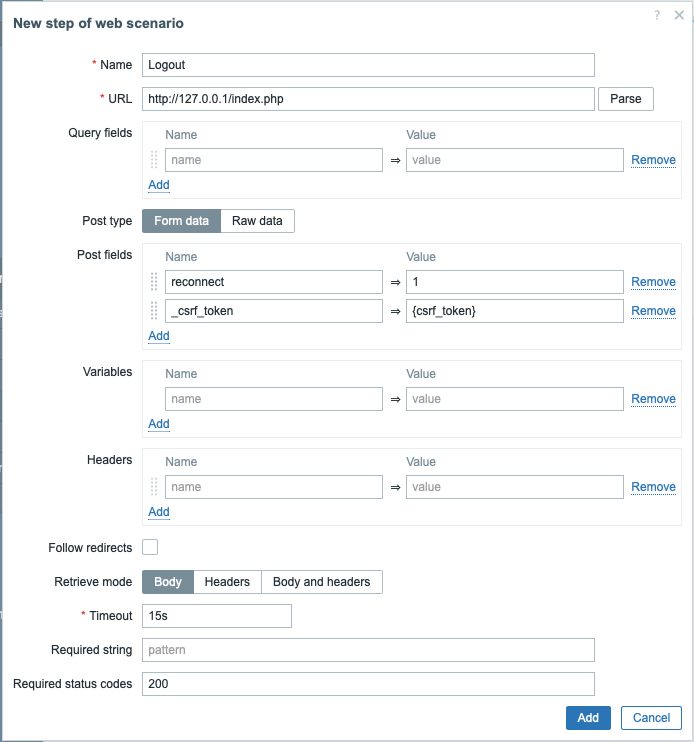
Webシナリオステップ4
フロントエンドのアクセシビリティとログインが確認できたら、ログアウトステップを追加します。そうしないと、Zabbixデータベースに多くのオープンセッションレコードが蓄積されてしまいます。
- 名前フィールドにLogoutと入力します。
- Postフィールドセクションで、2つのpostフィールドを追加します:
- reconnectに値1を設定
- _csrf_tokenに値{csrf_token}を設定
- 共通フィールドを入力します。
このステップでは、ステップ2で取得した変数{csrf_token}を使用します。
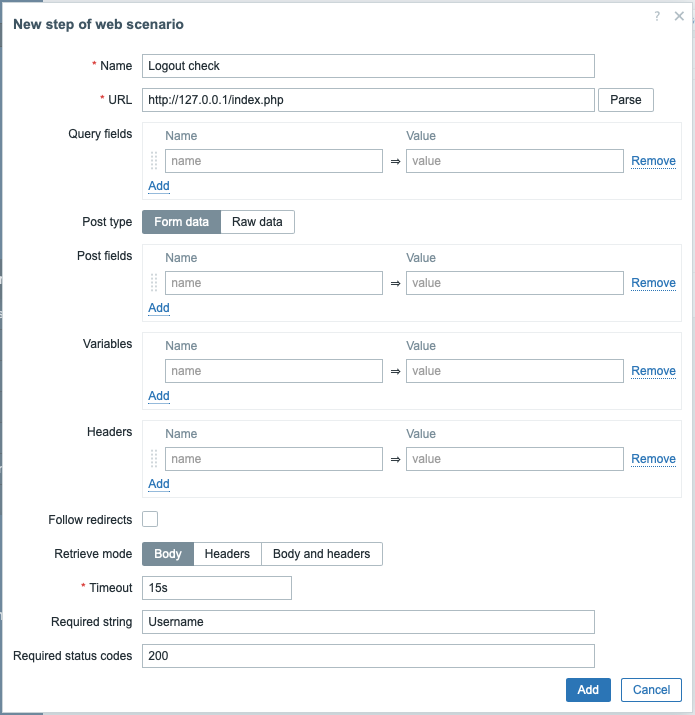
Webシナリオステップ5
ログアウトを確認するために、Username 文字列をチェックします。
- 名前 フィールドに Logout check を入力します。
- 必須文字列 フィールドに Username を入力します。
- 共通フィールドを入力します。
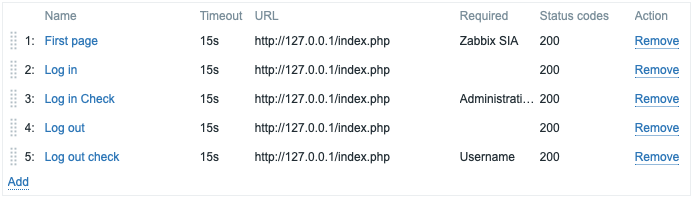
ステップの完全な設定
Webシナリオステップの完全な設定は次のようになります。
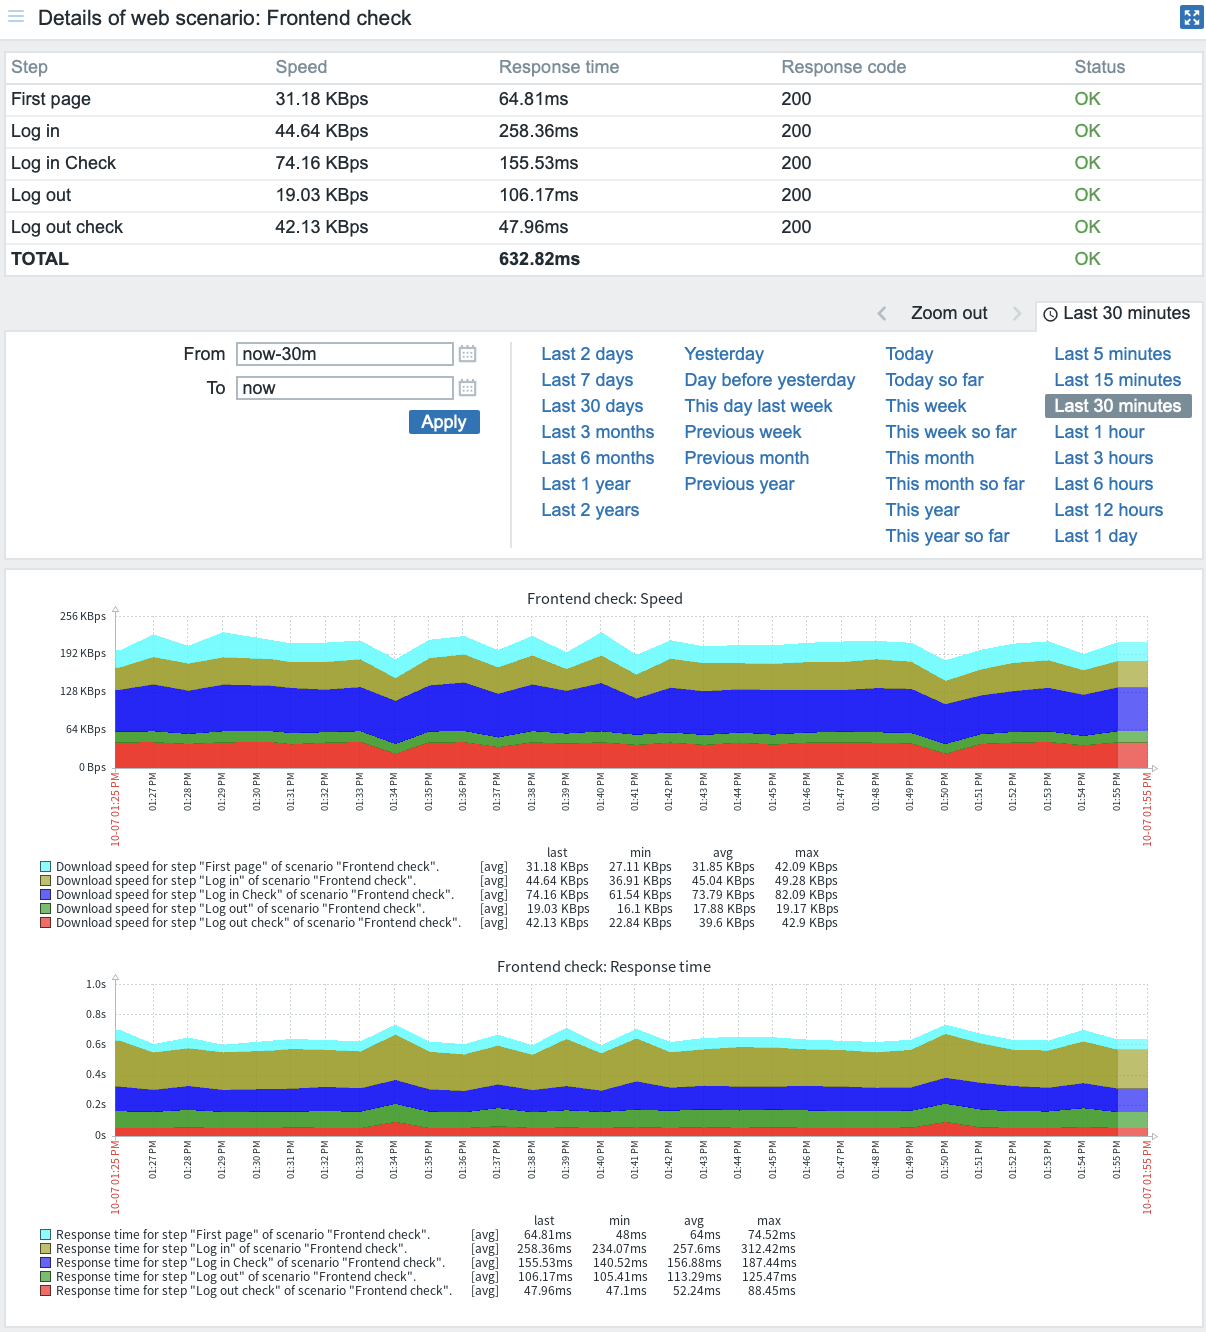
結果を確認する
作成したWeb監視シナリオを保存します。
このシナリオはホストに追加されます。Webシナリオの情報を表示するには、Monitoring → Hosts に移動し、一覧でホストを見つけて、最後の列にある Web ハイパーリンクをクリックします。

シナリオ名をクリックすると、より詳細な統計情報を表示できます。