
ノード設定
概要
クラウドノードは、クラウド上にある Zabbix インスタンスに相当します。これには Zabbix サーバー、データベース、および Webインターフェースが含まれます。クラウドノードには、専用の計算リソース(CPU、メモリ)とディスクストレージがあります。
ユーザーは 1 つ以上のクラウドノードを作成できます。クラウドノードは 組織(構造別、地域別など)にグループ化でき、分散監視構成を作成できます。
クラウドノードと組織は、Zabbix Cloud のユーザーインターフェースを使用して作成します。ノードの設定ページにアクセスするには、All organizations、組織メニュー から、またはノードが 起動 された後に表示される Node configuration page リンクから、対象のノードをクリックします。
ノード設定ビューでは、各タブでノードの特定の側面を管理できます。
- Overview - ノードの詳細を表示し、その Webインターフェースを開き、ノードユーザーを管理します。
- Access filters - IP アドレスまたはサブネットによるアクセス制御を行います。
- Encryption - 証明書、キー、および任意の CRL をアップロードして TLS を設定します。
- Backups - ノードのスナップショットを作成、復元、削除します。次回予定されているバックアップを表示します。
- History - 監査ログ、履歴、トレンドの保持期間を、あらかじめ設定された単位と 1 日 3 回の更新制限付きで設定します。
- Maintenance - タイムゾーン、曜日、時刻に基づいて毎週のメンテナンス時間帯を定義します。
- Upgrade - 計算/ストレージリソースを拡張するか、試用/支払いステータスを管理します。
ページを表示している ユーザーの種類 とノードの状態(試用/非試用)によっては、一部のタブが利用できない場合があります。
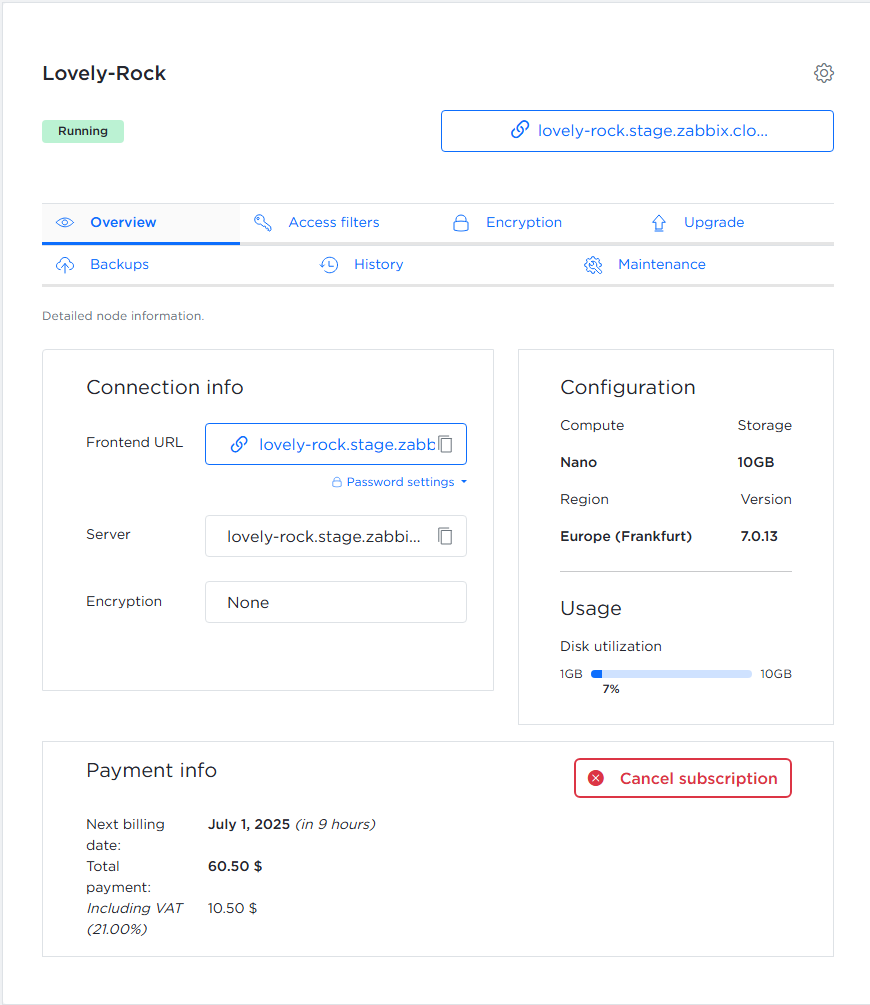
概要タブ
概要タブには、ノードに関する詳細情報が表示されます。
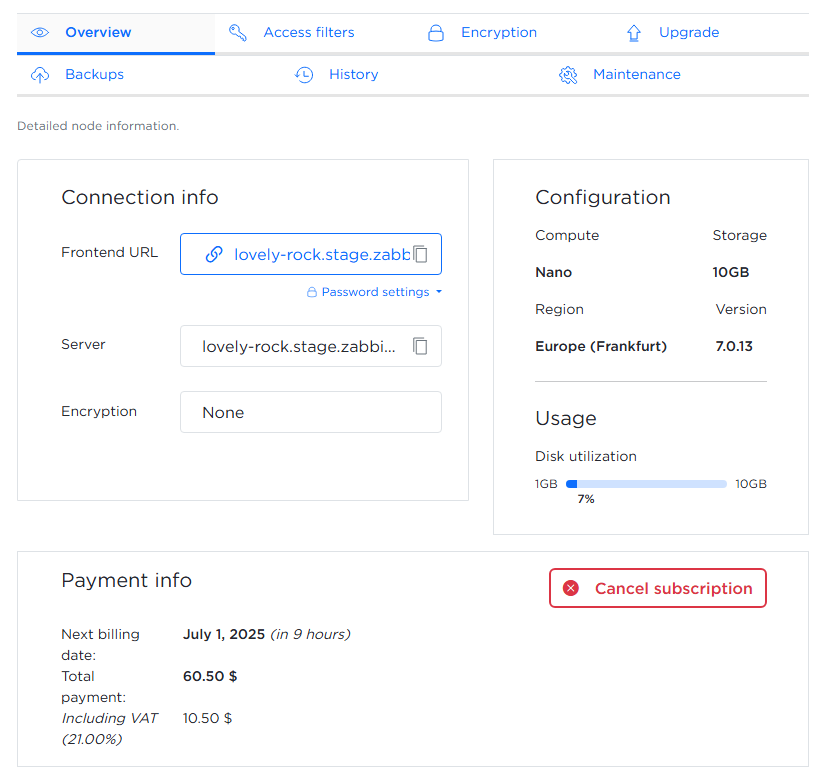
以下の3つのセクションに分かれています。
接続情報:
- クリック可能なフロントエンドURL(クリップボードへのコピーオプション付き)
- パスワード設定
- 現在の暗号化方式構成と使用状況:
- コンピューティング層、最大ストレージ容量、リージョン
- Zabbixコンポーネントのバージョン
- ディスク使用率ノード情報/お支払い情報:
- 有効期限(トライアル版およびプリペイド版ノードの場合)
- ノードの初期化完了後、ノードの種類に応じて、コンテキスト固有のボタンが表示されます。
- *有料版へのアップグレード* - 無料トライアル版のノードで利用可能です。
- *サブスクリプションのキャンセル* - 有効なサブスクリプションを持つ有料版ノードで利用可能です。
- *有料版への再登録* - サブスクリプションがキャンセルされている場合に表示されます。
- プリペイド版ノードは有効期限が長く、キャンセルできません。
アクセスフィルタータブ
アクセスフィルタータブでは、IPアドレスまたはサブネットでZabbixノードへのアクセスを制限できます。
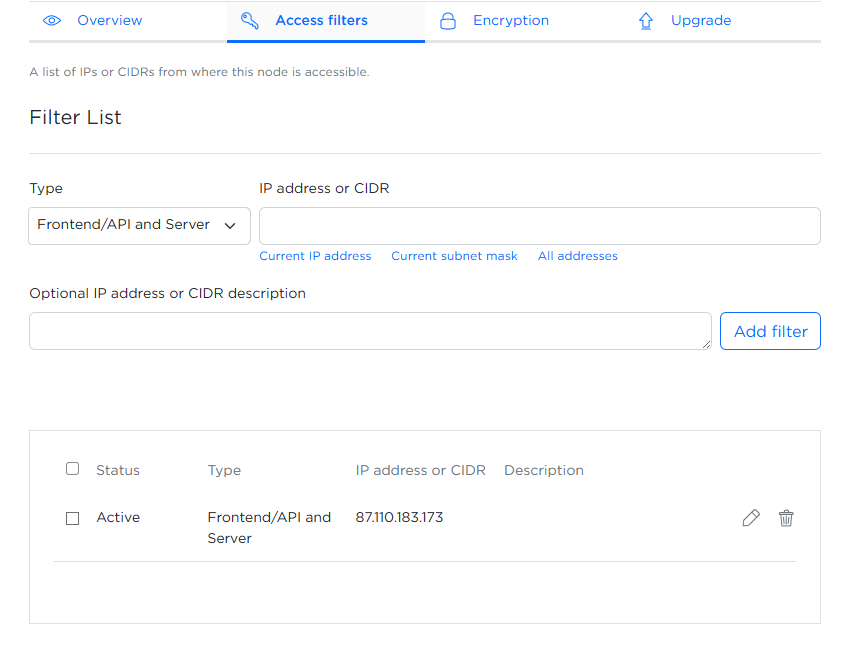
アクセスフィルターを設定するには、以下のフィールドに入力します。
- タイプ - ドロップダウンリストから、制限するZabbixコンポーネントを選択します。フロントエンド/APIのみ、サーバーのみ、または両方。
- IPアドレスまたはCIDR - IPアドレスまたはCIDRを手動で入力するか、該当するオプションを選択して自動的に入力します。
- IPアドレスまたはCIDRの説明(任意) - 各IPまたはサブネットの説明(任意)を追加します。
フィールドに入力し終えたら、フィルターを追加をクリックします。 追加されたフィルターは、下の表にステータス、タイプ、IPアドレスまたはサブネット、および説明とともに表示されます。
ノードの初期化中に、使用したIPアドレスに対してアクセスフィルターが自動的に作成されます。 後で別の IP またはネットワークから接続する場合は、そのアドレスをここに追加してください。追加しないとブロックされます。
次の操作を実行できます。
 - フィルターを編集します。
 - チェックボックスを使用して、フィルターを 1 つまたは複数削除します。
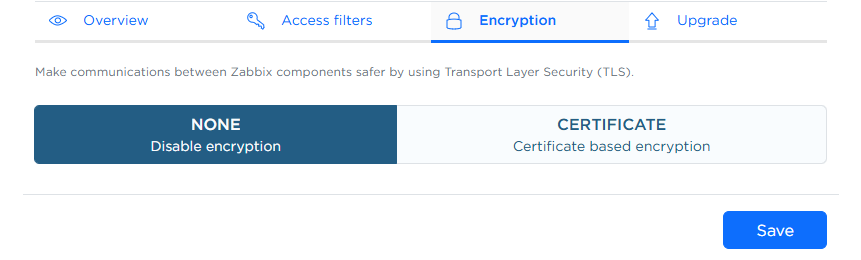
暗号化タブ
暗号化タブでは、必要な証明書ファイルをアップロードすることで、Zabbixコンポーネント間のTLS 暗号化を設定できます。
証明書を使用した安全な通信を有効にするには、証明書を選択し、以下のファイルをコンピューターからアップロードしてください。
- ルートCA証明書 - ピア証明書の信頼性を検証するために使用されます。 ファイルを選択をクリックし、信頼されたルートCA証明書(通常はPEMエンコードされた「.crt」または「.pem」ファイル)を含むファイルを選択します。
- 証明書チェーン - 自身の証明書の信頼チェーンを表します。 ファイルを選択をクリックし、証明書と中間CA証明書を含むPEMエンコードファイル(例:.crtまたは.pem)を選択します。
- 秘密鍵 - 証明書に対応する秘密鍵。
ファイルを選択をクリックし、PEMエンコードされた
.keyファイルを選択します。 - 失効した証明書(オプション) - 証明書失効リスト(CRL)を保持している場合は、ファイルを選択をクリックし、信頼できなくなった証明書を指定するCRLファイルを選択します。
ファイルを選択したら、保存をクリックします。ファイルはアップロードされ、検証され、Zabbixコンポーネント間のTLS暗号化の設定に適用されます。
バックアップタブ
バックアップタブでは、Zabbixノードのバックアップの表示、作成、復元、削除ができます。
保存済みのバックアップからインスタンスを復元したり、いつでも手動で新しいバックアップを作成したりできます。
このタブには、次回のバックアップスケジュールの日付も表示されます。
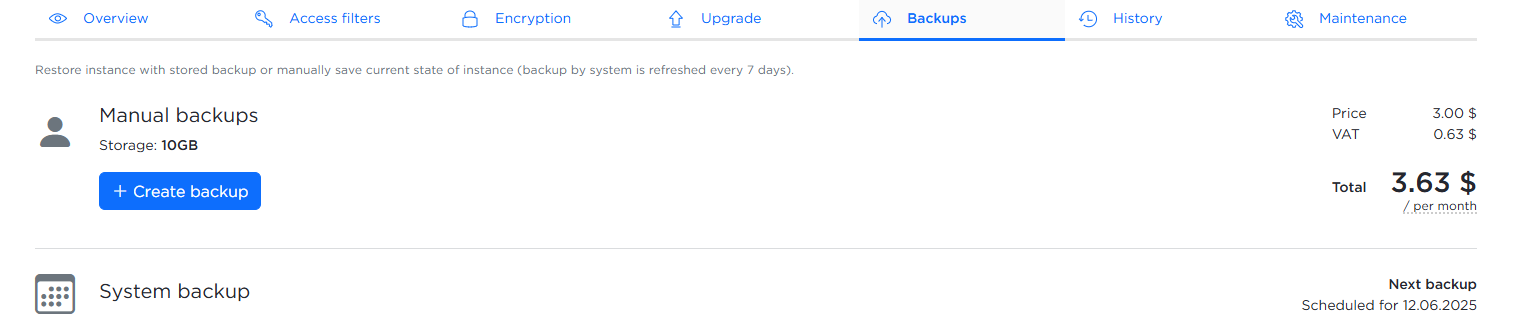
バックアップを作成するには:
- バックアップ作成 ボタンをクリックします。
- ポップアップウィンドウに必要に応じて説明を入力します。
- 作成 をクリックして確定します。
追加のバックアップは、ストレージ使用量に基づいて毎月課金されます。
履歴タブ
履歴タブでは、様々な種類の履歴データの保存期間を設定できます。
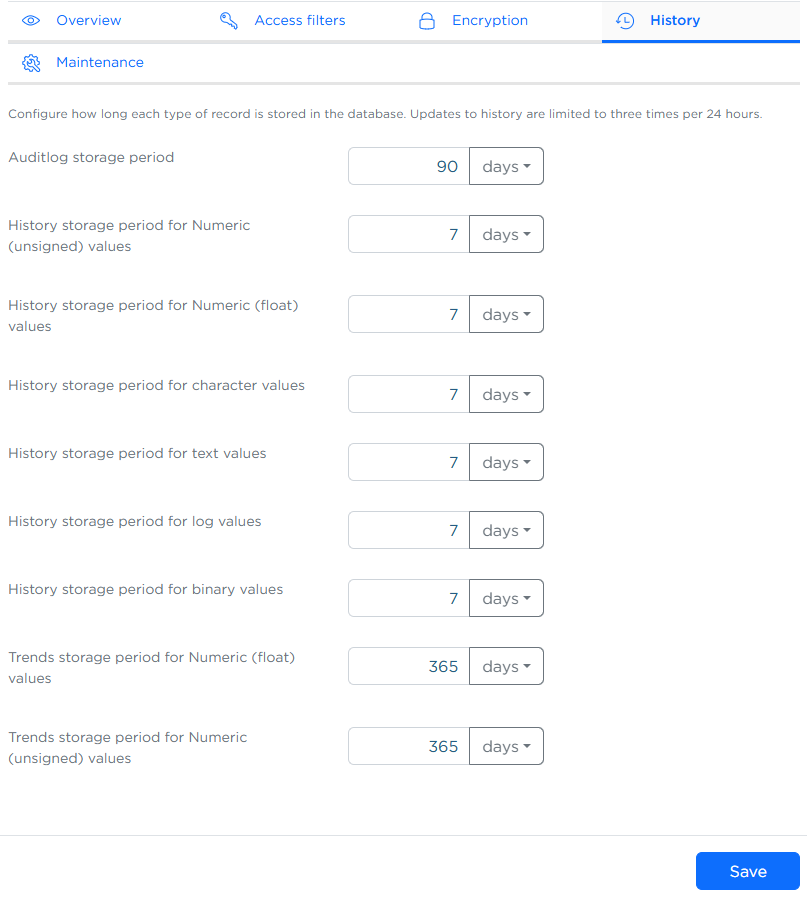
データの種類(数値、テキスト、ログなど)ごとに保存期間を設定し、保存単位(日、月、年)を選択できます。 変更は24時間ごとに最大3回まで可能です。
値を更新したら、保存 をクリックして変更を適用してください。
::: 注記
保存期間を長くすると、ディスク使用量が増加し、パフォーマンスに影響する可能性があります。
実際のデータと分析のニーズに基づいて保存期間を設定することをお勧めします。
Zabbix Cloudは、従来のZabbixハウスキーピングではなく、データベースパーティショニングを使用してデータストレージを管理します。これにより、パフォーマンスが向上し、より予測可能な保存期間管理が可能になります。
:::
メンテナンスタブ
メンテナンスタブでは、ノードの更新や調整が可能なメンテナンス期間を定義できます。
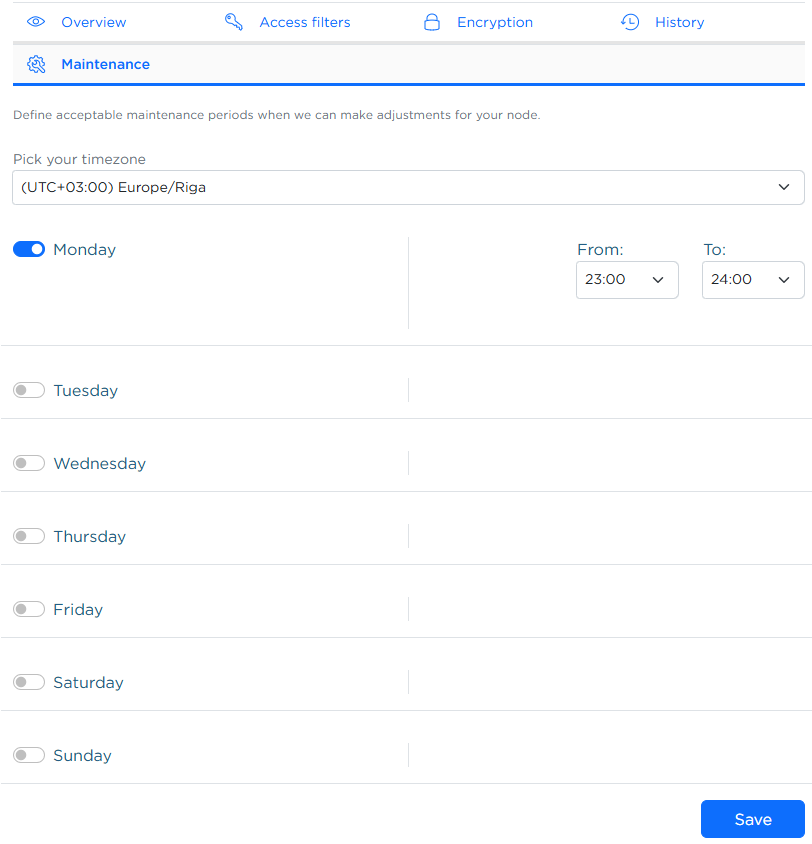
以下の操作を行う必要があります。
- ドロップダウンからタイムゾーンを選択します。
- メンテナンスを行う曜日と時間枠を少なくとも1つずつ選択します。
保存 をクリックして変更を適用します。
曜日または時間枠が選択されていない場合は、エラーが表示されます。

アップグレードタブ
アップグレード タブでは、ノードのリソースを拡張したり、サブスクリプションを管理したりできます。
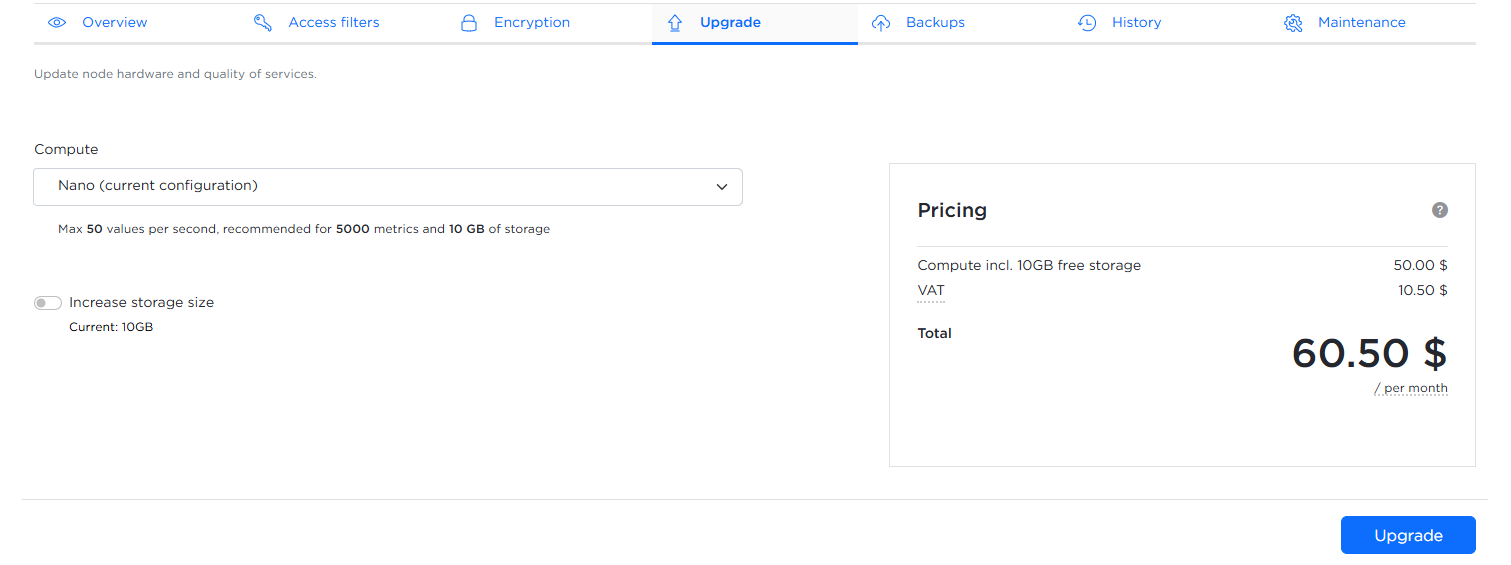
コンピューティング層またはディスクサイズを増やすことができます。ただし、ディスクサイズは24時間に1回しか増やすことができず、UIから減らすことはできません(縮小のリクエストについては、Zabbixサポートにお問い合わせください)。
無料トライアルのノードは、有料サブスクリプションに変更できます。
コンピューティング層を増やすには:
1. コンピューティング ドロップダウンをクリックします。

2. 必要な構成を選択します。
3. アップグレード ボタンをクリックします。
ディスクサイズを増やすには:
1. ストレージサイズを増やす ラジオボタンをクリックします。
2. ディスクサイズ スライダーを希望の値に調整します。
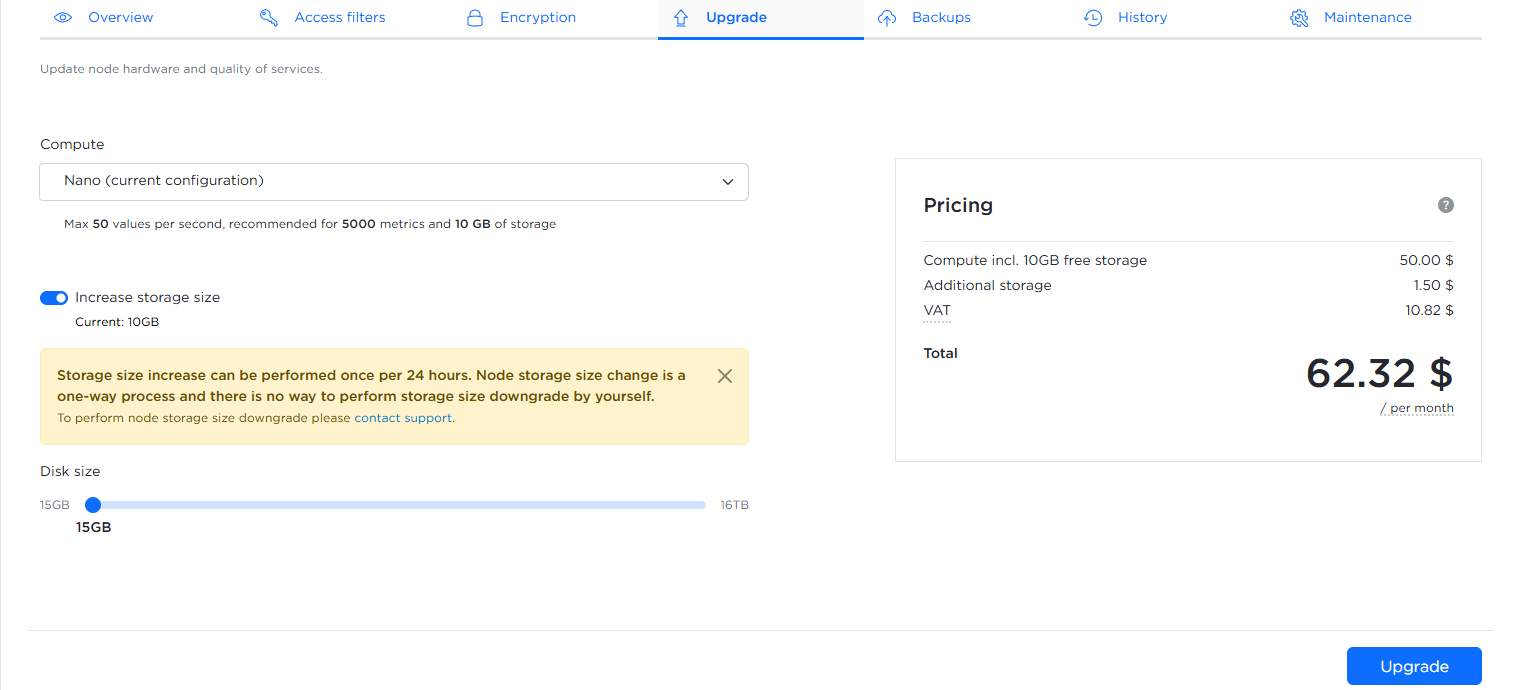
3. アップグレード ボタンをクリックします。
変更を確定する前に、料金 表に更新された月額料金が表示されます。