
4 Webhook
概要
webhook メディアタイプは、ヘルプデスクシステム、チャット、メッセンジャーなどの外部ソフトウェアと簡単に統合するために、
カスタム JavaScript コードを使用して HTTP コールを行うのに便利です。Zabbix が提供する統合機能をインポートするか、
カスタム統合機能を一から作成することができます。
インテグレーション
以下のインテグレーションを利用することで、定義済みの Webhook メディアタイプを使用して Zabbix 通知をプッシュすることができます:
- brevis.one
- Discord
- Express.ms messenger
- Github issues
- GLPi
- iLert
- iTop
- Jira
- Jira Service Desk
- ManageEngine ServiceDesk
- Mattermost
- Microsoft Teams
- Opsgenie
- OTRS
- Pagerduty
- Pushover
- Redmine
- Rocket.Chat
- ServiceNow
- SIGNL4
- Slack
- SolarWinds
- SysAid
- Telegram
- TOPdesk
- VictorOps
- Zammad
- Zendesk
ここに挙げたサービスに加え、Zabbix は Spiceworks と連携することができます。(Webhookは不要です)
Zabbixの通知をSpiceworksのチケットに変換するには、email media typeを作成し、Spiceworksヘルプデスクのメールアドレス
(例: [email protected]) を指定したZabbixのプロファイル設定に入力する必要があります。
構成
Webhook 連携の利用を開始するには:
- ダウンロードしたZabbixのtemplates/media`ディレクトリにある必要な.xmlファイルを見つけるか、Zabbix git repositoryからダウンロードしてください。
- ファイルを Zabbix のインストールにImport します。メディアタイプのリストに Webhookが表示されます。
- Readme.mdファイルの指示に従ってWebhookを設定します(上記のWebhookの名前をクリックすると、 Readme.mdにすぐにアクセスできます)
カスタムWebhookをゼロから作成する場合:
- Administration → Media types に進みます。
- Create media type をクリックします。
Media type タブには、そのメディアタイプに固有のさまざまな属性が含まれています:
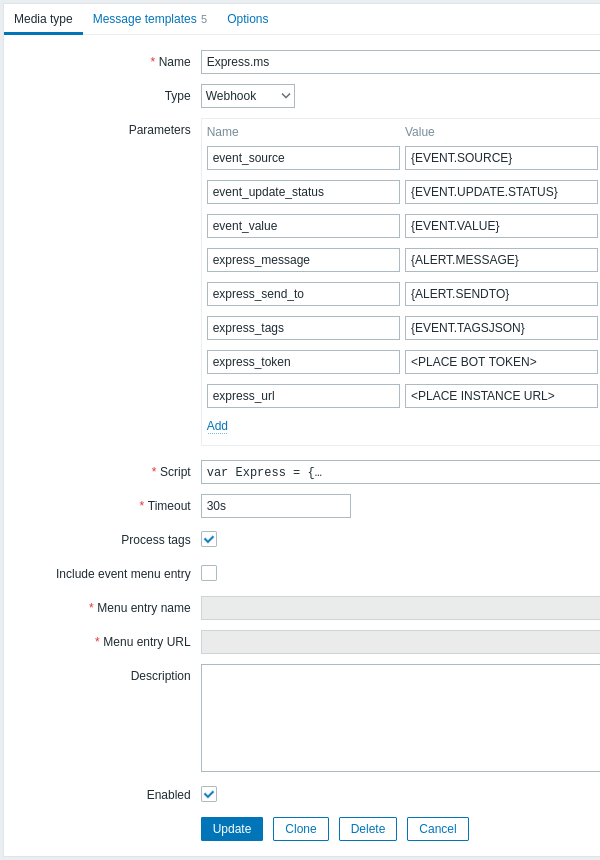
すべての必須入力フィールドには、赤いアスタリスクが表示されます。
以下のパラメータは、webhook メディアタイプに固有のものです:
| パラメータ | 説明 |
|---|---|
| Parameters | Specify the webhook variables as the attribute and value pairs. For preconfigured webhooks, a list of parameters varies, depending on the service. Check the webhook's Readme.md file for parameter description. For new webhooks, several common variables are included by default (URL:<empty>, HTTPProxy:<empty>, To:{ALERT.SENDTO}, Subject:{ALERT.SUBJECT}, <Message:%7BALERT.MESSAGE>}), feel free to keep or remove them. All macros that are supported in problem notifications are supported in the parameters. If you specify an HTTP proxy, the field supports the same functionality as in the item configuration HTTP proxy field. The proxy string may be prefixed with [scheme]:// to specify which kind of proxy is used (e.g. https, socks4, socks5; see documentation). |
| Script | Enter JavaScript code in the block that appears when clicking in the parameter field (or on the view/edit button next to it). This code will perform the webhook operation. The script is a function code that accepts parameter - value pairs. The values should be converted into JSON objects using JSON.parse() method, for example: var params = JSON.parse(value);.The code has access to all parameters, it may perform HTTP GET, POST, PUT and DELETE requests and has control over HTTP headers and request body. The script must contain a return operator, otherwise it will not be valid. It may return OK status along with an optional list of tags and tag values (see Process tags option) or an error string. Note, that the script is executed only after an alert is created. If the script is configured to return and process tags, these tags will not get resolved in {EVENT.TAGS} and {EVENT.RECOVERY.TAGS} macros in the initial problem message and recovery messages because the script has not had the time to run yet. See also: Webhook development guidelines, Webhook script examples, Additional JavaScript objects. |
| Timeout | JavaScript execution timeout (1-60s, default 30s). Time suffixes are supported, e.g. 30s, 1m. |
| Process tags | Mark the checkbox to process returned JSON property values as tags. These tags are added to the already existing (if any) problem event tags in Zabbix. If a webhook uses tags (the Process tags checkbox is marked), the webhook should always return a JSON object containing at least an empty object for tags: var result = {tags: {}};.Examples of tags that can be returned: Jira ID: PROD-1234, Responsible: John Smith, Processed:<no value>, etc. |
| Include event menu entry | Mark the checkbox to include an entry in the event menu linking to the created external ticket. If marked, the webhook should not be used to send notifications to different users (consider creating a dedicated user instead) or in several alert actions related to a single problem event. |
| Menu entry name | Specify the menu entry name. {EVENT.TAGS.<tag name>} macro is supported. This field is only mandatory if Include event menu entry is selected. |
| Menu entry URL | Specify the underlying URL of the menu entry. {EVENT.TAGS.<tag name>} macro is supported. This field is only mandatory if Include event menu entry is selected. |
デフォルトのメッセージとアラート処理オプションを設定する方法の詳細については common media type parameters を参照してください。
Webhook がデフォルトメッセージを使用しない場合でも、この Webhook が使用する操作タイプ用のメッセージテンプレートは
定義されている必要があります。
ユーザーメディア
メディアタイプを設定したら、Administration → Users セクションで、Webhook メディアを既存のユーザーに割り当てるか、
Webhook を表すユーザーを新規に作成します。既存のユーザーにユーザーメディアを設定する手順は、すべてのメディアタイプに
共通なので、Media types ページで説明されています。
Webhook がタグを使用して ticket \メッセージ ID を格納する場合、同じ Webhook を異なるユーザーにメディアとして割り当てることは
避けてください。エラーの原因となる可能性があります。(Include event menu entry optionを利用するウェブフックの大部分に
適用されます)この場合、ベストプラクティスは、Webhook を代表する専用のユーザを作成することです:
- Webhook メディアタイプの設定後、Administration → Users セクションに移動し、Webhook専用のZabbixユーザ (例:Slack Webhook用のユーザ名 Slack )を作成します。このユーザは Zabbix にログインしないため、メディア以外の設定は すべてデフォルトのままでよいです。
- ユーザプロファイルの Media タブで、必要な連絡先情報を入力し、add a webhookを行います。 WebhookがSend toフィールドを使用しない場合、検証要件を回避するためにサポートされている文字の任意の組み合わせを入力します。
- このユーザーに、アラートを送信するすべてのホストに対する少なくとも読み取り permissionsを許可します。
アラートアクションの設定時に、操作の詳細の Send to usersフィールドにこのユーザを追加することで、Zabbix にこのアクションからの
通知にWebhookを使用するよう指示します。
アラートアクションを設定する際、操作の詳細の Send to users フィールドにこのユーザーを追加します。これにより、<bnr> このアクションからの通知に Webhook を使用するようZabbix に指示します。
アラートアクションの設定
アクションは、どの通知を Webhook 経由で送信するかを決定します。 configuring actionsの手順は以下の通りです。 Webhook を含む他のすべてのメディアタイプの場合と同じですが、以下の例外があります:
- Webhook が ticket\message ID を保存し、update\resolve 操作でフォローアップするためにタグを使用する場合、 この Webhook は単一の問題イベントに対する複数の警告アクションで使用されるべきではないです。 {EVENT.TAGS.<name>} が既に存在し、Webhook で更新される場合、その結果の値は定義されません。このような場合、 更新された値を保存するために、Webhook で新しいタグ名を使用する必要があります。これは、Zabbix が提供する Jira、 Jira Service Desk、Mattermost、Opsgenie、OTRS、Redmine、ServiceNow、Slack、Zammad、Zendesk Webhookと、 Include event menu entry オプションを利用する Webhook の大部分に適用されます。複数の操作で Webhook を 使用することは可能です。これらの操作またはエスカレーションステップが同じアクションに属している場合、Webhook を 複数の操作で使用することができます。また、フィルタ条件が異なるため、同じ問題イベントにアクションが適用されない場合、 異なるアクションでこの Webhook を使用することもできます。
- internal events アクションでWebhookを使用する場合: アクションの動作設定で、Custom messageチェックボックスをチェックし、カスタムメッセージを定義します。 さもないと、通知が送信されません。