
1 ホストの設定
概要
ZabbixのWebインターフェースでホストの設定を行うには以下の手順を実施します。
- 設定 > ホストまたは監視データ > ホストに遷移します。
- 右側のホストの作成をクリックします(またはホスト名をクリックして既存のホストを編集します)。
- フォームにホストのパラメーターを入力します。
既存のホストのフォームで複製およびすべて複製ボタンを使用して、新しいホストを作成することもできます。 複製をクリックすると、ホストのすべてのパラメーターとテンプレートのリンクが保持されます(それらのテンプレートのすべてのエンティティが保持されます)。すべて複製では、直接接続されたエンティティ(タグ、アイテム、トリガー、グラフ、ローレベルディスカバリ、Webシナリオ)も保持されます。
注意: ホストを複製すると、テンプレート上のすべてのエンティティはそのまま保持されます。既存のホスト上で行われたエンティティへの変更(アイテムの監視間隔の変更、正規表現の変更、ローレベルディスカバリルールへのプロトタイプの追加など)は、新しいホストには反映されず、テンプレートどおりになります。
設定
ホストタブには、一般的なホストの属性が表示されます。

すべての必須入力フィールドには赤いアスタリスクが表示されます。
| パラメーター | < | 説明 | |
|---|---|---|---|
| ホスト名 | < | 一意のホスト名を入力します。英数字、スペース、ドット、ダッシュ、アンダースコアを使用できます。ただし、先頭と末尾のスペースは使用できません。 注: 設定しているホストでZabbixエージェントが実行されている場合、エージェント設定ファイルのパラメーターHostnameは、ここで入力したホスト名と同じ値である必要があります。パラメーター内の名前は、アクティブチェックの処理に必要です。 |
|
| 表示名 | < | ホストの一意の表示名を入力します。この名前を設定すると、リストやマップなどに技術的なホスト名の代わりに表示されます。この属性はUTF-8をサポートしています。 | |
| テンプレート | < | テンプレートをホストにリンクします。すべてのエンティティ(アイテム、トリガー、グラフなど)は、テンプレートから継承されます。 新しいテンプレートをリンクするには、テンプレートの検索文字列を入力フィールドにテンプレート名を入力します。一致するテンプレートのリストが表示されるので、スクロールして選択します。または、フィールドの横にある選択をクリックし、ポップアップウィンドウのリストからテンプレートを選択することもできます。まずホストグループフィールドの横にある選択をクリックしてホストグループを選択し、下に表示されるリストから1つまたは複数のテンプレートの前にあるチェックボックスをオンにして 選択をクリックします。テンプレートフィールドで選択したテンプレートは、ホスト設定フォームが保存または更新されるときにホストにリンクされます。 テンプレートのリンクを解除するには、リンクされたテンプレートの2つのオプションのいずれかを使用します。 リンクを削除 - テンプレートのリンクを解除しますが、そのアイテム、トリガー、グラフは保持します。 リンクと保存データを削除 - テンプレートのリンクを解除し、そのすべてのアイテム、トリガー、グラフを削除します。 リストされているテンプレート名は、テンプレート設定フォームにつながるクリック可能なリンクです。 |
|
| グループ | < | ホストが属するホストグループを選択します。ホストは少なくとも1つのホストグループに属している必要があります。存在しないグループ名を入力すると、新しいグループを作成してホストにリンクできます。新しい名前はドロップダウンリストに括弧内に"新規"として表示されます。それをクリックすると、選択フィールドに追加されます。 | |
| インターフェース | < | ホストではいくつかのホストインターフェースタイプがサポートされています: エージェント、SNMP、JMX、IPMI。 デフォルトではインターフェースは定義されていません。新しいインターフェースを追加するには、インターフェースブロックの追加をクリックし、インターフェースタイプを選択して、IP/DNS、接続先、ポート情報を入力します。 注: いずれかのアイテムで使用されているインターフェースは削除できず、それらのインターフェースの削除リンクはグレー表示されます。 SNMPインターフェイスの"IP"または"DNS"は、SNMPトラップにも使用されます。 マッチング中、ホストインターフェースで選択された"IP"または"DNS"のみが使用されます。 SNMPインターフェース(v1、v2、v3)の設定の詳細については、SNMP監視の設定 を参照してください。 |
|
| IPアドレス | ホストIPアドレス (オプション)。 | ||
| ^ | DNS名 | ホストDNS名 (オプション)。 | |
| ^ | 接続方法 | それぞれのボタンをクリックすると、エージェントからデータを取得するために何を使用するかを Zabbixサーバーに指示します: IP - ホストのIPアドレスで接続します (推奨) DNS - ホストのDNS名で接続します |
|
| ^ | ポート | TCP/UDPポート番号。デフォルト値は、Zabbixエージェントの場合は10050、SNMPエージェントの場合は161、JMXの場合は12345、IPMIの場合は623です。 | |
| ^ | 標準 | デフォルトのインターフェースを設定するには、ラジオボタンをオンにします。 | |
| 説明 | < | ホストの説明を入力します。 | |
| プロキシによる監視 | < | ホストは、ZabbixサーバーまたはいずれかのZabbixプロキシによって監視できます。 (プロキシなし) - ホストはZabbixサーバーによって監視されます プロキシ名 - ホストはZabbixプロキシ"プロキシ名"によって監視されます。 |
|
| 有効 | < | チェックボックスがオンの場合、ホストは有効になり、監視の準備が整います。 チェックボックスがオフの場合、ホストは無効になり、監視されません。 Zabbixサーバー/プロキシによって開始されたパッシブデータ要求(例えば、Zabbixエージェント、SNMPエージェント、シンプルチェックなど)の場合、設定の同期後、監視は無効になります。ホストにリンクされたトリガーとアクションも、設定が再読み込みされた後にのみ無効になります。 Zabbixエージェントのアクティブチェックの場合、Zabbixエージェントがホストが無効になったことに関する情報を受信するまでの時間枠内(2分未満)に監視が停止します。この短い間隔の間、ホストはアクティブチェックのデータをローカルで収集し続け、サーバー/プロキシに送信しようとします。ただし、ホストが無効としてマークされているため、Zabbixサーバー/プロキシは監視データを拒否します。 |
|
IPMIタブには、IPMIの管理属性が表示されます。
| パラメーター | 説明 |
|---|---|
| 認証アルゴリズム | 認証アルゴリズムを選択します。 |
| 特権レベル | 権限レベルを選択します。 |
| ユーザー名 | 認証用のユーザー名。ユーザーマクロを使用できます。 |
| パスワード | 認証用のパスワード。ユーザーマクロを使用できます。 |
タグタブでは、ホストレベルのタグを定義します。このホストのすべての障害は、ここで入力された値でタグ付けされます。
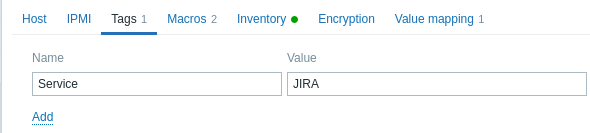
タグでは、ユーザー マクロ、{INVENTORY.*}マクロ、{HOST.HOST}、{HOST.NAME}、{HOST.CONN}、{HOST.DNS}、{HOST.IP}、{HOST.PORT}および{HOST.ID}マクロがサポートされています。
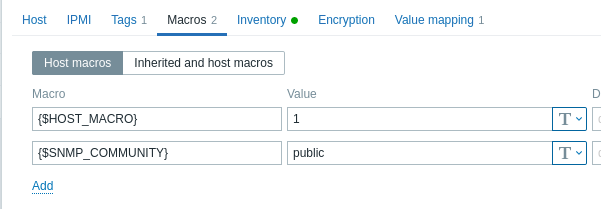
マクロタブでは、ホストレベルのユーザーマクロを名前と値のペアで定義することができます。 マクロの値は、プレーン・テキスト、シークレット・テキスト、またはVaultシークレットとして保持することに注意してください。説明の追加もサポートされています。
継承したマクロとホストマクロ オプションを選択すると、テンプレートレベルおよびグローバルなユーザマクロを表示することができます。 ここには、ホスト用に定義されたすべてのユーザー マクロが、それらが解決する値と元の値とともに表示されます。
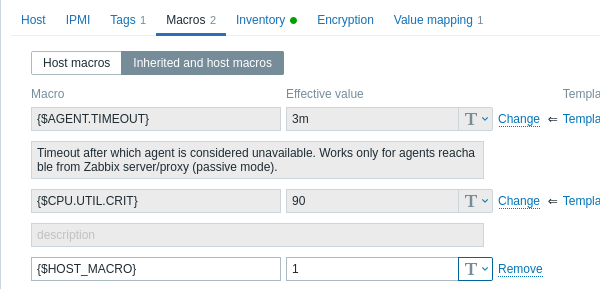
便宜上、各テンプレートとグローバルマクロの設定へのリンクを設けています。 また、ホストレベルでテンプレート/グローバルマクロを編集し、ホスト上にマクロのコピーを効果的に作成することも可能です。
ホストインベントリタブでは、ホストのインベントリ情報を手動で入力することができます。また、このホストの自動でのインベントリ作成を有効にするか、インベントリ作成を無効にするかを選択できます。
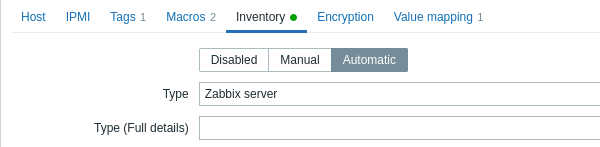
インベントリが有効な場合(手動または自動)、タブ名とともに緑色の点が表示されます。
暗号化
暗号化タブでは、ホストと暗号化された接続をするように要求できます。
| パラメーター | 説明 |
|---|---|
| ホストへの接続 | Zabbixサーバーまたはプロキシがホスト上のZabbixエージェントに接続する方法: 暗号化なし(デフォルト)、PSK(事前共有キー)または証明書を使用。 |
| ホストからの接続 | ホスト(Zabbixエージェントおよび Zabbix sender)から許可される接続の種類を選択します。複数の接続タイプを同時に選択できます(テストや他の接続タイプへの切り替えに便利です)。デフォルトは"暗号化なし"です。 |
| 発行者 | 許可された証明書の発行者。証明書は最初にCA (証明機関)で検証されます。証明書が有効で、CAによって署名されている場合は、発行者フィールドを使用して、許可されるCAをさらに制限できます。このフィールドは、Zabbixインストールで複数のCAからの証明書を使用する場合に使用することを目的としています。このフィールドが空の場合、どのCAでも受け入れられます。 |
| サブジェクト | 許可された証明書の件名。証明書は最初にCAで検証されます。証明書が有効で、CAによって署名されている場合、サブジェクトフィールドを使用してサブジェクト文字列の値を1つだけ許可できます。このフィールドが空の場合、構成されたCAによって署名された有効な証明書はすべて受け入れられます。 |
| PSKアイデンティティ | 事前共有キーID文字列。 PSK IDには機密情報を入れないでください。これは、受信者にどのPSKを使用するかを通知するために、ネットワーク経由で暗号化されずに送信されます。 |
| PSK | 事前共有キー(16 進文字列)。最大長:ZabbixがGnuTLSまたはOpenSSLライブラリを使用する場合は512桁の16進数(256バイトのPSK)、Zabbixがmbed TLS(PolarSSL)ライブラリを使用する場合は64桁の16進数(32バイトのPSK)。例: 1f87b595725ac58dd977beef14b97461a7c1045b9a1c963065002c5473194952 |
値のマッピング
値のマッピングタブでは、値のマッピングを使用してアイテムの値を分かりやすい表現で表示できるよう設定できます。